This post may contain affiliate links. See my full disclosure. As an Amazon Associate, I earn from qualifying purchases.
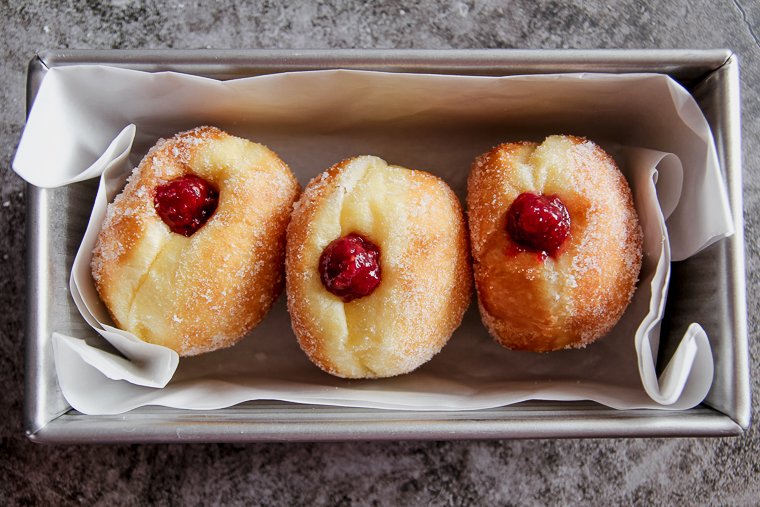
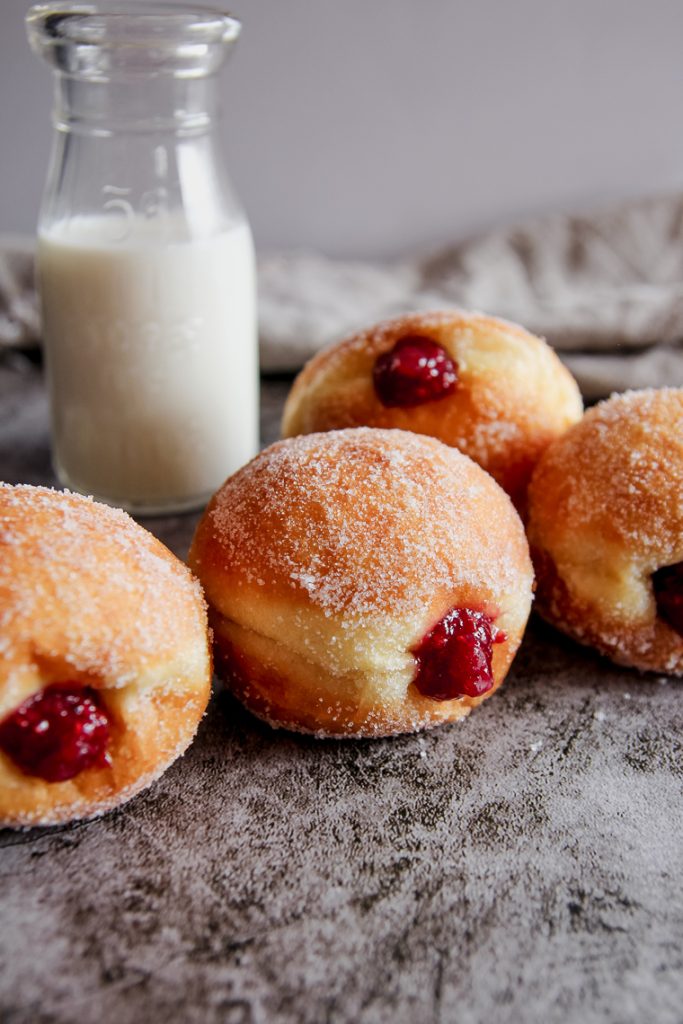
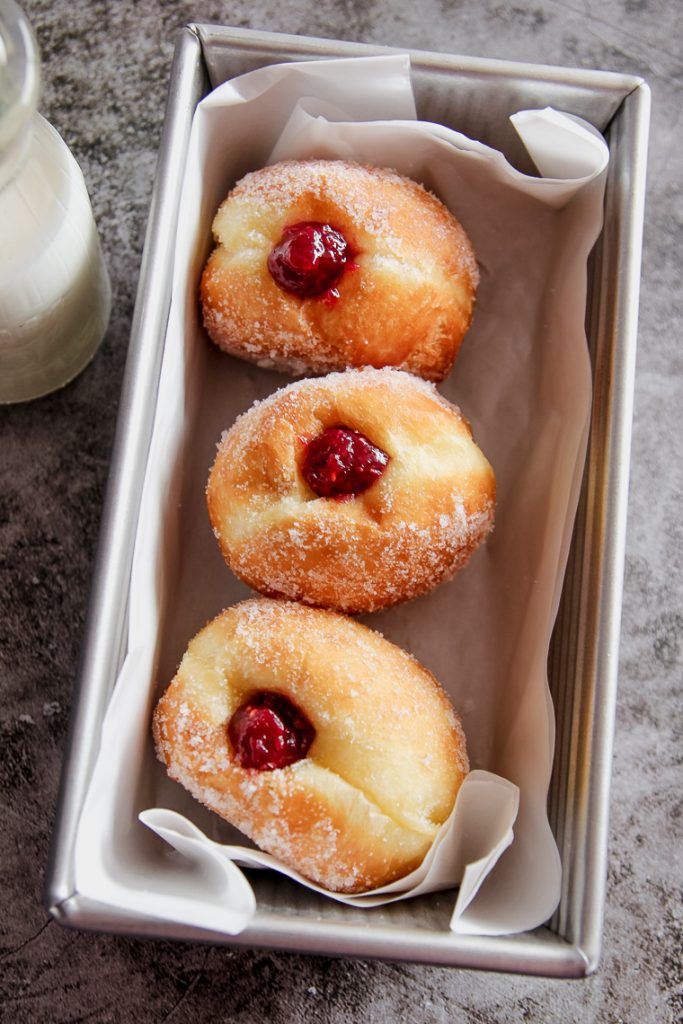
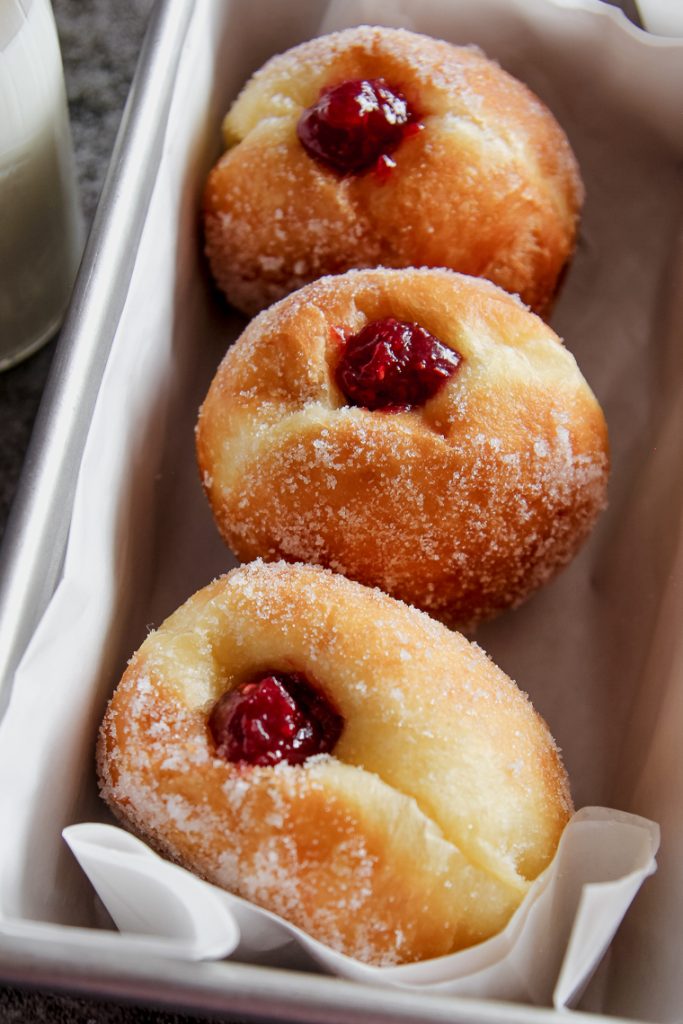
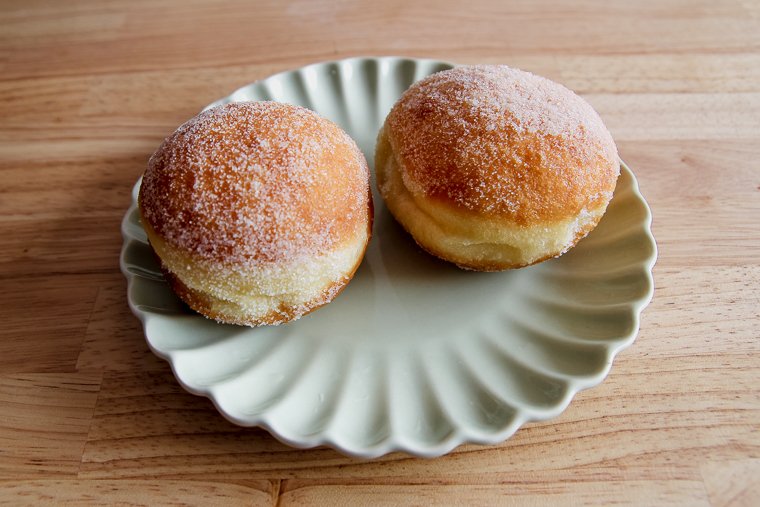
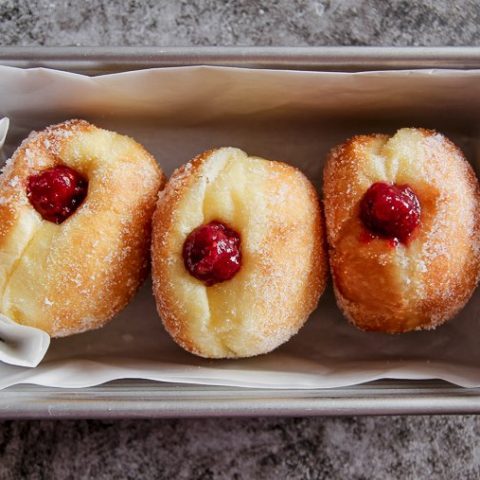
Pillowy soft filled sourdough donuts (also known as Bomboloni or Krapfen) are the most amazing weekend morning treat! The dough comes together in a mixer the day before frying and filling.

Some of my favorite sourdough recipes are my breakfast ones like Danishes, croissants, English muffins, and bagels.
We live in the mountains a bit far from town, so there are some recipes I’m compelled to develop out of necessity.
Sometimes, a person just needs a good, fresh donut, and donuts are hard to come by up here!
The base for these sourdough donuts is actually a half recipe of my sourdough brioche recipe.
If you haven’t tried it yet, the naturally leavened dough utilizes a tangzhong (cooked flour mixture) for a bread with an amazingly delicate and soft texture…
…which is actually perfect for fried donuts!
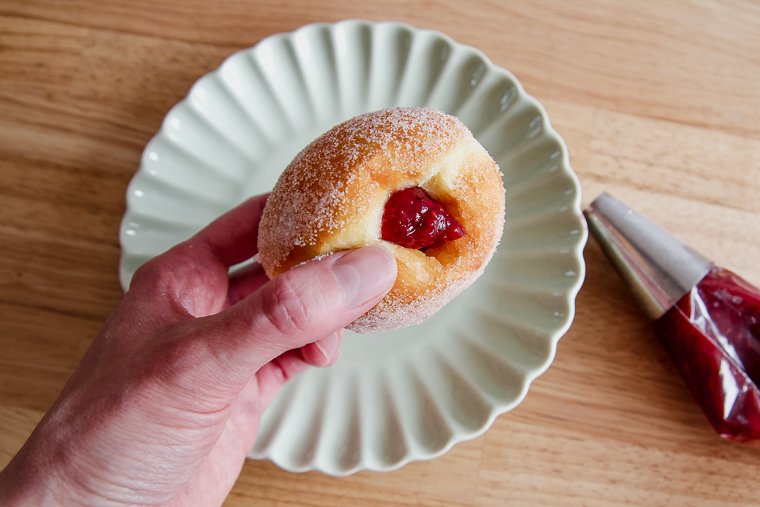
This time around, I rolled them in granulated sugar and filled them with my favorite mixed berry jam that isn’t overly sweet.
I also have a fluffy sourdough raised glazed donut recipe you can try!
When I sent a picture of the sourdough donuts to my family members, my sister living in Germany messaged that I had made German donuts, called krapfen or berliner.
The Italians have a similar version of the filled donut too (called bombolone) as do other cultures (doughnuts, ballen, pączki, etc.)
You don’t have to fill these sourdough donuts with jam or preserves. They are delicious simply rolled in sugar or a cinnamon/sugar mixture.
You could alternately fill them with a vanilla pastry cream (crème pâtissière or crema pasticcera) or chocolate ganache.
I’ve also tried filling with both jam and pastry cream together, and that was delicious.
Options for the Extra Donut Dough
Since the full brioche recipe makes enough for 24 donuts, I formed half the recipe into donuts and deep fried them the day after I made the dough. I shaped them around 6am, and was frying them around 10am.
I fried the second half of the dough on day 3. The dough was just fine held an extra day in the fridge, though they did have a barely noticeable “tang” to them. It’s a really flexible recipe.
I prefer to make the whole recipe of brioche at once because it’s difficult for the mixer to knead half the amount of dough.
You could use half the dough for another purpose altogether, such as burger buns or a loaf of bread.
Freezing the Sourdough Donut Dough
Amazingly, you can also freeze sourdough donuts directly after shaping for up to two weeks!
I like to place the donuts in a single layer in a freezer bags with space in between each donut.
The night before you’re ready to make the donuts, place them on a prepared pan and cover with plastic wrap. They will thaw and proof so you can fry them in the morning!
Filled Sourdough Donuts Baking Schedule
*The strength of your starter and the temperature at which you keep the dough will affect how long each step will take. I bulk fermented and proofed around 80°F (26°C).
Approximate timing:
- Prepare and cool tangzhong: 30 minutes
- Mix and knead dough: 50 minutes
- Warm bulk rise: 4 hours
- Cold retard in fridge: overnight (12 hours+)
- Shape: 15 minutes
- Proof: 3 hours
- Fry and fill: 30 minutes
Feed your starter several hours prior to baking the recipe and allow it to peak.
I fed my starter early in the morning and started my dough in the early afternoon on day 1.
You’ll want to shape, proof, fry, and fill on day 2.
Tips for Making Filled Sourdough Donuts
- The keys to a soft and delicate texture are using a strong sourdough starter, kneading the dough until it gets to the windowpane stage (the order of mixing and the 30-minute rest are essential), and rising and proofing the dough sufficiently. Use the dough as your guide to know when to move on to the next step.
- The temperature of the oil is a huge key to nailing this recipe. You want the donuts to cook through sufficiently by the time they brown on the outside. Use a candy thermometer to know when your oil is between 350°F and 370°F, and wait to fry if your oil isn’t quite at the right temperature.
- Any large bubbles that appear on the sides of the donuts during frying can be pricked with a pairing knife. To avoid this, insure that you’ve shaped the donuts tightly and proofed them sufficiently.
- If your donuts are frying up flat, this is in indication that you’ve proofed too long. They should still be delicious!
Why are my sourdough donuts oily?
The perfect fried donut will not taste oily when you bit into it.
Common problems that could cause an oily layer on the outside of your donuts include frying at a temperature that is too low, under-proofing the donuts, or failing to drain them on paper towels directly after frying.
How to Make Filled Sourdough Donuts (Step-by-Step Instructions)
Step 1 – Feed Starter and Prepare Tangzhong
Don’t forget to feed your starter a few hours before you’re ready to make your brioche dough. You want to use it as it reaches its peak.
If you wait until it collapses again, your donuts will end up tasting a bit sour, and in my opinion, that isn’t as desirable.
The tangzhong sounds fancy, but it is quick to prepare. You simply stir the flour and milk in a small saucepan over medium heat until it thickens.
It will resemble the texture of mashed potatoes.
It needs to cool completely before it can be added to the dough so it doesn’t melt the butter in the dough.
I like to help it along by spreading it flat on a dinner plate, covering it with plastic wrap, and sticking it in the fridge.
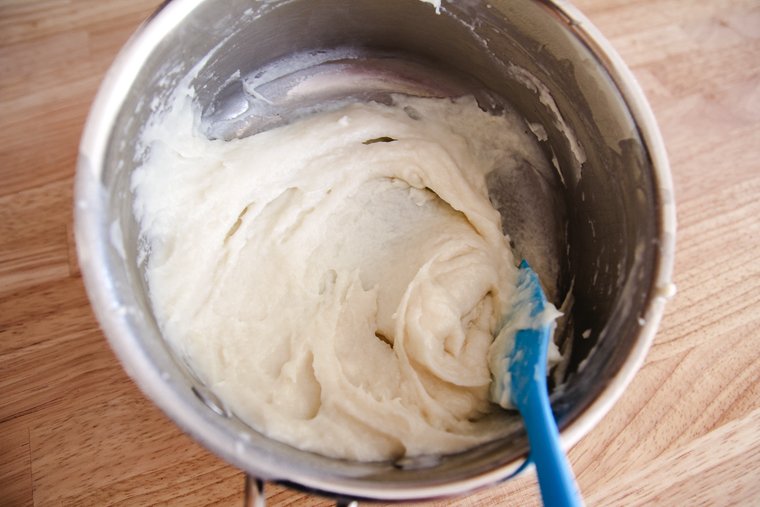
Step 2 – Mix and Knead Brioche Dough
Once your starter is ripe and your tangzhong has cooled, you can mix your dough! A mixer fitted with a dough hook is essential for this recipe.
If you use a Bosch mixer like I do, make sure to use the dough hook extender. A bit of dough will likely sneak into the center post, but the post removes for easy cleaning.
The goal is to develop some strength in the dough before the salt and butter are added. To do this, mix the cooled cooked flour mixture, ripe starter, eggs, sugar, and flour until everything is combined.
Cover the dough to keep it from drying out, and allow it to rest for 30 minutes.
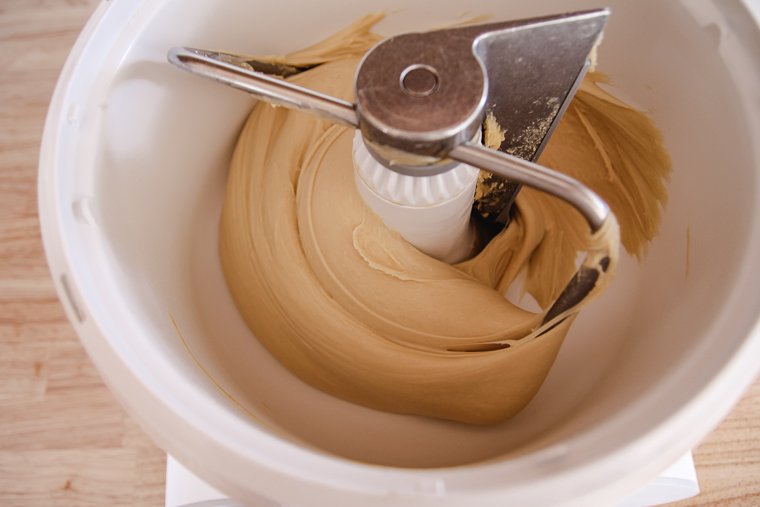
After that, you can add in the salt and knead on low speed for 10 minutes. The dough should look fairly strong at this point, and much less sticky.
Now half of the cold butter cubes can be added in. Continue mixing until you don’t see any more butter.
Add in the remaining butter chunks, and mix again. Once that butter is fully incorporated, it’s time to assess the dough.
The dough should look shiny and clean itself off the bottom and sides of the mixing bowl to cling to the dough hook.
If you pull it with damp fingers, it should stretch into a dramatic windowpane. This is how you know you’ve developed enough strength.
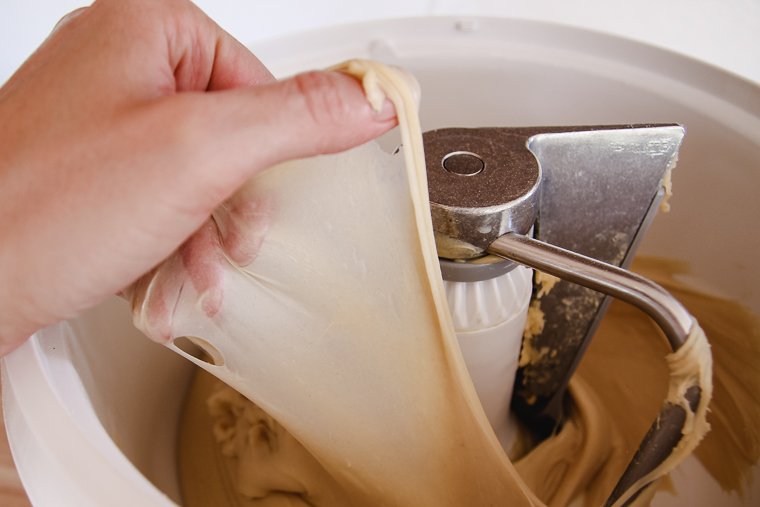
If the dough hasn’t yet reached this point, knead for a couple more minutes and check it again.
Step 3 – Bulk Rise Dough and Refrigerate Overnight
Form the dough into a tidy ball (moisten your hands to prevent sticking) and place it in a large bowl. Cover it with plastic wrap to prevent it from drying out.
Since this dough is enriched with eggs, sugar, and butter, it will take its time to rise.
Keeping it in a warm spot like a foldable dough proofer or a turned off oven or microwave with the light on will help keep the process moving along.
Place an ambient thermometer with your dough and aim for 78°-80°F. Turn off the light for a while if the temp climbs too high.
After the dough increases by 1/3 (this will take 3-4 hours), place it in the fridge overnight.
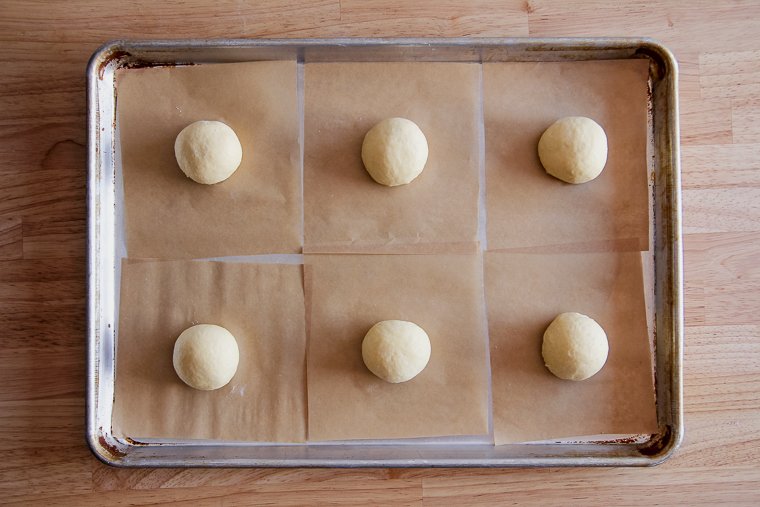
Step 4 – Shape and Proof Sourdough Donuts
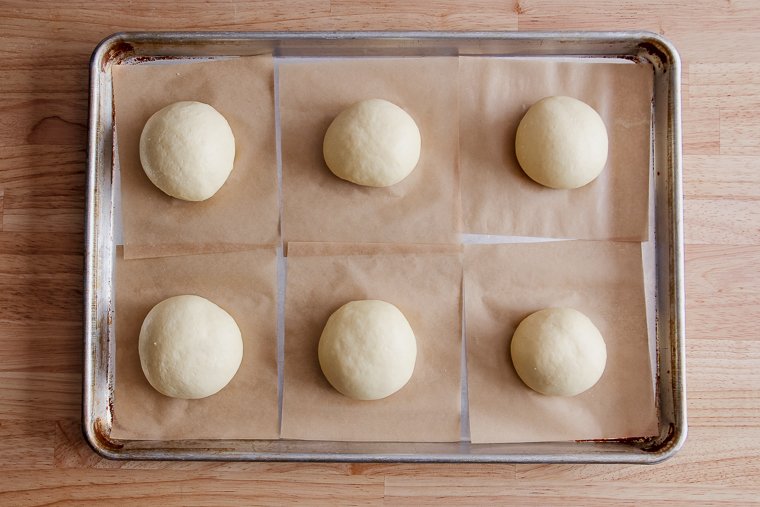
The next day, line two half sheet pans with squares of parchment paper and dust the papers with flour. (Note that the photos below don’t show the dusting of flour.)
Turn out your cold dough on a lightly floured surface.
Divide the dough in half (again, half the dough recipe will yield 12 donuts). Divide one half into 12 even pieces (you can use your scale here for accuracy).
Degass each piece with the palm of your hand so you won’t have funny air pockets in your donuts.
Form each piece into a tight ball by scooting it in a circular motion with your hand on the countertop. Lightly dust your hands with flour as needed. (You’ll be shaping the same way you would shape buns or dinner rolls… here’s a video if you need a demonstration).
Set the balls on the prepared parchment squares.
Cover the pans with plastic wrap, and place them in a warm place until the donuts have risen and relaxed outward and pass the “poke” test.
This means the dough will bounce back only slightly when poked with a damp finger.
Step 5 – Fry and Fill Sourdough Donuts
Please see this article for safety tips when deep frying.
When your donuts are almost done proofing, add oil to a heavy-bottomed pot over medium heat and clip on a candy thermometer so you can continuously monitor the temperature.
Line a cooling rack with a double layer of paper towels, and prepare a bowl or plate with sugar for rolling the hot donuts.
Once the oil temperate is in the range of 350°-370°F, you are ready to begin frying.
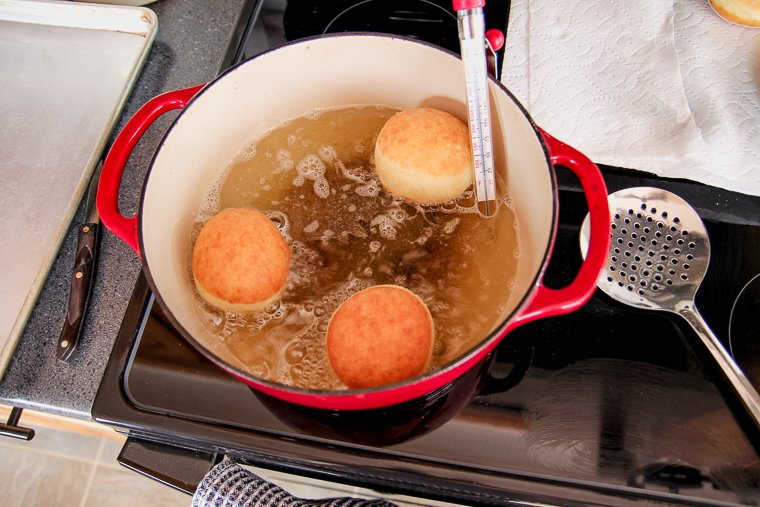
The parchment paper will help you to transfer the donuts to the frying pot, and they should release and drop into the pot top-side down.
Fry up to 4 at a time, flipping once, until both sides of the donuts are golden brown.
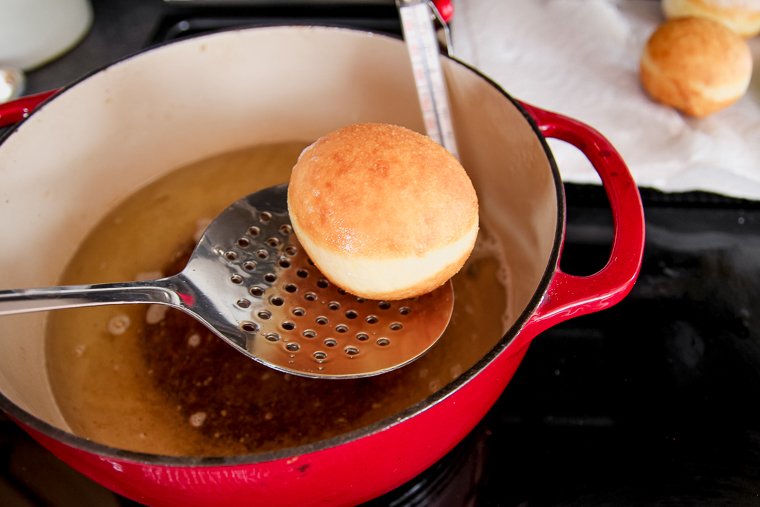
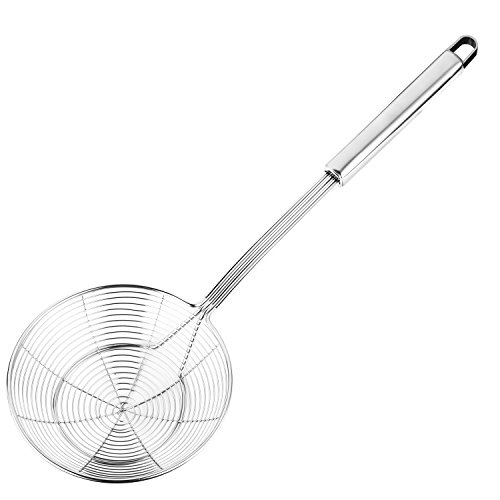
Remove them with a spider strainer spoon to the rack you’ve prepared so any excess oil can drain off.
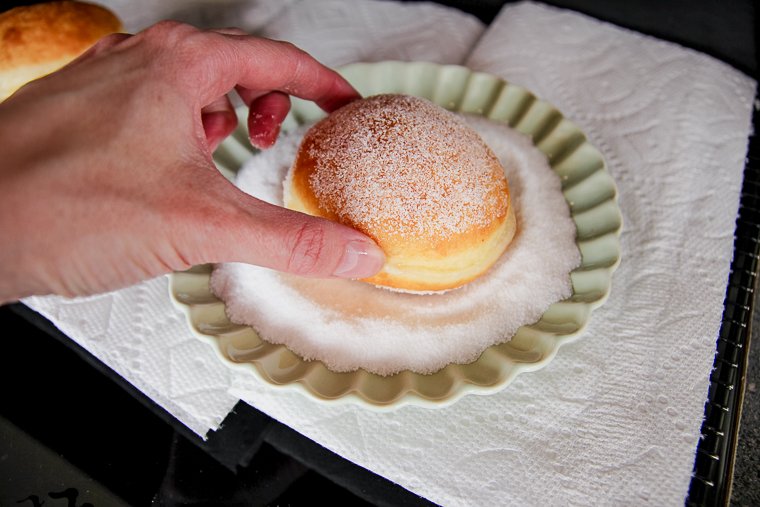
As soon as they are cool enough to handle, dip them in sugar to coat and set them aside.
Finish frying the remaining donuts. Give your oil time to heat or cool between frying if the temperature isn’t right.
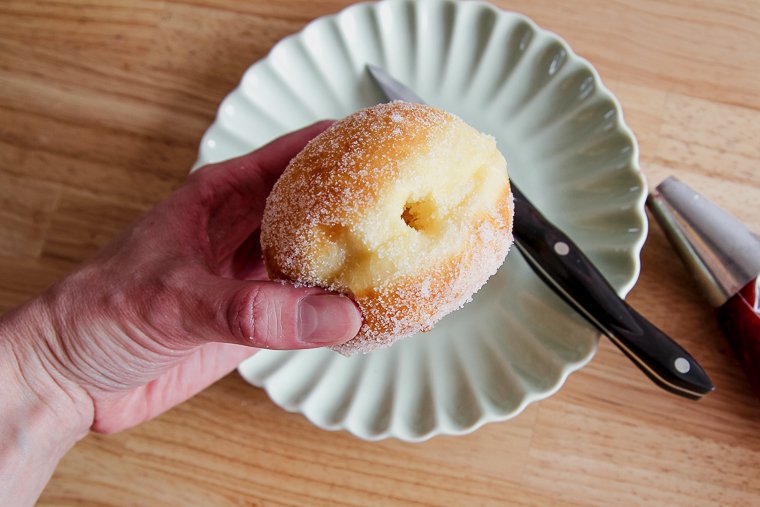
You can fill the donuts as soon as you’ve finished frying.
Place your filling in a piping bag. You can use a large round tip inside, or simply use the bag with the tip cut off.
Use a small knife you pierce the side of the sourdough donut until you reach the center. Give the knife a twist to make a hole.
Then insert your piping bag and squeeze gently until you’ve extruded the desired amount of filling. Aim for a tablespoon or two depending on your preferences.
The donuts are amazing eaten right away while the exterior is slightly crisp! They will soften after an hour or so, which is equally delicious.
But I will say, they are best eaten the same day.

I’m so grateful for your comments, reviews, and questions! Your star ratings help others discover my recipes, and your feedback helps me make improvements. Thank you for your support!
Filled Sourdough Donuts (Bomboloni or Krapfen)
Pillowy soft filled sourdough donuts (also known as Bomboloni or Krapfen) are the most amazing weekend morning treat! The brioche dough comes together in a mixer the day before frying and filling. The dough is borrowed from my Sourdough Brioche (Master Recipe).
Ingredients
Dough (half this amount will yield 12 donuts)
- 240g (1 cup) whole milk, for tangzhong
- 50g (6 Tablespoons) unbleached all-purpose flour, for tangzhong
- 200g ripe sourdough starter, 100% hydration
- 200g eggs (about 4 large eggs)
- 50g granulated sugar
- 500g unbleached all-purpose flour (I use Central Milling Organic Artisan Baker's Craft Plus)
- 15g kosher salt
- 140g (10 Tablespoons) butter, cold, cut into small cubes
For Frying
- Vegetable oil or refined coconut oil for frying, enough to fill a heavy-bottomed pot with 2 inches of oil (a 32oz bottle of vegetable oil works well in a 6qt Dutch oven)
Toppings & fillings
- 2/3 cup granulated sugar, for rolling
- About 1 cup desired filling (jam or preserves, vanilla pastry cream, chocolate ganache, etc.)
Instructions
Day 1
Feed starter several hours prior to mixing dough and allow it to peak.
- Prepare tangzhong mixture: Whisk together milk and flour in a small saucepan and set over medium heat. Stir constantly with a rubber spatula until it thickens to the consistency of mashed potatoes. Spread the mixture flat on a dinner plate and cover the surface with plastic wrap. Set aside (or refrigerate) until completely cool.
- Mix & knead dough: Into the bowl of a mixer fitted with a dough hook, add cooled tangzhong, ripe starter, eggs, sugar, and flour. Mix on low until combined.
Cover dough and allow to rest for 30 minutes.
Add the salt and knead for 10 minutes. The dough should look fairly strong at this point. Add half the butter cubes and continue to mix on low until the butter is fully incorporated. Add the remaining butter cubes and continue to knead until the butter is no longer visible. Assess the dough. lf dough is very smooth, shiny, pulls itself away from the bowl to hold to the dough hook, and can be pulled to a dramatic "windowpane" with damp fingers, it's done. If it's not yet showing these signs, knead for a couple more minutes and check again.
- Bulk ferment and refrigerate overnight: Turn out the dough onto a clean countertop. Use a damp bench scraper to form the dough into a smooth ball by scooting it against the counter in a circular motion. Place dough in a large bowl, cover, and allow to rise in a warm place until it increases in volume by 1/3. This takes 3-4 hours at 80°F (26°C) (see notes below). Place in the refrigerator overnight.
Day 2
- Shape: Prepare two half sheet pans with six 5-inch squares of parchment paper each, and dust the parchment squares with flour.Divide half of the cold dough into 12 equal pieces (weigh for accuracy, if desired). The remaining dough can be used for more donuts, another baking project, or used the following day. Lightly flouring your hands as needed, press each piece of dough with your hands to degas, then form into a tight ball by scooting in a circular motion with your hand against the countertop. Arrange the balls on the squares of floured parchment paper.
- Proof: Cover trays with plastic wrap and set in a warm place to proof until they have doubled in size and pass the "poke" test. (This will take about 3.5 hours at 78°F, longer if your kitchen is cooler.)
- Fry: Meanwhile, line a cooling rack with a double layer of paper towels. Fill a bowl or small plate with sugar for rolling. Fill a heavy-bottomed pot with oil and set over medium heat until oil reaches 360°F (use a candy thermometer). Keep oil between 350°F and 370°F while frying. Fry up to 4 donuts at a time, flipping after the first sides are deeply golden to fry the other sides (about 2 minutes per side). (The parchment papers will allow you to easily transfer the donuts to the frying oil, releasing as you drop the donuts in top-side down.) Remove donuts with a slotted spoon, allowing excess oil to drip off into the pot, then place on the paper towels to drain.
- Roll in sugar and fill: As soon as donuts are cool enough to handle, roll them in the sugar. Prepare a piping bag with a large round tip (or just cut off tip) and fill with desired filling. Poke a hole into the side of the first donut with a pairing knife until you reach the center of the donut. Give the knife a twist to make a space for the piping bag. Pipe in desired amount of filling (aim for 1-2 tablespoons), and repeat for remaining donuts. Serve donuts the same day. (The frying oil can be cooled, strained, and stored for next time.)
Notes
- Please see this article for safety tips for deep frying.
- Place the dough in a foldable proofer box, a turned-off oven with the light on or in the microwave with the door ajar to keep the dough warm enough to rise within the time frames listed. An ambient thermometer can help you determine if the temperature is right. If your dough is kept in a cooler place, expect the rise times to take longer. Observe the dough to know when to move on to the next step.
- Unsalted or salted butter works fine.
- The other half of the brioche dough is perfect to make into cinnamon rolls or a brioche loaf or buns. You can also save it in the refrigerator to use a couple days later.
Recommended Products
As an Amazon Associate and member of other affiliate programs, I earn from qualifying purchases.
-
 100pcs Upgraded anti-burst piping bags, disposal pastry bags for cake and buttercream frosting, cupcake baking decorating icing bags, thick, non-slip for all size tips and couples,12 inch,Gexolenu
 -
Thermoworks SPOT Ambient Thermometer
-
Candy/Deep Fry Glass Thermometer
-
KitchenAid Artisan Stand Mixers, 5 quart, Pearl Metallic
-
Nordic Ware Natural Aluminum Commercial Baker's Half Sheet (2 Pack), Silver
-
If You Care Parchment Paper
-
Hiware Spider Strainer Spoon
-
Lodge Enameled Cast Iron Dutch Oven, 6 Quart, Red
-
Cooling Racks


Nutrition Information:
Yield: 12 Serving Size: 1Amount Per Serving: Calories: 348Total Fat: 6gSaturated Fat: 1gTrans Fat: 0gUnsaturated Fat: 5gCholesterol: 65mgSodium: 549mgCarbohydrates: 63gFiber: 2gSugar: 17gProtein: 10g
*Nutrition information is not always accurate.
You dont use sweet stif starter?is it taste sour or not?thx
Hi Dee! I’ve not found these donuts to turn out sour when a healthy starter is used.
This is a great recipe! The dough was beautiful. Couple notes I hope helps others:
– using spray oil (like Pam) on your hands, tools, and surfaces makes it much easier to handle the dough. I would skip the flour.
– frying was the hardest part for me. I did mine in a Dutch oven and took oil temperature measurements on the side and in the center. My individual donuts were about 55 grams each
– 360 was WAY too hot. After a couple lost donuts, I fried mine at around 300-325 degrees for 1 min and 30 sec on each side and they came out beautiful. I live at 5,000 ft above sea level so this could’ve affected fry times and temps.
Thank you so much for trying the recipe and sharing your notes, Brianna!
I’m making these now for Christmas Eve. I’m so excited to try them. I’m having trouble with my old KitchenAid overheating towards the end of the mixing process. What kind of mixer do you use?
Hi Erin, I use a Bosch Universal Plus Mixer. I have a coupon code for the mixer, if you need it. It definitely has a strong motor.
I made these yesterday and they turned out great! Have you tried freezing them after you have shaped the dough before the second proof?
Hi Melissa! I haven’t personally tried that yet, but one of my readers did successfully! I just wouldn’t freeze longer than 2 weeks. 🙂
I made them with a lemon curd filling and OH. MY. GOD. Best doughnuts I’ve ever had. Will be making again and again. Thank you!.
I’m so glad you loved them, Erin!
Can you air fry them?
Hi Jenn! I’ve never done it, but I’m sure you could.
Best sourdough donuts ever! I added custard, but half my family doesn’t like fillings. Need to find an excellent icing recipe to make them happy.
I have chocolate and vanilla glaze recipes on my sourdough raised donuts post!
I made these for my son’s birthday and they were amazing! I didn’t even knead them as long as I should have, I got my rise times all messed up and they turned out so yummy and perfect! I’m amazed!
Yay! I’m so glad to hear they turned out well, Kayleigh. 🙂
I made these just now and they were a bit tough on the outside maybe my shaping caused that… and 15g of salt was a bit too much for my family but I like the balance of sweet and salt. I used the other half to make a brioche bread so I’m hoping it come out nicer
Hi Martha, sometimes a proofing issue can cause them to be tough on the outside. If you want to email me pictures at leanna (at) aberlehome (dot) com, I can help you troubleshoot. What kind of salt did you use?
Hi. Can i bake the bomboloni instead of fry them? And since they are not “oily”, how to roll the sugar? Thank you
Hi Mare, you could bake them! Just know they would taste more like a soft brioche roll. You could brush them with melted butter before rolling in sugar.
I think I may have over kneaded the dough afte the butter because it’s sticking to the counter, did I ruin it or will it still work?
Hi Natalie! Sticking is usually because you needed to knead longer. If the dough hasn’t bulk fermented yet, you could knead it more until it cleans itself off the sides of the mixer bowl and passes the windowpane test.
Has anyone substituted the dairy for plant based milk and butter?
If you try it, Marcy, I’d love to know if it works!
These are absolutely amazing! Taste awesome! Family enjoyed them and are calling dibs for breakfast. Thank you for sharing!
I’m so glad to hear that, Jamie! Thank you for trying the recipe!
Can I use sourdough starter that is not 100% hydration?
Hi Jennifer, if yours is a stiffer starter, you definitely can. You would have to do the math to adjust the amount of flour in the recipe and add a small amount of milk or water to the dough to make up the difference in hydration.
These look amazing! I have never had or made these before.
I hope you get to try these Keira! Frying takes a little effort, but they are so tasty!