This post may contain affiliate links. See my full disclosure. As an Amazon Associate, I earn from qualifying purchases.
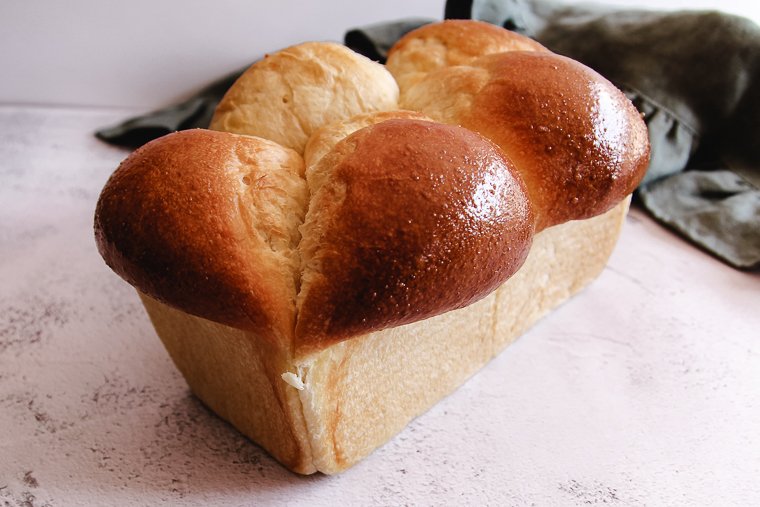
This showy sourdough brioche is rich and buttery, and yet unbelievably light and soft due to the addition of a cooked flour and milk (tangzhong) mixture. A mixer fitted with a dough hook attachment is needed for this recipe. I call this a master recipe because the dough can be used for many applications!
*Updated 11/15/23

Brioche is a pastry-like bread enriched with milk, sugar, eggs and a generous amount of butter.
This overnight brioche recipe yields two pan loaves.
This is such a versatile dough, though, that you could make half the recipe into cinnamon rolls, hamburger buns, donuts, or even pastries! Or you can simply freeze the second loaf for another time.
The dough is quite sticky at first, but after a long knead, it comes together into the most beautiful, stretchy dough.
Inspired by Claire Saffitz’s All-Purpose Enriched Bread, I added a cooked milk and flour mixture (called a tangzhong) to this sourdough brioche bread recipe.
The tangzhong makes the loaves even lighter and softer than traditional brioche.
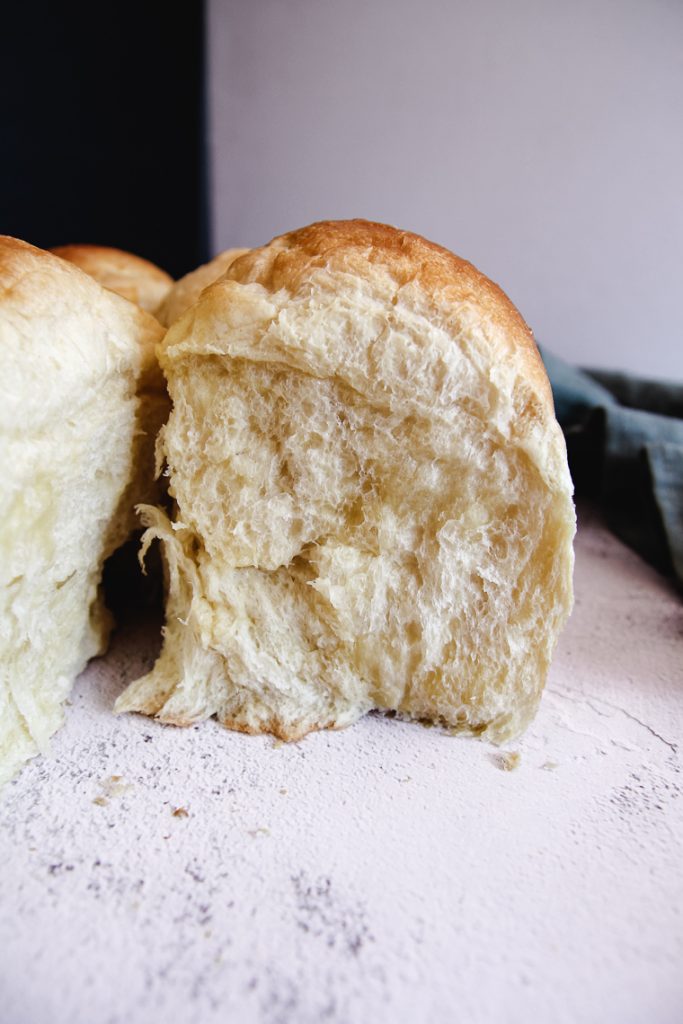
And of course, I had to use my sourdough starter instead of yeast. The longer rise times only make the flavor of this bread more desirable.
After the first rise, the dough spends the night in the refrigerator as it develops even further.
After you’re done here, you might love to try your hand at some sourdough croissants or sourdough Danish pastries!
Sourdough Brioche Baking Schedule
*The strength of your starter and the temperature at which you keep the dough will affect how long each step will take.
Approximate timing:
- Prepare and cool cooked flour mixture: 20 minutes
- Mix and knead dough (including 30-minute rest): 50 minutes
- Bulk rise: 4 hours
- Retard in refrigerator: overnight (12 hours+)
- Shape and proof: 3.75 hours
- Egg wash and bake: 30 minutes
Feed your starter several hours prior to baking the recipe and allow it to peak.
Start the dough in the afternoon on day 1. Shape, proof and bake the morning of day 2.
Tips for Making Sourdough Brioche
- To prevent your sourdough brioche from taking on an acidic flavor from the sourdough starter, plan to use your freshly-fed starter right as it reaches its highest point in the jar (don’t wait until it collapses again). Also, avoid over-fermenting the dough before it goes into the refrigerator overnight.
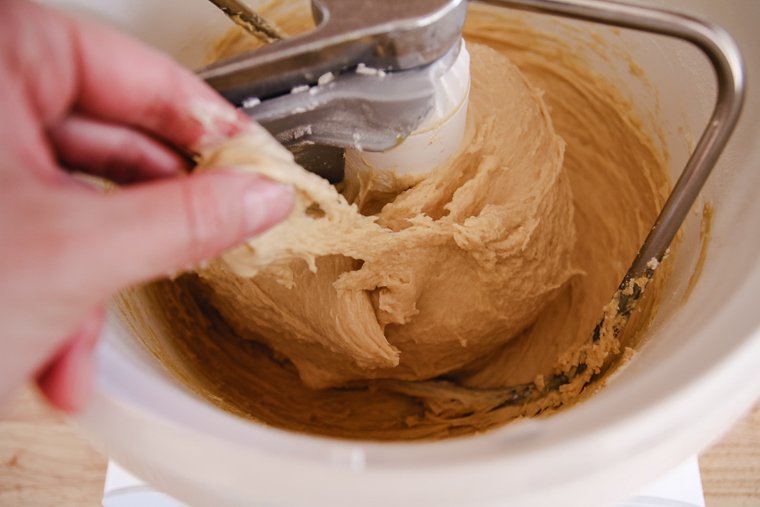
- This is supposed to be a sticky dough (see photos in step 2)! It will come together perfectly and become less sticky after kneading. The order of mixing and the 30-minute rest are essential to the gluten developing without an excessive amount of kneading in the mixer.
- The baking schedule above is assuming you keep your dough at 80°F (26°C). I achieve this by keeping my dough in my turned-off oven with the light on or in the microwave with the door ajar. I use an ambient thermometer to insure the temperature isn’t getting too warm. It would be fine if you keep the dough at a cooler room temperature, just know that the rise times will take longer. Use the dough as your guide to know when to move on to the next step.
Recommended Equipment
- Digital kitchen scale
- Bosch Universal Plus Mixer (I use the dough hook extender here for the best results)
- Bench scraper
- Ambient termometer
- Termapen ONE instant-read thermometer
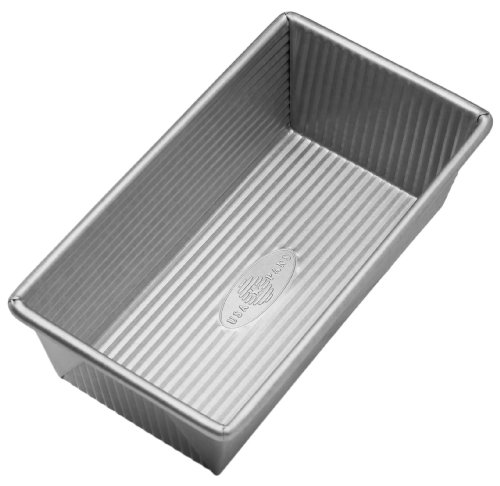
- USA 1-lb loaf pans
- Parchment paper
- Pastry brush
How to Make Sourdough Brioche
Step 1 – Make Cooked Flour (Tangzhong) Mixture
The tangzhong is the key to this amazingly soft brioche recipe, and it’s quick to make. Whisk the flour into the milk in a small saucepan.
Then set the pan over medium heat. Stir with a silicone spatula until the mixture thickens. It should look like smooth mashed potatoes.
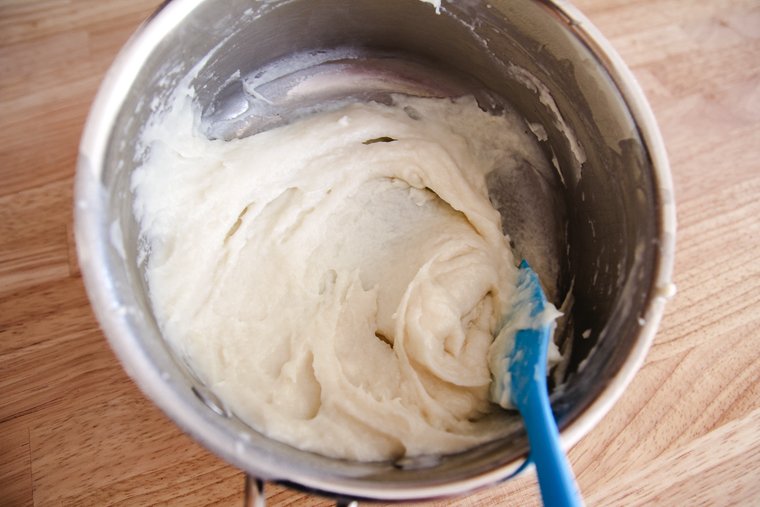
At this point, I remove the mixture to a dinner plate and smooth it out flat so it can cool quickly.
Cover the surface directly with a piece of plastic wrap to prevent a skin from forming on the surface as it cools.
You can place it in the refrigerate to cool it even faster.
Step 2 – Mix and Knead Sourdough Brioche Dough
Once your cooked flour and milk mixture has cooled completely and your starter has peaked, you’re ready to mix the brioche dough.
First add the cooled cooked flour mixture, starter, eggs, sugar, and flour to the bowl of your mixer.
(If you’re using a Bosch mixer like I am here, make sure to use the dough hook extender with the dough hook. A slight bit of dough will likely sneak into the center post with this high-hydration recipe, but the post can be removed for easy cleaning.)
Knead on low speed just until everything is incorporated. Cover the dough, and allow it to rest for 30 minutes.
After it has rested, add in the salt and knead on low speed for 10 minutes. The dough will be looking fairly strong at this point and ready to handle the butter.
Add half of your cold butter cubes. Knead on low until the butter is fully incorporated. Add the remaining butter and continue to knead until that butter is fully incorporated as well. It will take a few minutes.
At this point, observe how your dough is behaving in the bowl.
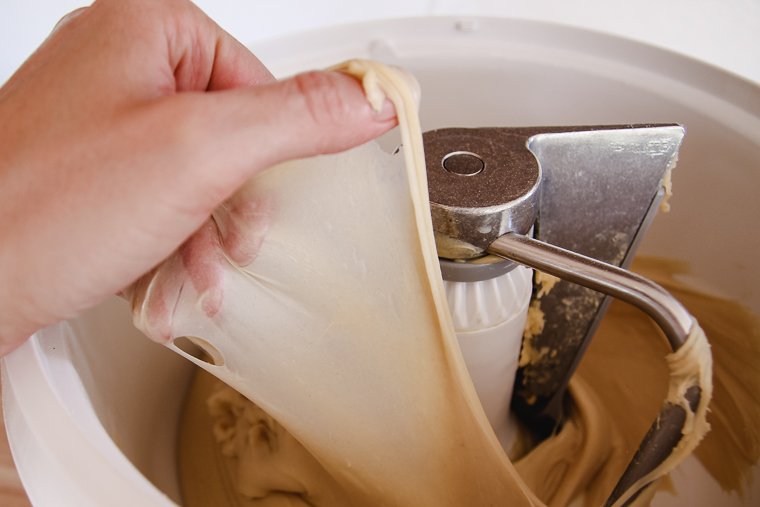
If you’ve developed enough strength in the dough, you’ll notice the dough looks smooth and shiny and will pull away from the sides of the bowl as it holds to the dough hook.
It will pull to a dramatic “windowpane” if you pull it gently with damp fingers.
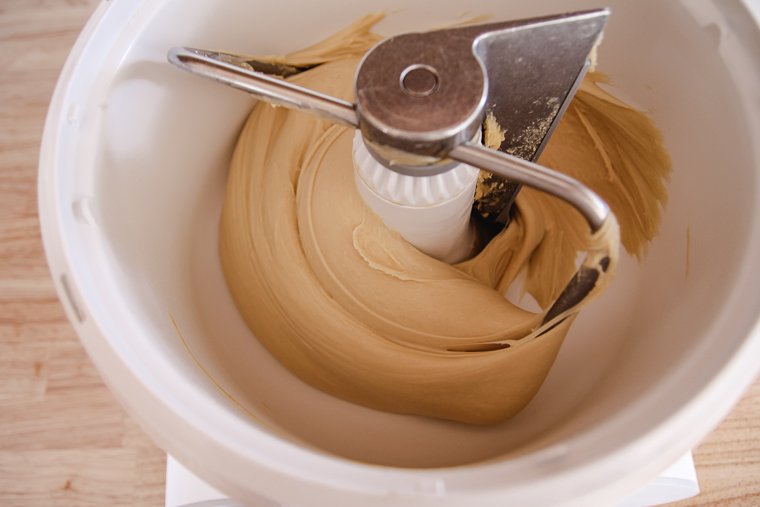
If it is showing these signs, you’re done kneading and ready to move on to the next step. If it’s not quite there yet, continue kneading for a couple more minutes, and check again.
Step 3 – Bulk Rise and Refrigerate Overnight
After kneading, turn the dough out onto a clean surface.
Use a dampened dough scraper to scoot the dough in a circular motion until it forms a tight ball. Place the ball in a large bowl and cover with a lid or plastic wrap. Set the dough in a warm place to rise until it has increased in volume by one-third.
Place the dough in the refrigerator overnight where it will develop amazing depth of flavor (but not sourness).
Step 4 – Shape and Proof Sourdough Brioche Loaves
At this point you can use the sourdough brioche dough for various baking projects. Find instructions for Filled Sourdough Donuts here.
For Brioche Burger Buns: Divide dough into 65g pieces. Degass, shape into tight rounds, place on parchment-lined sheet pans, six buns to a pan. Egg wash after proofing and bake at 425°F on center rack 16-18 minutes or until deeply golden.
The next morning, prepare your loaf pans.
Use a paper towel to apply softened butter to the inside of two 1-pound loaf pans. Line the pans with parchment paper, and then butter the inside of the parchment paper as well.
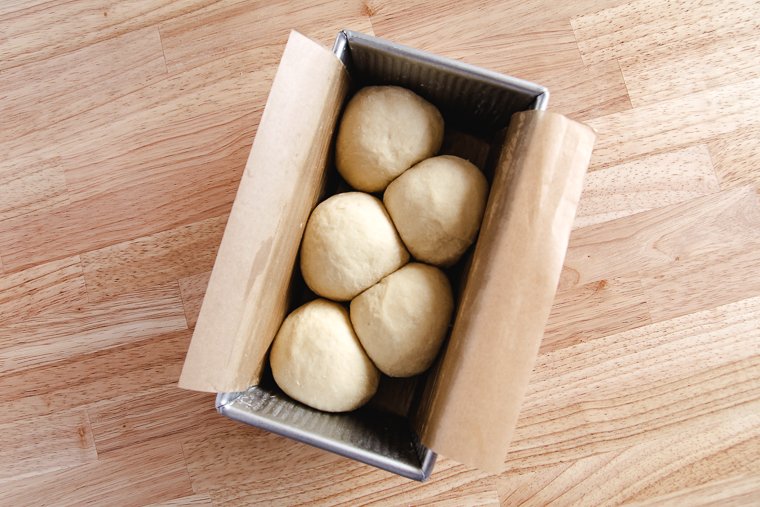
Turn the cold dough out on a clean surface again and divide it in half for two loaves. I use my digital kitchen scale to make sure the halves are even.
Then divide each half into five even pieces.
Degas each piece by pressing it flat with your palm. Then form them into tight balls the same way you would shape rolls (This video demonstrates how to shape rolls quickly). Use a little flour on your hands to prevent sticking as you are shaping.
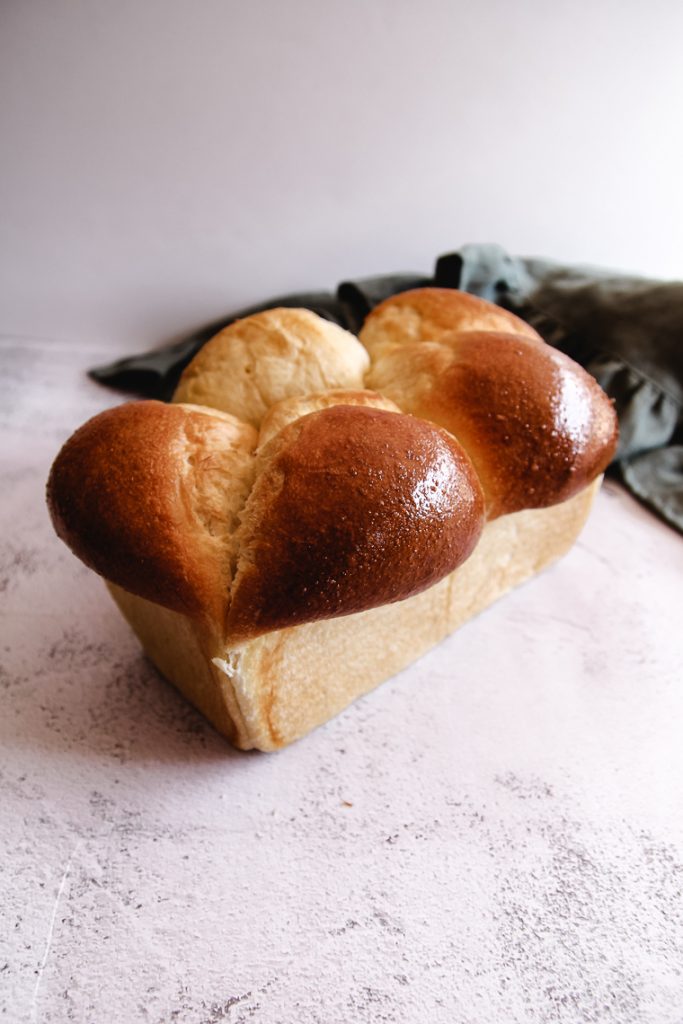
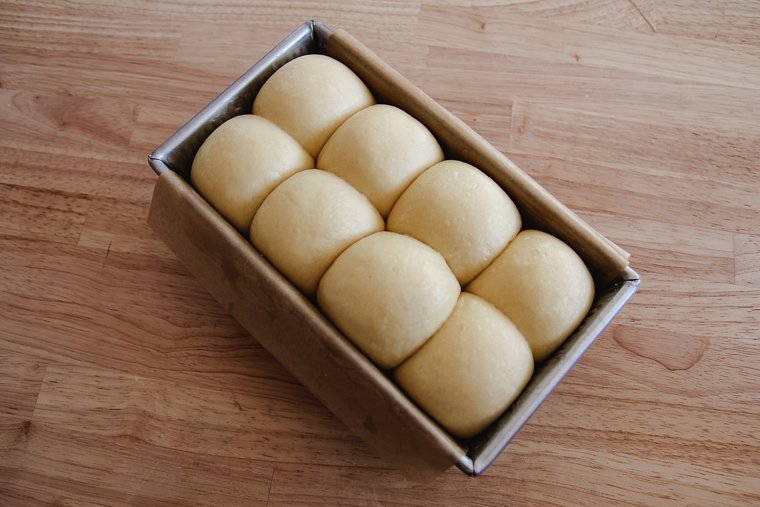
Arrange the balls in your prepared loaf pans. It works to place them in a zigzag pattern as pictured below.
Cover the pans with plastic wrap and place them in a warm place to proof until the balls have filled the pans and reach slightly over the top rims.

Alternately, you can divide the dough into eight pieces and arrange the balls in twos in the loaf pan. I have included a picture here in case you would rather shape this way. Either way is lovely.
Preheat your oven to 350°F (177°C) when the dough is close to being fully proofed.
Step 5 – Egg Wash and Bake
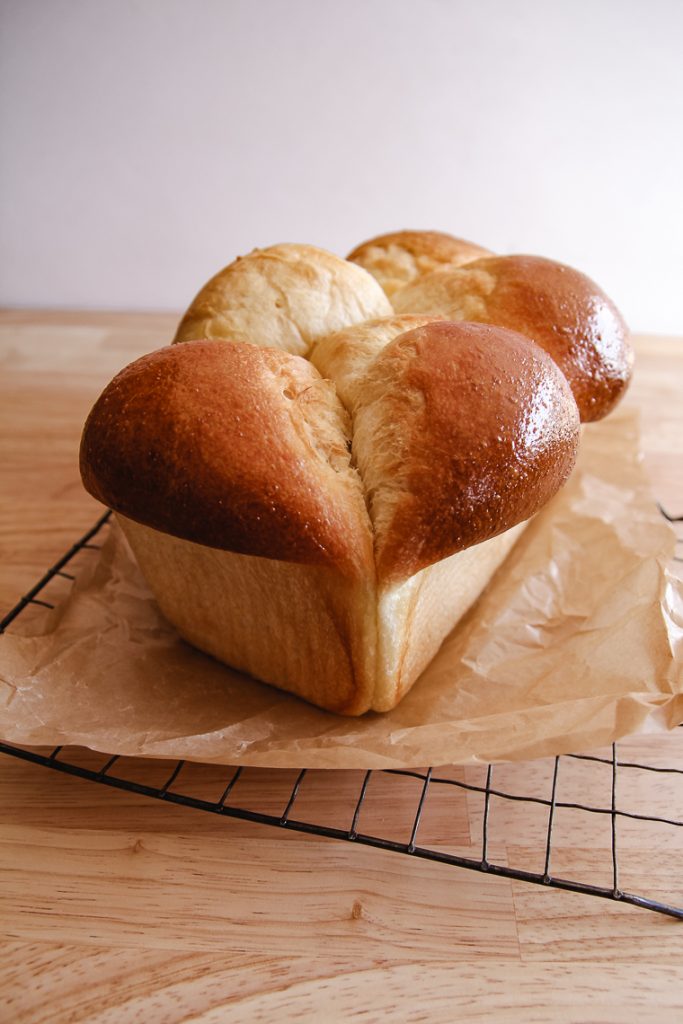
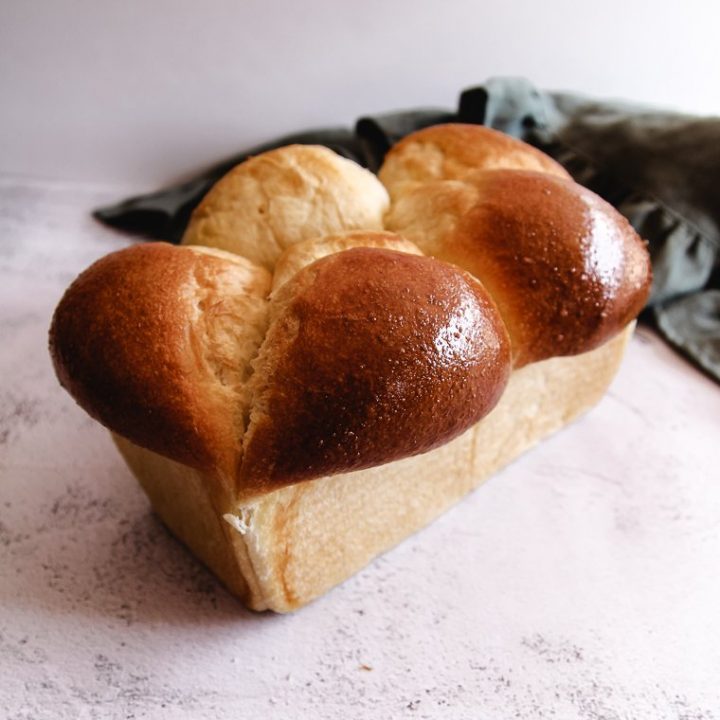
Finally, beat an egg to make an egg wash and gently brush a layer over the tops of the proofed loaves. The egg wash will help the loaf brown properly with a beautiful shine.

Bake the loaves together on the center rack for about 25 minutes. They will register 190°F (88°C) on an instant-read thermometer when they are baked through.
Although you will want them golden brown, you can always tent the loaves with foil if you feel they are browning too quickly.
Leave the loaves in the pans to cool for the first ten minutes out of the oven. Then lift them out of the pans and transfer them to a cooling rack to finish cooling completely before you slice or store them.
Voilà! I hope you enjoy making this sourdough brioche bread recipe!
I’m so grateful for your comments, reviews, and questions! Your star ratings help others discover my recipes, and your feedback helps me make improvements. Thank you for your support!
Sourdough Brioche (Master Recipe)
This showy sourdough brioche is rich and buttery, and yet unbelievably light and soft due to the addition of a cooked flour and milk (tangzhong) mixture. A mixer fitted with a dough hook attachment is used to knead the dough. I call this a master recipe because the dough can be used for many applications!
Ingredients
Cooked flour (tangzhong) mixture
- 240g (1 cup) whole milk
- 50g (6 Tablespoons) unbleached all-purpose flour
Dough
- Cooked flour mixture, completely cooled
- 200g ripe sourdough starter, 100% hydration
- 200g eggs (about 4 large eggs)
- 50g granulated sugar
- 500g unbleached all-purpose flour (see notes)
- 15g kosher salt
- 140g (10 Tablespoons) butter, cold, cut into small cubes (plus more butter for greasing pans)
Egg wash
- 1 egg, beaten
Instructions
Day 1
Feed starter several hours prior to mixing dough and allow it to peak.
- Prepare cooked flour (tangzhong) mixture: Whisk together milk and flour in a small saucepan and set over medium heat. Stir constantly with a rubber spatula until it thickens to the consistency of mashed potatoes. Spread the mixture flat on a dinner plate and place a piece of plastic wrap directly on the surface to prevent a skin from forming. Set aside (or refrigerate) until completely cool.
- Mix & knead dough: Into the bowl of a mixer fitted with a dough hook, add cooled cooked flour mixture, ripe starter, eggs, sugar, and flour. Mix on low until everything is incorporated.
Cover dough and allow to rest for 30 minutes.
Add salt and knead on low speed for 10 minutes. At this point, the dough should be fairly strong. Add half the butter cubes and continue to knead on low until the butter is fully incorporated. Add the remaining butter pieces and continue to knead until the butter is no longer visible.
At this point, assess the dough. If it's very smooth, shiny, pulls itself away from the bowl to hold to the dough hook when kneading, and can be pulled to a dramatic "windowpane" with damp fingers, it's done. If it's not yet showing these signs, continue kneading for a couple more minutes, and check again.
- Bulk ferment and refrigerate overnight: Turn out the dough onto a clean countertop. Use a damp bench scraper to form the dough into a smooth ball by scooting it against the counter in a circular motion. Place dough in a large bowl, cover, and allow to rise in a warm place until it increases in volume by 1/3. This takes 3-4 hours at 80°F (26°C) (see notes below). Place in the refrigerator overnight.
Day 2
- Shape: Butter two 1-pound loaf pans, line with parchment paper, and butter the parchment paper (I use a piece of paper towel to apply softened butter). Remove dough from fridge and turn out onto a clean surface. Divide in half for 2 loaves. (At this point the dough could alternately be used for burger buns, cinnamon rolls, donuts, or pastries.) Divide each half into 5 pieces (weigh for accuracy).
Degas and form each piece into a tight, smooth ball by using your hand in a cupped shape to scoot the dough against the counter in a circular motion. Lightly flour your hands to prevent sticking. Arrange balls in a prepared loaf pan in a zigzag arrangement (alternately, divide dough into 8 pieces and arrange in pan by twos). Repeat for second loaf. - Proof: Cover pans with plastic wrap and set in a warm place to proof until the dough balls are puffy, fill the pans, and peak over the top edges. The dough will spring back only slightly when poked with a damp finger. This takes about 3.5 hours at 80°F (26°C). Meanwhile, preheat oven to 350°F (177°C) and position a rack in the center of the oven.
- Bake: Remove plastic wrap and use a pastry brush to gently coat the top of each loaf with egg wash. Bake loaves side-by-side on the center rack for 25 minutes or until the loaves are golden brown and the centers register 190°F (88°C) on an instant-read thermometer. (Tent loaves with foil if they are browning too quickly, and rotate pans if they are browning unevenly.) Allow loaves to cool for 10 minutes in the pans, then transfer to a cooling rack. Cool completely before slicing, storing, or freezing.
Notes
- This is supposed to be a sticky dough! It will come together perfectly and become less sticky after kneading. The order of mixing and the 30-minute rest are essential to the gluten developing properly without an excessive amount of kneading.
- Place the dough in a foldable proofer box, a turned-off oven with the light on or in the microwave with the door ajar to keep the dough warm enough to rise within the time frames listed. An ambient thermometer can help you determine if the temperature is right. If your dough is at a cooler room temperature, just expect the rise times to take longer. Observe the dough to know when to move on to the next step.
Recommended Products
As an Amazon Associate and member of other affiliate programs, I earn from qualifying purchases.


Nutrition Information:
Yield: 16 Serving Size: 1 sliceAmount Per Serving: Calories: 239Total Fat: 3gSaturated Fat: 1gTrans Fat: 0gUnsaturated Fat: 1gCholesterol: 60mgSodium: 417mgCarbohydrates: 45gFiber: 2gSugar: 4gProtein: 8g
*Nutrition information is not always accurate.
I have made this recipe countless times, never to make a loaf though. This is my go-to recipe for making soft sourdough hamburger and hot dog buns. Everyone loves them! I’m thinking about making cinnamon rolls with it next. I replace the sugar with honey every time I make it because we avoid refined sugar and it works out perfectly! Thanks for this recipe!
Hi Amber! I love that you replace the sugar with honey! Thank you for your kind review!
Love different versions of sourdough, this would change things up.