
This post may contain affiliate links. See my full disclosure. As an Amazon Associate, I earn from qualifying purchases.
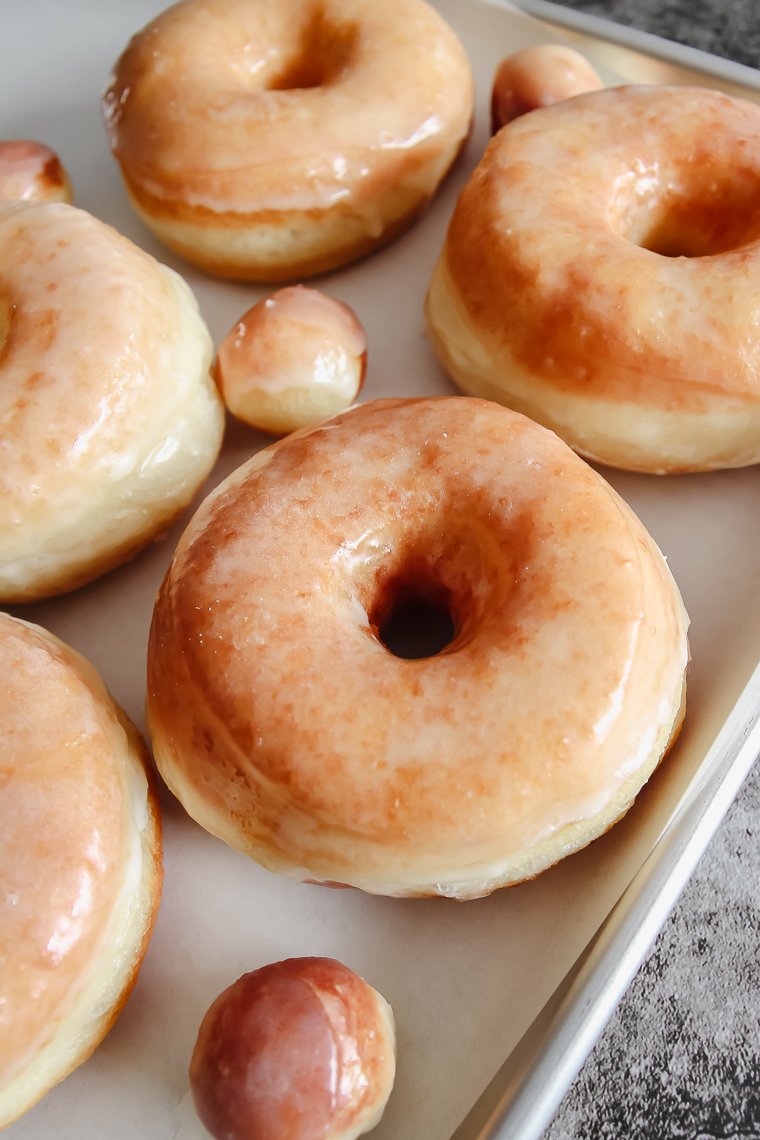
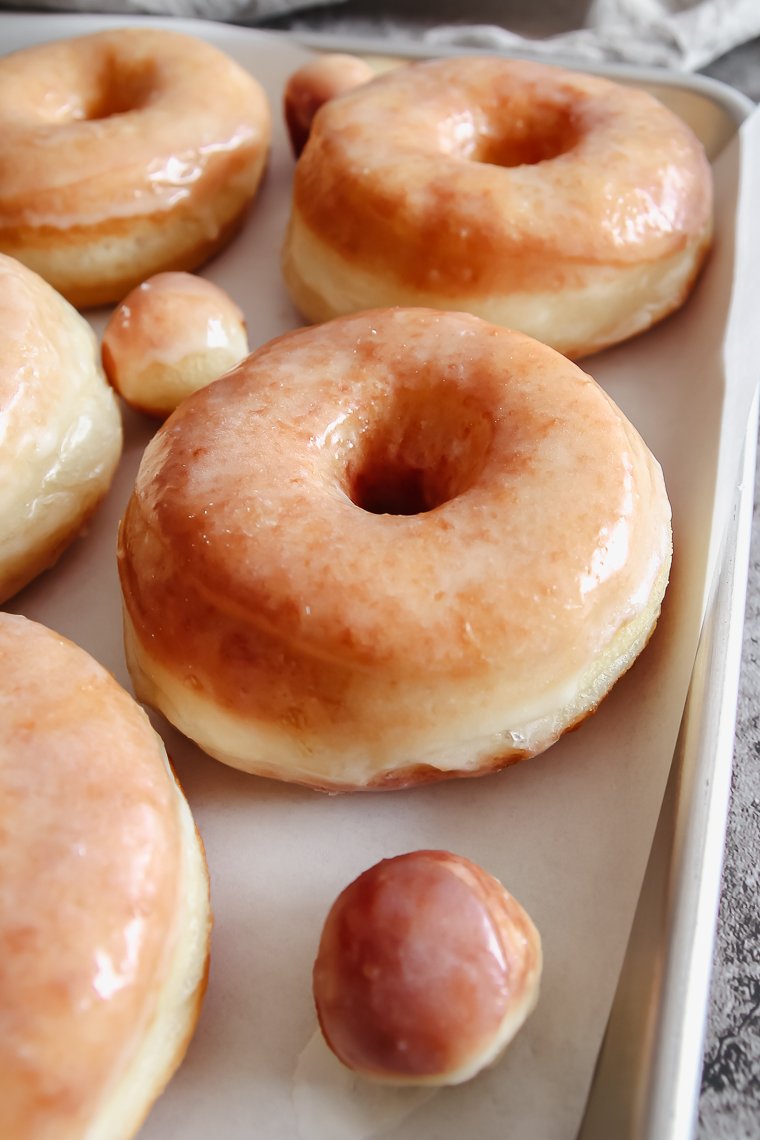
These sourdough raised donuts have the perfect soft and fluffy, melt-in-your-mouth texture and two glaze options! You’ll love making this naturally leavened donut recipe with simple ingredients.

Just take a look at the mile-long ingredient list on a box of store-bought iced donuts. You’ll be more inclined to make up a homemade batch with real ingredients!
I’m excited to say, this sourdough raised donut recipe has a comparable flavor and lofty texture to the ones you can buy.
They are a special treat to make and share!
What is a raised donut?
A raised donut (doughnut) is made from an enriched, yeasted bread dough. The dough is kneaded and allowed to rise and proof before frying.
Raised donuts are also called yeasted donuts for this reason. They typically have a light and fluffy texture.
Cake donuts, on the other hand, are made from a cake-like batter. They have a denser texture because they are chemically leavened with baking powder or baking soda.
Why leaven raised donuts with sourdough starter instead of yeast?
Sourdough starter (a wild yeast starter) naturally leavens bread without the use of commercial yeast.
The longer fermentation/rise times make bread more digestible and impart a desirable depth of flavor to the dough.
Contrary to popular belief, not all bread made with sourdough starter is sour!
Sourdough starter works well to make treats like filled donuts, croissants and Danish pastries (and my readers love to make these recipes too!).
Ingredients and Recipe Notes
This raised donut recipe is actually a variation on my Filled Sourdough Donuts (Bomboloni or Krapfen).
The dough is essentially a brioche dough enriched with plenty of eggs and butter.
This recipe utilizes a cooked milk and flour mixture (tanzghong) that is prepared before the dough is mixed. The tangzhong acts as a natural dough enhancer for the softest donuts.
The flour used is unbleached organic bread flour (King Arthur at 12.7% protein).
The extra protein strength insures the sourdough raised donuts can hold their shape after being rolled and cut (and also through an extended proof).
Sugar and a touch of vanilla extract add flavor to the dough.
This recipe is formulated to make 12 donuts and donut holes. You’ll have some extra scraps leftover since the scraps don’t re-roll well.
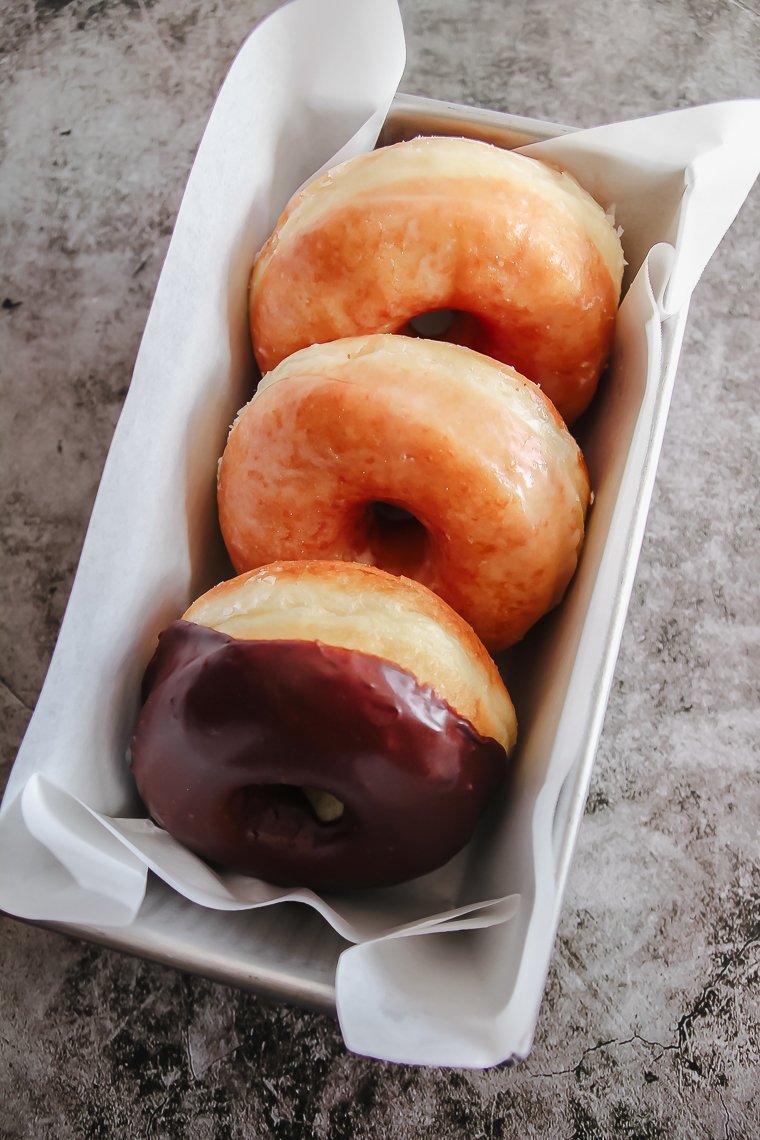
I provide recipes in the printable card for vanilla and chocolate glaze, but you can get creative!
Feel free to thicken my vanilla glaze with extra powdered sugar. This will create a more substantial icing to hold sprinkles or other toppings. You can add different flavoring extracts as desired.
You can simply dip the donuts in granulated sugar while they are still hot if you prefer that over an iced sourdough donut.
Sourdough Raised Donuts Baking Schedule
*The strength of your starter, the temperature in your home, and other factors will affect how long each step will take. Use the dough as your guide.
Approximate timing:
- Prepare and cool tangzhong: 30 minutes
- Mix (including 30-minute rest): 55 minutes
- Warm bulk rise: 3 hours, 45 minutes (assuming a final dough temp of 76°F and ambient temp of 78°F)
- Cold retard in fridge: Overnight (12+ hours)
- Roll and cut: 10 minutes
- Proof: 2 hours, 40 minutes (76-78°F)
- Fry and glaze: 45 minutes
I normally make the dough in the morning or early afternoon on day 1. I roll and cut the donuts the next morning to fry them in the early afternoon.
To fry the donuts in the morning for breakfast: Prepare the dough on day 1. Chill the dough for only 2 hours, then proceed to roll and cut them the same day. Allow the donuts to proof halfway, then refrigerate overnight (make sure they are well-covered with plastic wrap). Continue proofing in the morning. Fry and glaze as usual.
Tips for Making Sourdough Raised Donuts
- Be sure to use a strong, active starter at its peak. A strong starter insures a good rise and prevents the donuts from tasting sour.
- It is essential to follow the order of mixing the ingredients (this includes the 30-minute rest and kneading before the butter is added). If you mix all the ingredients together at the beginning, the dough will struggle to gain strength in the mixer and will require excessive kneading.
- Make sure your dough shows the signs of full gluten development as described and pictured below before you stop kneading.
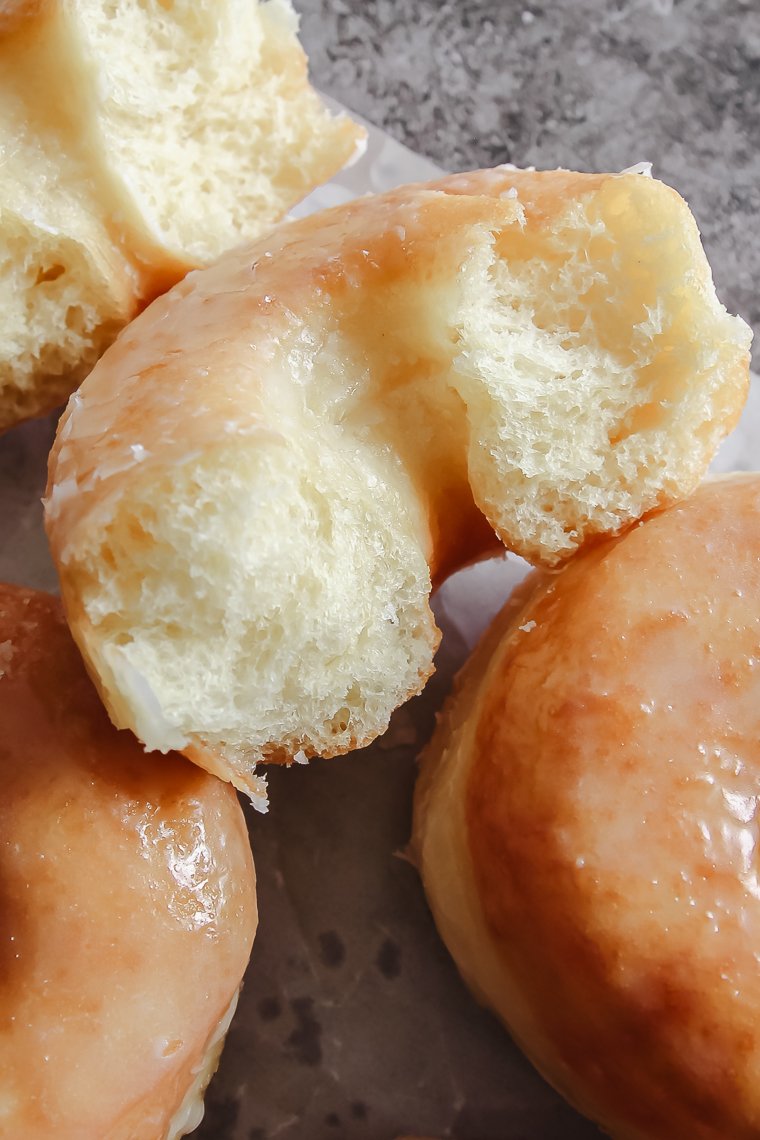
- Insure you proof the donuts long enough after they are cut. Without proper proofing, the texture won’t be very light and fluffy. The donuts may bulge or become misshapen while frying (slightly under-proofed) or even sink low in the oil (substantially under-proofed). You can fry one tester donut to start. If you find it wasn’t quite ready, you can cover the remaining donuts to proof longer before frying. Over-proofed donuts will begin to collapse on the baking tray and will fry up flat.
- The temperature of the oil is very important when frying donuts. You want the donuts to cook through sufficiently by the time they brown on the outside. Use a candy thermometer, and fry when your oil is at 360°F. The window between 350°F and 370°F is okay.
How to Make Sourdough Raised Donuts (Step-by-Step Instructions)
Step 1 (Day 1) – Prepare Tangzhong
As I mentioned, tangzhong is simply a scald. It’s so easy to prepare.
Stir the flour and milk together in a small saucepan over medium heat. Keep stirring and cooking until the mixture thickens to the consistency of mashed potatoes.
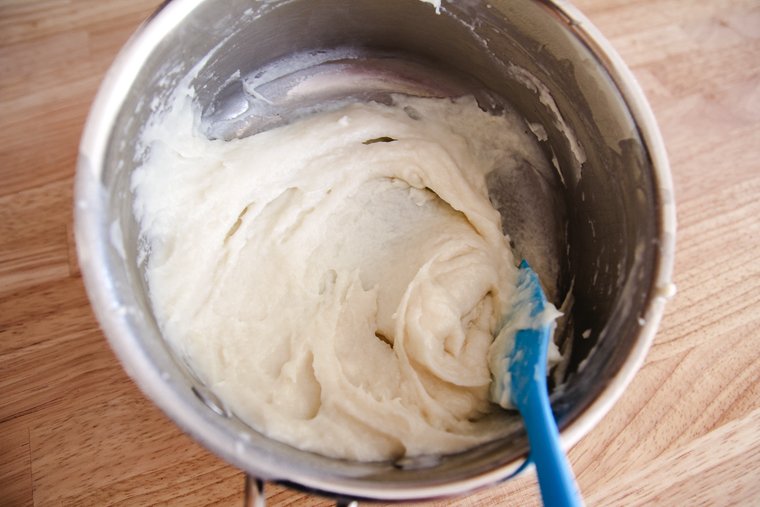
You can just cover it and let it cool completely before you mix the dough.
To speed up the cooling process, though, you can spread the scald out on a large dinner plate. Place a piece of plastic wrap over the surface, and refrigerate until it’s cool.
Step 2 – Mix Sourdough Raised Donut Dough
After the tangzhong is cool and your starter is ripe, it’s time to mix the dough.
Hold back the salt and butter at first. Mix together the tangzhong, starter, eggs, granulated sugar, strong bread flour, and vanilla extract.
If you use a Bosch mixer, be sure to use the dough hook extender. A little dough may sneak into the center post, but the post removes later for easy cleaning.
Mix on low speed for a minute or so until everything is incorporated and no dry flour remains.
Cover the dough and allow it to rest at room temperature for 30 minutes to kickstart gluten development.
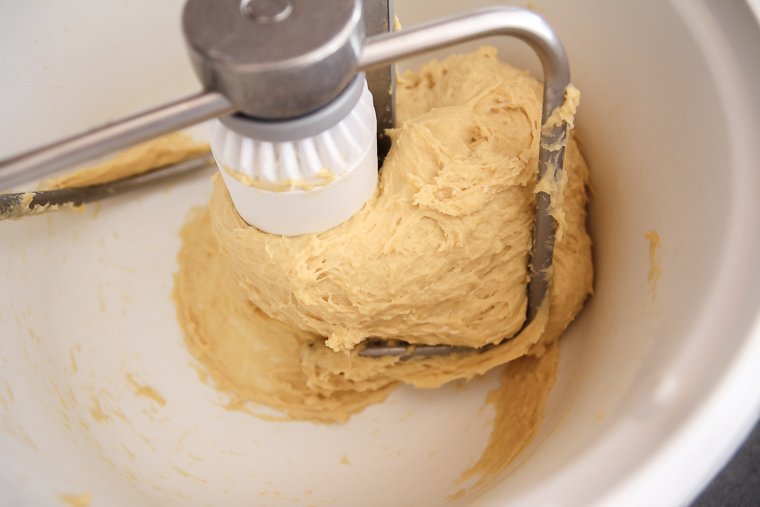
After the rest, add the salt and knead the dough on low speed for 10 minutes. The gluten will be mostly developed at this point.
Add half of the butter cubes. Continue kneading until the butter is fully absorbed, then repeat to knead in the remaining butter cubes.
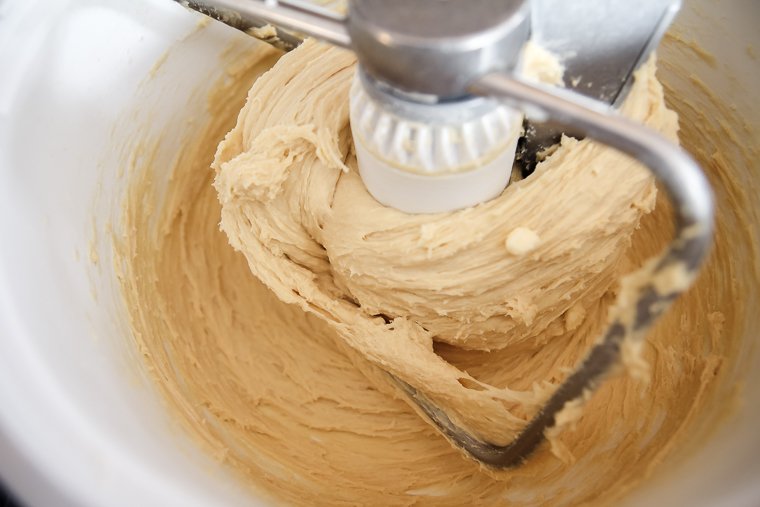
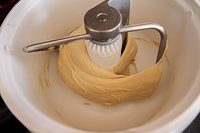
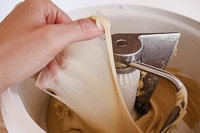
Take a look at the dough at this point to see if the gluten is fully developed. The dough should be shiny and taught.
It should cling to itself and the dough hook and clean itself off the sides of the bowl.
If you pull it with damp fingers, you should be able to pull it to a very thin “windowpane” before it tears.

If it’s not showing these signs yet, continue kneading until it does (even if it takes 10-15 more minutes).
Step 3 – Bulk Fermentation
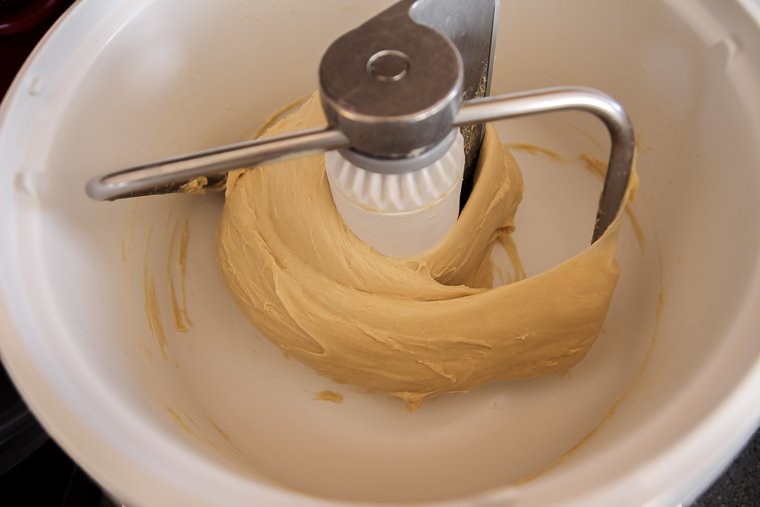
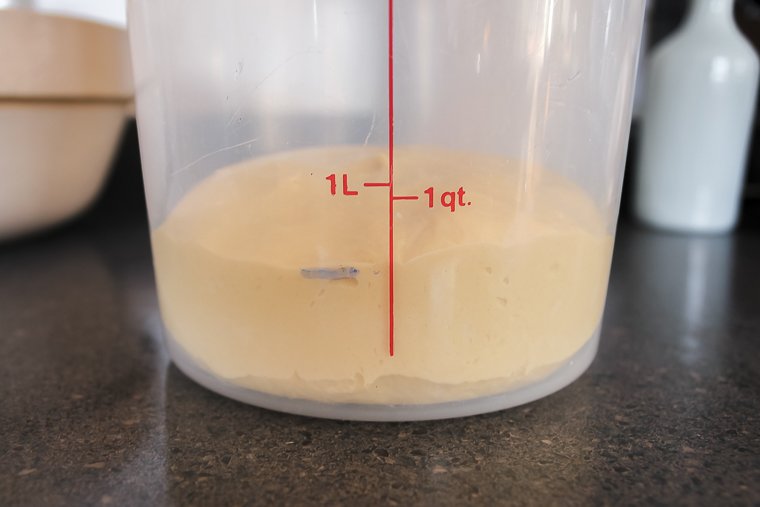
Using damp hands, form the dough into a tidy ball.
Place it in a large bowl or straight-sided container for bulk fermentation. I mark the starting point with a dry-erase marker.
You can use an instant-read thermometer at this point if you’d like to know your final dough temperature.
Cover the dough with plastic wrap or a lid and leave it in a warm place to rise until it has nearly doubled in volume.
Bear in mind that doughs with a lot of enriching ingredients like butter and eggs take their time to rise. A warm ambient (room) temperature will help the process along. 78°-80°F is ideal.
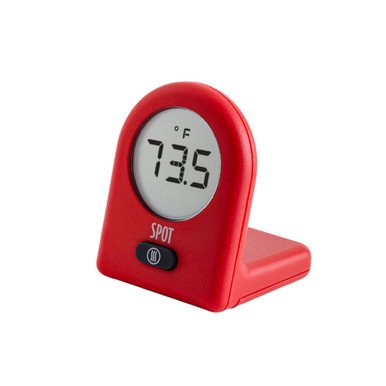
I place my dough in my turned-off microwave with the door ajar to keep the light on inside. I close the door once the temperature reaches 78°F (and keep an eye on the temperature with an ambient thermometer).
My dough took nearly 4 hours with a final dough temp of 76°F and an ambient temp of 78°F.
The dough will seem to rise very slowly at first. Then it will speed up near the end of bulk fermentation.
After it has risen, cover the dough tightly, and place it in the refrigerator overnight. It will continue to rise a little more in the fridge while it cools down.
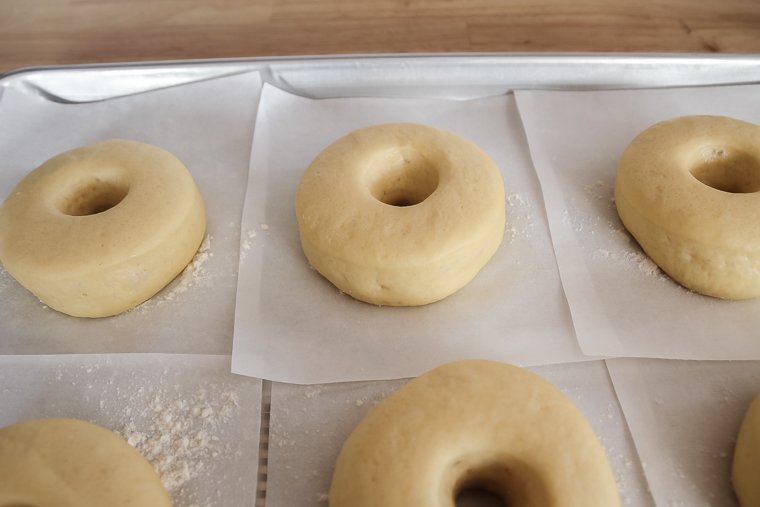
Step 4 (Day 2) – Rolling and Cutting Sourdough Raised Donuts
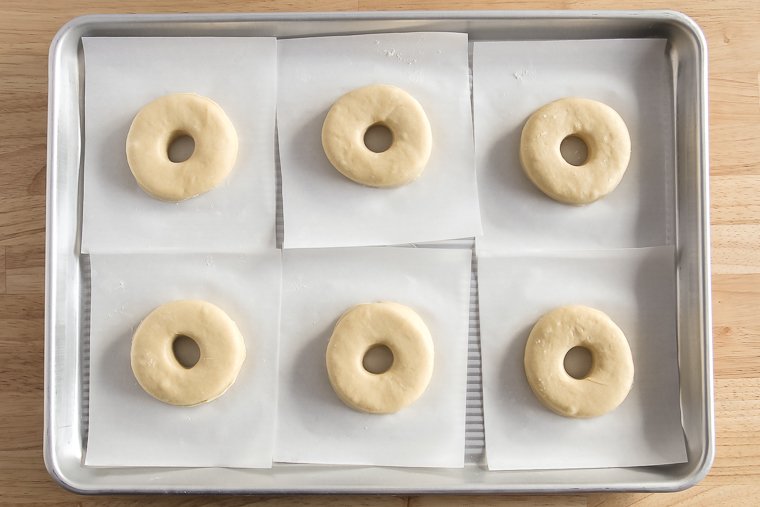
Line two half sheet pans with with 6 squares of parchment paper on each one. Dust the squares lightly with flour.
Dust your counter with flour and turn out your cold dough.
(Note: if you don’t want to fry all the donuts at one time, you can hold half the dough 1-2 extra days in the fridge. The dough will become more sour the longer it’s refrigerated.)
Without handling the dough any more than necessary, roll it out evenly to 1/2-inch thickness.
Double check that the dough is not sticking to the counter. Then use a 3-inch donut cutter to cut donuts as closely spaced as possible.
(I prefer this cutter with the donut hole separate. That way I can also use it to cut biscuits or English muffins.)
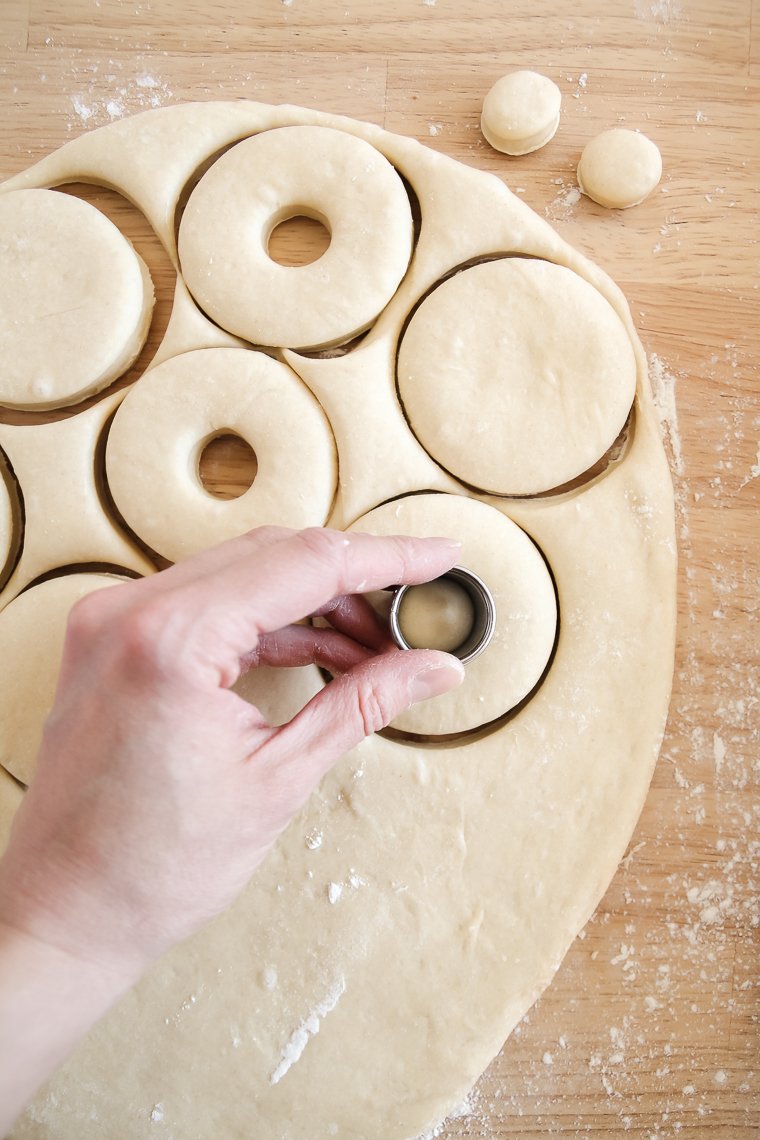
You can probably get away with re-rolling the scraps one time, but the dough will try to spring back. You should be able to cut at least 12 donuts.
If you’re determined to use the scraps, let them rest, covered, for 10 minutes to allow the gluten to relax before rolling again.
Alternately, you can form the scraps into round donuts, or simply discard them.
Step 5 – Proof
Set the cut donuts on the prepared pans on the squares of parchment paper.
Cover the pans with plastic wrap. Leave the donuts to proof until they are very puffy with air and soft to the touch. Proofing took me 3 hours, 20 minutes at 76°F.
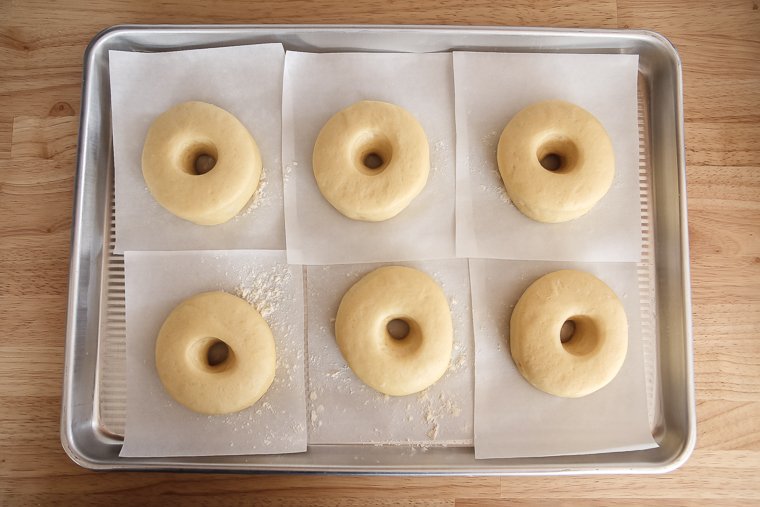
It can be hard to judge when they have proofed enough. They may even pass the “poke test” before they have actually proofed to their full potential.
When they are fully proofed, you’ll see some visible bubbles on the inside of the donuts where the holes were cut.
The sourdough raised donuts should be soft enough that they seem to be on the verge of over-proofing. However, you definitely don’t want to take them so far that they begin to collapse on the sheet pan.
Begin to heat your oil when the donuts are nearly proofed.
Step 6 – Fry
See this article for safety tips when deep frying.
Heat 2 inches of oil in a heavy-bottomed pan with a candy thermometer clipped to the side. I use my trusty Dutch oven for frying.
Vegetable oil is a good, affordable choice. Refined coconut oil is another great option (and shouldn’t impart coconut flavor to your donuts).
Set a cooling rack near your pot and line it with a double layer of paper towels.
Heat your oil over medium heat to 360°F before you begin frying the first raised donut. Then insure the temperature is between 350°F and 370°F whenever you place new donuts in.
Wait if your oil needs to heat back up or cool down.
The parchment paper squares are handy for transferring the delicate donuts to the oil without deflating them.
The raised donuts may release from the parchment easily to drop into the oil. If not, the parchment can go in the oil with the donut.
It will slip off the donut shortly after hitting the frying oil.
Use kitchen tongs to carefully remove the parchment from the oil into a bowl held over the frying pot (be especially cautious if you’re using a gas stovetop).
Fry only 3 or 4 donuts at a time, and continue to monitor the temperate of your oil.
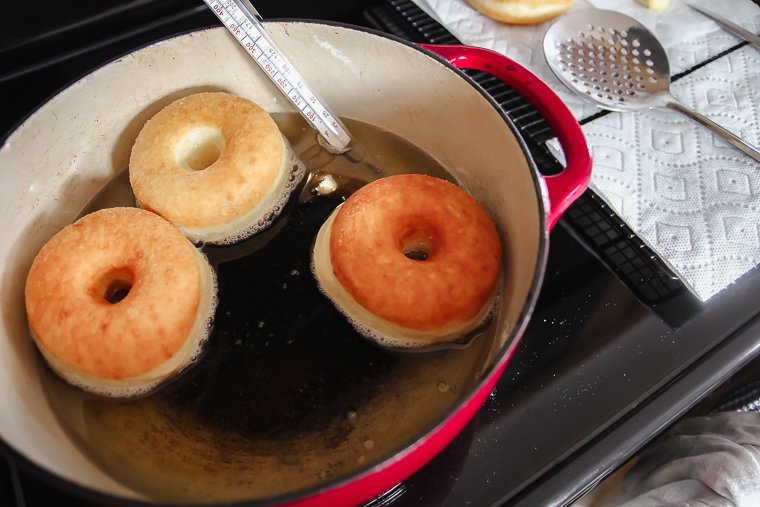
Fry about 2 minutes on each side or until the donuts are nicely golden in color. Flip them only once.
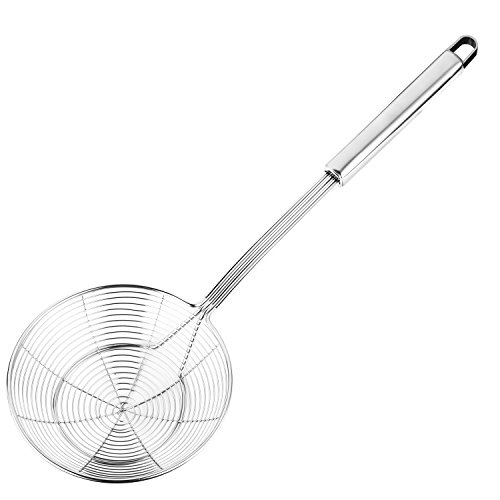
Remove the raised donuts from the pot with a slotted spoon, allowing excess oil to drip back into the pot. Place them on the paper towels to drain as they cool.
Step 7 – Glaze the Sourdough Raised Donuts
Prepare the glaze while the donuts are cooling. The raised sourdough donuts need to cool completely before you can ice them to prevent the glaze from melting off.
You’ll whisk powdered sugar, cocoa powder for the chocolate variation, whole milk, cooled melted butter, vanilla extract, and a pinch of salt.
You can make half of each type of glaze if you want both.
Gently invert a cooled donut into the bowl of glaze to dip the top half.
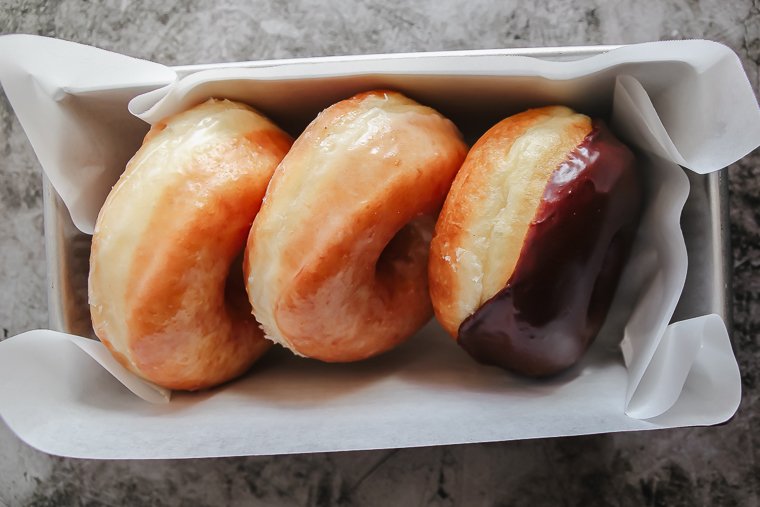
Hold the donut over the bowl to allow excess glaze to drip off. Place it glaze-side-up on a cooling rack or sheet pan. Repeat with the remaining donuts.
Allow the iced donuts to sit for about 20 minutes while the glaze sets. The vanilla glaze will run down the sides of the donuts.
Then it’s time to admire your work and serve the fresh, scrumptious donuts!
How to Keep Glazed Donuts Fresh Overnight
Sourdough raised donuts are best eaten the same day, shortly after they are fried and glazed.
If you must store donuts overnight (or even for later the same day), I wouldn’t recommend storing them in an airtight container or dessert dome. The glaze will quickly become wet/gooey.
The donuts will store best in a bakery box.
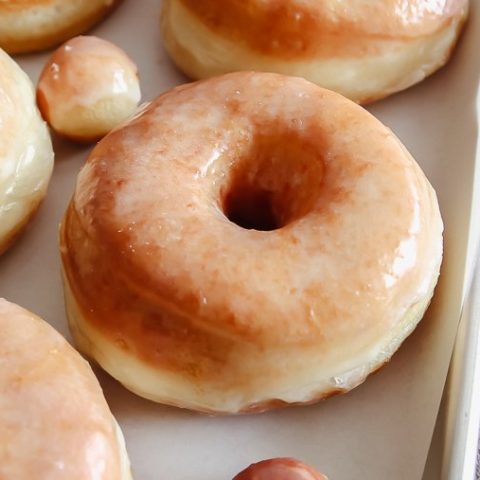
Sourdough Raised Donuts
Sourdough raised donuts with the perfect soft and fluffy, melt-in-your-mouth texture and two glaze options! You'll love making this naturally leavened donut recipe with simple ingredients.
Ingredients
Tangzhong (Scald)
- 180g whole milk
- 38g unbleached bread flour*
Final Dough
- Cooled tangzhong
- 200g ripe sourdough starter (100% hydration)
- 150g eggs (about 3 large)
- 38g granulated sugar
- 375g unbleached bread flour (12.7% protein)
- 1 teaspoon pure vanilla extract
- 12g kosher salt
- 100g salted butter, cold and cut into small cubes
For Frying
- Vegetable oil or refined coconut oil, enough to fill a heavy-bottomed pot with 2 inches of oil (a 32oz bottle of vegetable oil works well in a 6qt Dutch oven)
Vanilla Glaze for 12 Donuts
- 230g powdered sugar
- 70g whole milk
- 14g (1 Tablespoon) salted butter, melted and cooled
- 1/4 teaspoon pure vanilla extract
- Pinch of salt
Chocolate Glaze for 12 Donuts
- 260g powdered sugar
- 20g dutch process cocoa powder
- 70g whole milk, room temperature
- 14g (1 Tablespoon) salted butter, melted and cooled
- 1/4 teaspoon pure vanilla extract
- Pinch of salt
Instructions
Day 1
Feed starter prior to mixing dough and allow it to peak.
- Prepare tangzhong mixture: Whisk together 180g milk and 38g flour in a small saucepan over medium heat. Cook and stir constantly with a rubber spatula until the mixture thickens to the consistency of mashed potatoes. Cover and allow to cool completely. (To speed up cooling, spread mixture flat on a large dinner plate and cover the surface with plastic wrap. Refrigerate until completely cool.)
- Mix dough: To a stand mixer fitted with a dough hook (and dough hook extender if using a Bosch mixer), add cooled tangzhong, ripe starter, eggs, sugar, flour, and vanilla extract. Mix on low speed for 1 minute until combined. Cover dough and allow to rest for 30 minutes.
Add salt and knead for 10 minutes on low speed. At this point, the gluten should be mostly developed. Add half the butter cubes and continue kneading until butter is thoroughly incorporated and no longer visible. Repeat to knead in the second half of the butter cubes.Access the dough at this point: if it's very smooth, taught, and shiny, cleans itself off the sides of the bowl to cling to itself and the dough hook and stretches to a dramatic windowpane when pulled with damp fingers, it's done. If it doesn't yet show these signs, continue kneading until it does (even if it takes 10-15 more minutes).
- Warm bulk ferment and refrigerate overnight: With damp hands, form dough into a smooth ball. Place dough in a large bowl or straight-sided container. Cover and set in a warm place until it has nearly doubled in size (approximately 2 hr, 45 min with a final dough temp of 76°F and an ambient temp of 78°F. Bulk will take longer if your dough/kitchen are cooler). After the dough has risen, cover tightly and refrigerate overnight.
Day 2:
- Roll and cut donuts: The next day, line two half sheet pans with six 5-inch squares of parchment paper on each. Lightly dust parchment paper squares with flour. Turn out cold dough onto a clean countertop and roll evenly to 1/2-inch thickness (avoid handling dough more than necessary). Insure rolled dough is not sticking to the counter, then use a 3-inch donut cutter to cut donuts as closely spaced as possible. Place donuts on prepared pans, one donut on each square of parchment. (Scraps do not re-roll well. You can re-roll scraps once to cut a couple more donuts, then discard remaining scraps or use for another purpose. Donut holes may be proofed on a separate tray and fried, if desired.)
- Proof: Cover pans with plastic wrap and set in a warm place to proof until donuts are very puffy with air and soft to the touch (they may pass the poke test a little before being fully proofed). You should see some visible air bubbles inside the center holes (about 3 hrs, 20 min at 76-78°F, longer if your kitchen is cooler).
- Fry: When donuts are nearly proofed, fill a heavy-bottomed pot with 2 inches of frying oil. Set over medium heat with a candy thermometer clipped to the inside edge. Line a cooling rack with a double layer of paper towels and set near frying pot. Begin frying when oil reaches 360°F. Fry only 3 or 4 donuts at a time (see notes for signs of proper proofing when frying). Fry on the first side until golden brown, then flip to fry the second side, about 2 minutes per side. Maintain proper oil temp before repeating to fry remaining donuts. (The parchment squares will allow you to gently transfer the donuts to the pot without deflating them. If the donuts won't release while inverting, simply fry them with the parchment. The parchment will release and can be carefully removed from the frying oil with kitchen tongs into a bowl held over the oil.) Remove fried donuts from oil with a spider strainer spoon and transfer to the paper towels to drain and cool.
- Glaze: While donuts are cooling, prepare desired glaze. Add powdered sugar, (cocoa powder for chocolate glaze), whole milk, melted butter, vanilla, and a pinch of salt into a small bowl. Whisk briskly until glaze is very smooth with no lumps. Cover and set aside. Once donuts have cooled completely, dip them into the glaze to coat the tops. Place donuts glazed-sides-up on a cooling rack or sheet pan, uncovered for about 20 minutes, until glaze is set (vanilla glaze will run down the sides of the donuts). Serve.

Notes
- Frying safety: See this article.
- Dough temperature: If your kitchen is chilly, you can place the dough in a foldable proofer box, a turned-off oven with the light on or in the microwave with the door ajar to keep the dough warm enough to rise within the time frames listed (use an ambient thermometer so as not to exceed 80°F). If your dough is kept in a cooler place, expect the rise times to take longer. Observe the dough to know when to move on to the next step.
- To fry only half the donuts at once: Hold half the dough for an additional day or two in the fridge before cutting and proofing. The donuts will become more sour the longer the dough is refrigerated.
- Alternate schedule to fry donuts in the morning: Mix dough in the morning on day 1. Chill dough for only 2 hours instead of overnight. Roll and cut donuts, proof halfway, then refrigerate the well-covered trays overnight. Finish proofing, frying, and glazing the next morning.
- Signs of a well-proofed donut: Donut floats in the oil instead of sinking down in. Donut has a pale ring or "fry line" around the outside after frying both sides. Donut does not bulge on one side or become misshapen when frying. If the donut collapses/flattens, however, it is over-proofed.
- Donut toppings: You may add food coloring or alternate flavorings to the vanilla glaze. Add additional powdered sugar if you want a thicker icing that will hold toppings. If you would like to coat the donuts in granulated sugar instead of glaze, coat them directly after frying when they are just cool enough to handle.
- How to store: Do not store donuts in an airtight container or dessert dome or the glaze will become wet/gooey. If donuts must be stored for later in the day or overnight, a bakery box is the best option.
- Leftover oil: Allow frying oil to cool completely. Do not pour down sink drain. Pour back into original container using a funnel to discard, or strain first before pouring back into original container to reuse.
Recommended Products
As an Amazon Associate and member of other affiliate programs, I earn from qualifying purchases.
-
 Nutiva Organic Steam Refined Oil, Coconut, 128 Fl Oz
 -
Cooling Racks
-
Hiware Spider Strainer Spoon
-
Candy/Deep Fry Glass Thermometer
-
Lodge Enameled Cast Iron Dutch Oven, 6 Quart, Red
-
USA Pan Bakeware Half Sheet Pan
-
Hiware Parchment Paper Baking Sheets
-
Thermoworks SPOT Ambient Thermometer
-
Thermapen ONE Instant Read Thermometer
-
White Universal Plus Mixer (Use code ABERLEHOME for $20 off)
-
Bakers Math Kitchen Scale - KD8000
-
HULISEN 3 inch Cutter


Nutrition Information:
Yield: 12 Serving Size: 1Amount Per Serving: Calories: 485Total Fat: 16gSaturated Fat: 8gTrans Fat: 0gUnsaturated Fat: 7gCholesterol: 72mgSodium: 510mgCarbohydrates: 78gFiber: 2gSugar: 45gProtein: 8g
*Nutrition information is not always accurate.
I’m so grateful for your comments, reviews, and questions! Your star ratings help others discover my recipes, and your feedback helps me make improvements. Thank you for your support!