
This post may contain affiliate links. See my full disclosure. As an Amazon Associate, I earn from qualifying purchases.
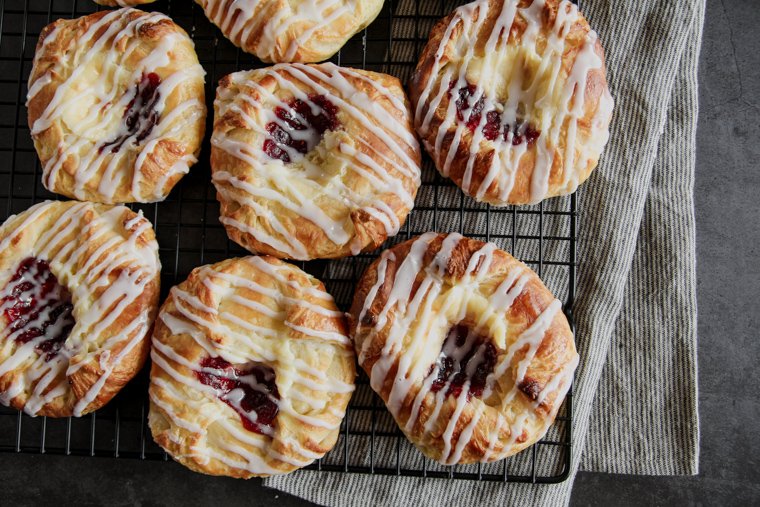
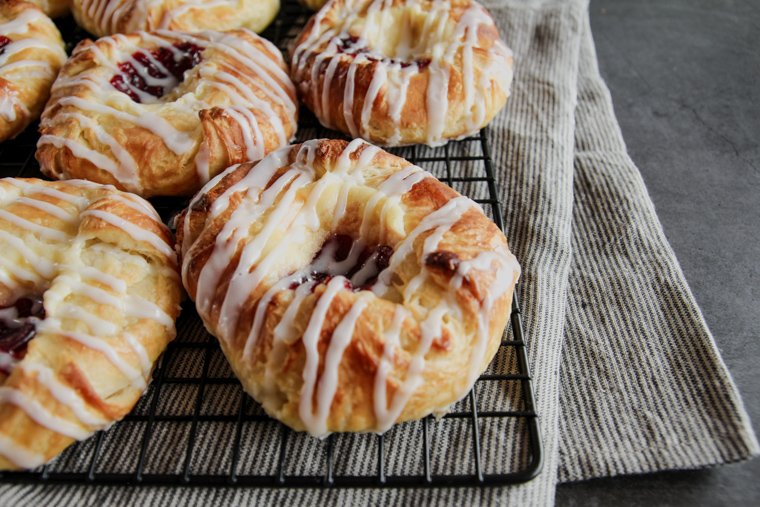
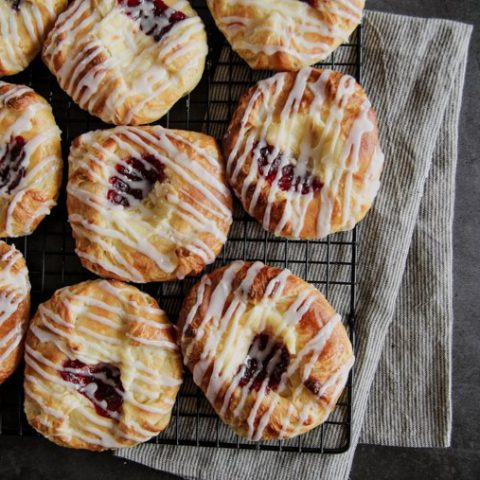
You can make bakery-quality sourdough Danish pastries using sourdough starter and a long ferment instead of commercial yeast. No stand mixer required! The danishes are flavorful (but not sour), tender, and flaky with a cheese and fruit filling and a beautiful glaze to finish them off.

I use my sourdough starter for all my bread baking, so these homemade Danishes are no exception.
You may also enjoy making my Sourdough Brioche, Homemade Sourdough Croissants, or Filled Sourdough Donuts!
Pastry-making can seem intimidating for the first-timer, but it is so worth it.
I will show you step-by-step how to make these, and once you get the process down, it really moves pretty quickly.
The Danish dough is laminated meaning it has many thin layers of dough and butter.
Lamination is accomplished in a process of folding and rolling a thin block of cold butter into the dough. The layers of butter give the pastry its perfect rise and light flakiness.
If you need a good reason to wake up in the morning, one of these Danishes with a hot cup of coffee may just do the trick.
I’ve included a printable recipe card at the end of this post with recipes for the dough, the butter block, the egg wash, the cheese filling, the glaze, and also an optional streusel topping (not pictured).
I’ve included both volume and weight measurements, but I would definitely recommend you weigh the ingredients on a digital kitchen scale for accuracy.
To make half the laminated sourdough Danish dough into one large pastry skillet, visit this post.
About the Homemade Danish Dough and Filling
The sourdough Danish dough itself is enriched with sugar, eggs, milk, and butter.
These enrichments are the most profound difference between Danish dough and croissant dough.
Ground cardamom and vanilla give danishes their iconic flavor, so I would recommend you do not skip the cardamom. You can find it with the spices at your grocery store.
The cheese filling is easy to make with a base of cream cheese, and it pairs extremely well with my favorite four-fruit preserves (strawberry, cherry, raspberry, and current).
You can use your favorite fruit preserves, use the cheese filling alone, or even swap for some lemon curd.

You could make your own variation to these Danishes with finely chopped pecans or sliced almonds or even by sprinkling streusel topping over your filling.
Here is a simple (but optional) streusel topping:
Streusel Topping
1/4 cup (30g) unbleached all-purpose flour
1/4 cup (50g) granulated sugar
1 ½ tablespoons (21g) butter, melted
Stir together streusel ingredients with a fork just until the streusel is crumbly, then chill before using.
I like adding a drizzle of glaze after baking for a touch more sweetness.
Feel free to play around shaping the pastry differently once you get the hang of this shape I will show you here.
Do I have to use unsalted butter?
You will definitely want to choose unsalted butter. Salted butter would pull moisture from the dough during lamination. Unsalted butter will give you cleaner layers.
Additionally, any time you are making pastry dough, I would recommend you go the extra mile to use a cultured European-style butter (82% fat).
The higher fat content makes lamination easier since the butter is more pliable at a colder temperature. Higher quality butter also lends added color and flavor to the finished pastries.
That being said, a store-brand unsalted butter like I’ve used here will work fine if that’s what you have.
Doesn’t using sourdough starter make the process more difficult?
The Danish-making process isn’t made any more difficult with the use of sourdough starter and no yeast. The only difference is the extra hands-off time the dough needs to ferment before laminating and shaping.
Much of this time is spent in the refrigerator and can be manipulated to fit in with your schedule. The dough develops flavor from this process but does not become sour.
You can make the dough on day one and laminate, shape, proof and bake on day two.
Or you can leave the dough in the fridge an extra full day before or after lamination (or both) for an even longer ferment or to time your bake for early morning.

Sourdough Beginner Guides:
- How to Feed and Maintain a Starter (Easy Refrigerator Method)
- Essential Sourdough Bread Making Tools
- Sourdough Baking Terms for Beginners
- Milling Flour at Home: A Beginner’s Guide
Tips for Making Homemade Danishes
- When you begin laminating your dough, be sure your butter block and your dough are the same consistency so they will roll out nicely. Your butter should be cold, but bend easily without cracking, and the dough should be chilled. If your butter is too cold, it will crack and look like broken ice below your dough. If it is too warm, it will meld into the dough and you won’t get clean layers.
- Chill your dough as needed though the laminating process to keep your dough and butter from becoming too soft. If your butter gets too cold, leave your wrapped dough on the counter for a few minutes to warm up a bit before you try to roll it out.
- It is best to proof Danish dough at room temperature (preferably under 75°F). Under-proofing or proofing at a high temperature could result in butter leaking out of the laminated layers. In that case your finished pastry could end up with overly-pronounced thick, crunchy layers instead of a light, flaky texture.
Recommended Equipment
- Digital kitchen scale
- Plastic wrap
- Parchment paper
- Rolling Pin
- Half sheet baking pans
- Measuring tape or ruler
- Pastry brush
- Pizza cutter
- Cooling rack
How to Make Sourdough Danish Pastries
Step 1 – Make and Ferment the Sourdough Danish Dough
Make sure your starter has been recently fed, and has had time to double in its container and become very bubbly.
Weigh and stir together your starter, sugar, salt, cardamom, melted butter, egg and egg yolks, milk, and vanilla. Add in the flour and mix until most of the flour is absorbed and you have a shaggy dough.
Turn the dough out onto a clean countertop and knead it for a few minutes until it becomes nice and smooth. Use a bench scraper to help as you knead if you find the dough is sticking to the counter at first.
The sourdough Danish dough should be tacky, but not sticky, when you are finished kneading.
Form the dough into a ball and place in a large bowl. Prop the lid on so the dough or cover with plastic wrap so it doesn’t dry out.
Place it in a warm place to ferment for about 5 hours or until the dough increases in size by about 1/3. Then cover tightly and refrigerate for at least 12 hours, and up to two days.
Step 2 – Make the Butter Block
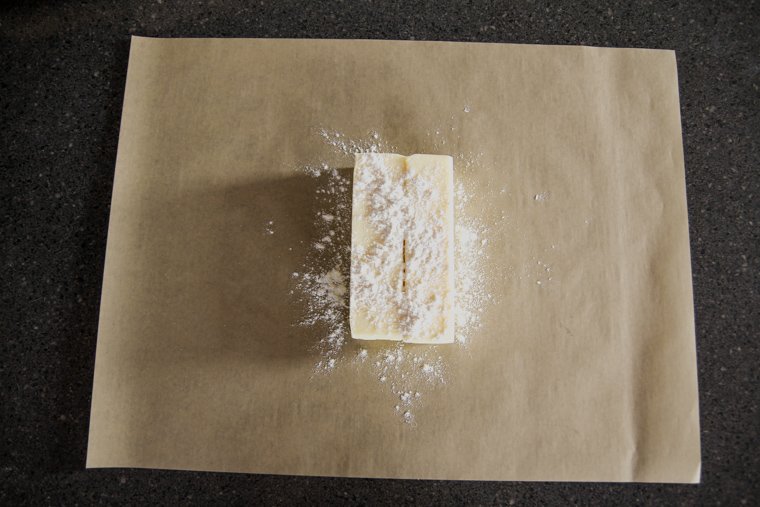
After your dough has had sufficient time to ferment, you are ready to laminate it. The first step is forming your butter into a thin block that can be rolled into the dough.
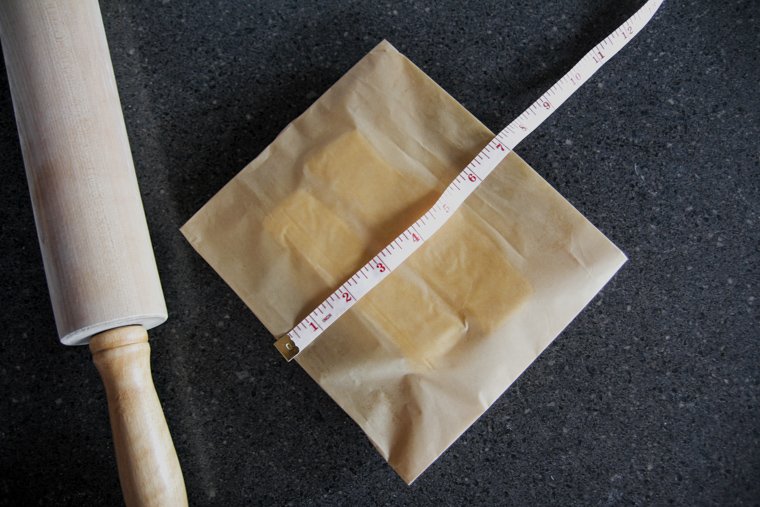
Place your butter on a good-sized rectangle of parchment paper and sprinkle it with the tablespoon of flour.
Next, loosely fold the ends of the parchment over the butter to cover it. (Update: I now find it easier to measure and fold the parchment before placing the butter inside.)
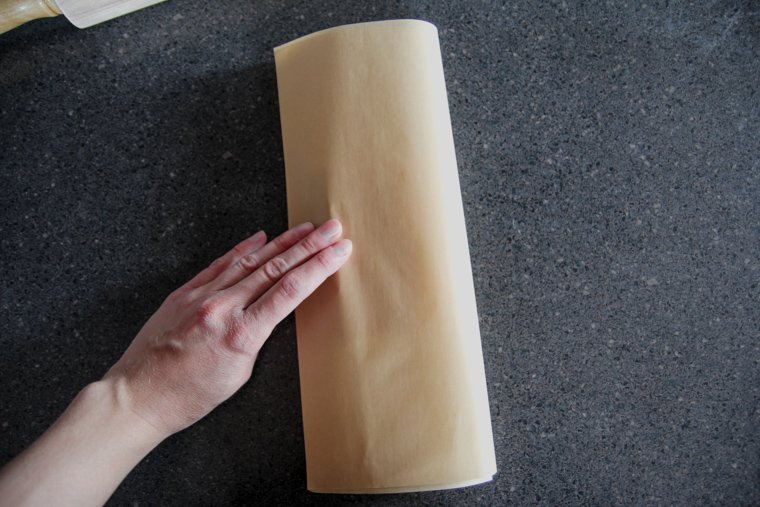
Begin beating the butter with your rolling pin until it begins to flatten (do this evenly without “digging” into the butter). If your butter is too hard, wait a couple minutes and try again.

Now we’re going to create a package on the outside of the butter to help us shape the butter into a rectangle.
Crease the edges of your parchment paper to make the start of a rectangle that is 7 inches wide. Fold the top and bottom edges over to make your rectangle 8 inches long. Use a measuring tape to be precise.
Flip your butter package over and measure again to make sure it’s right.
Now pound, roll and press your butter evenly into the package you just made. Make sure the butter fills each corner.
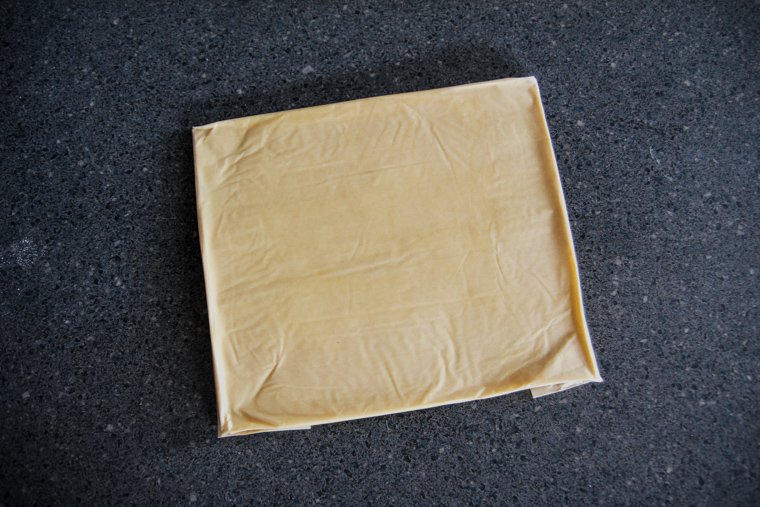
If your butter feels like it’s beginning to melt on the edges, place it in the refrigerator for a few minutes to help it set back up. If your butter block is still cold, but nice and pliable, you’re ready for the next step.
Step 3 – Lock the Butter Block into the Sourdough Danish Dough
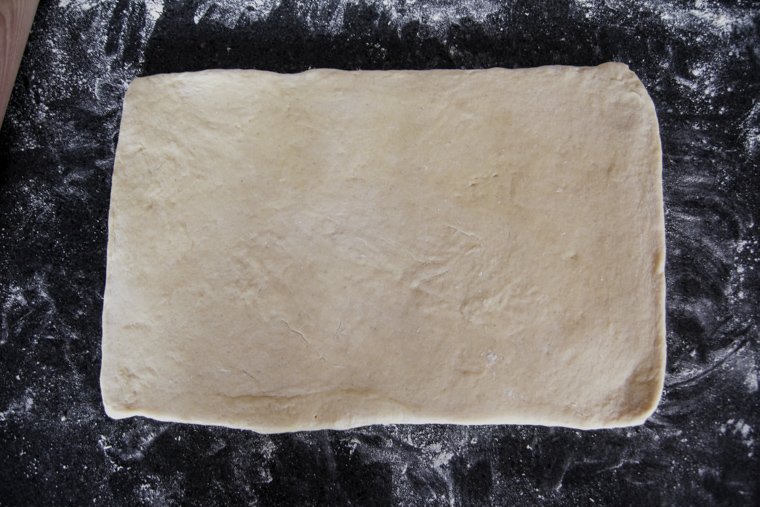
Remove your sourdough Danish dough from the fridge and roll it out to a 16 x 9-inch rectangle.
Before I even begin rolling, I like to press the dough into the shape of a rectangle with my hands. I pinch the corners out to help them keep their shape.
Focus on being as precise as you can, and measure your dough for each step.
Frequently check that the dough is not sticking to your counter. Lift up the edges and sprinkle with more flour when you need to.
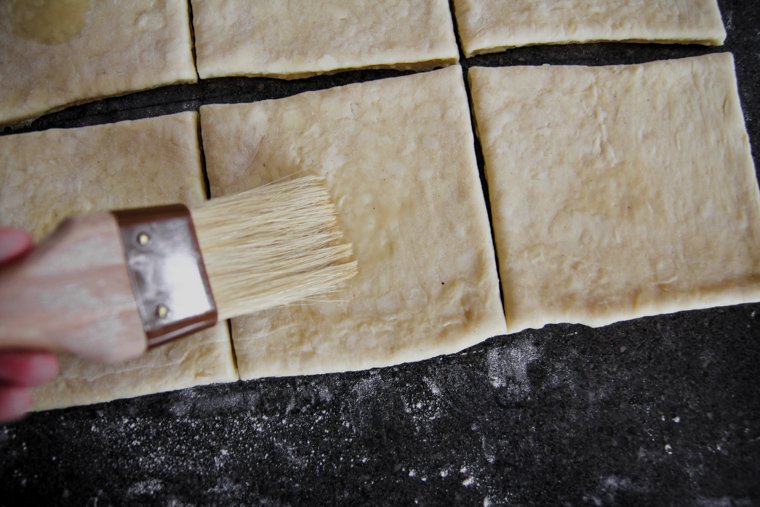
Brush away any loose flour from the top of the dough with a pastry brush.
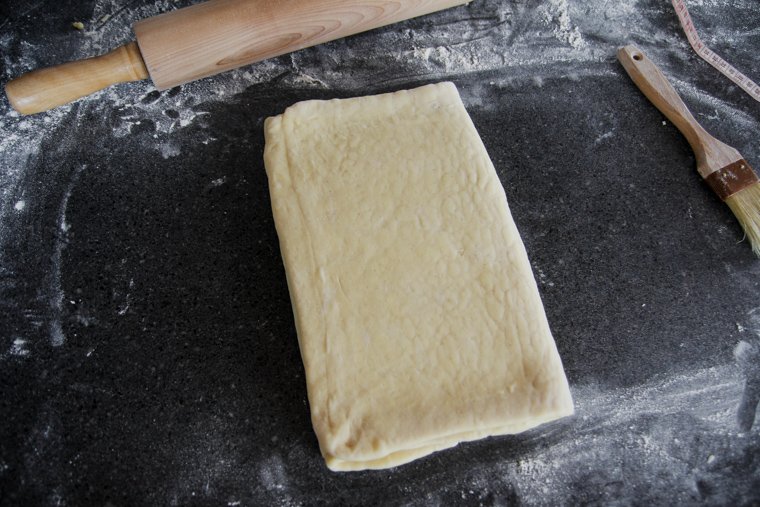
Now unwrap your butter block and place it in the center of your rectangle with a short side facing you.

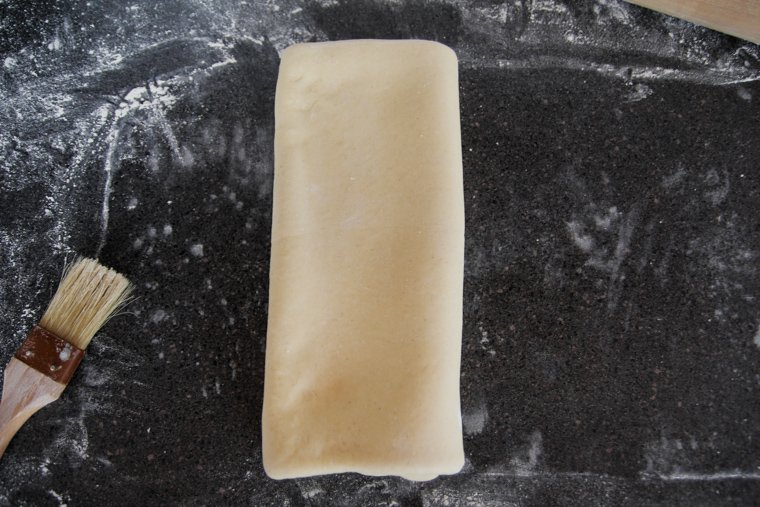
Fold one side of the rectangle over the butter block so the edge meets the center of the butter block.
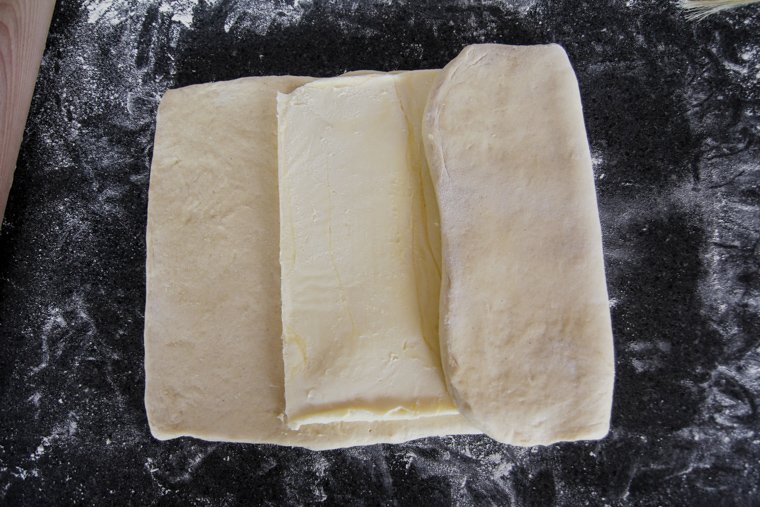
Then fold in the other end to meet the first end.
Brush away any loose flour and pinch the center seam together to seal it shut. Press the top and bottom edges together around the butter block so the butter won’t escape during rolling.
Step 4 – First Lamination Fold (Book Fold)
Now we are going to roll the dough out and do the first fold. Turn your dough 90 degrees so your center seam is horizontal to you.
Roll your dough into a 20 x 12-inch rectangle. Roll the 20-inch length first, and then get the width to 12 inches.
I like to carefully pound the rectangle longer by beating it with the length of my rolling pin at first. This helps to keep the edges straighter, distribute the butter evenly, and avoid developing the gluten in the dough too much.
Concentrate on rolling with a gentle outward “sweeping” motion instead of pressing hard downward into the Danish pastry dough.
Keep checking underneath to make sure your dough isn’t sticking.

Brush away any loose flour from the top after rolling.
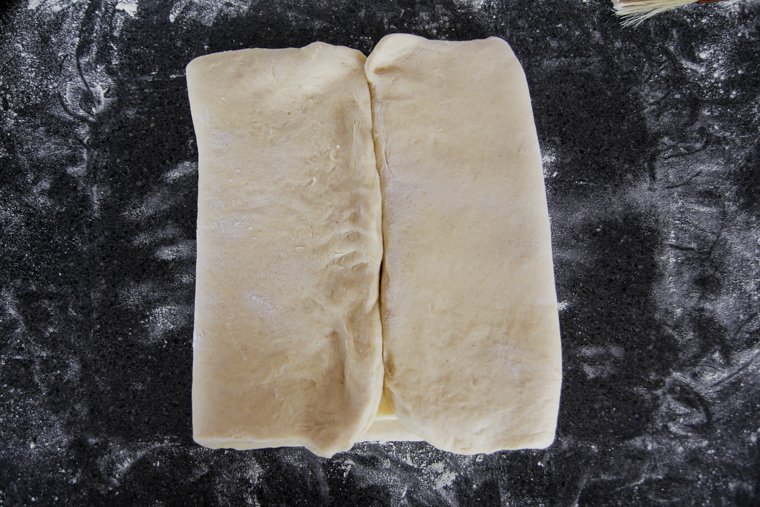
Now for the first fold or “book fold.” You’re going to fold each short end to meet in the middle. It’s totally okay if the dough meets somewhere other than the middle too.
Brush away any loose flour again.
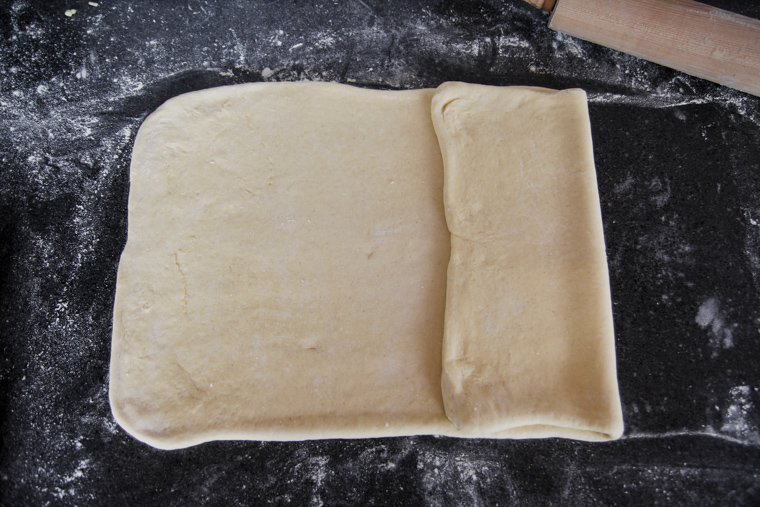
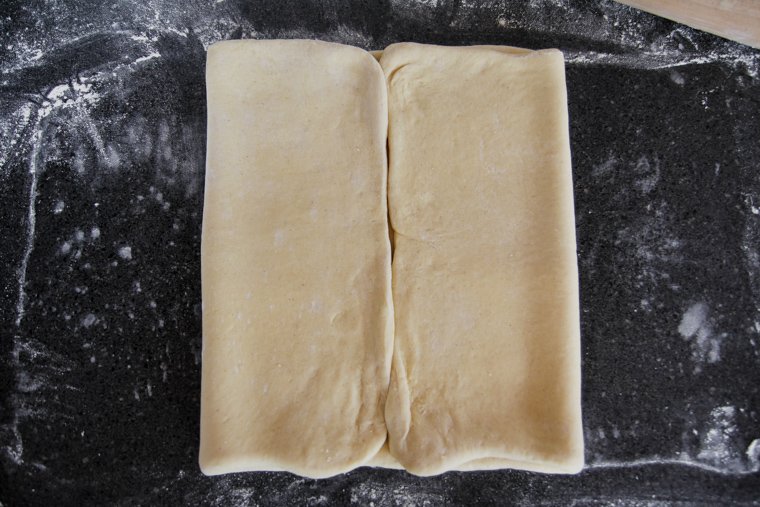
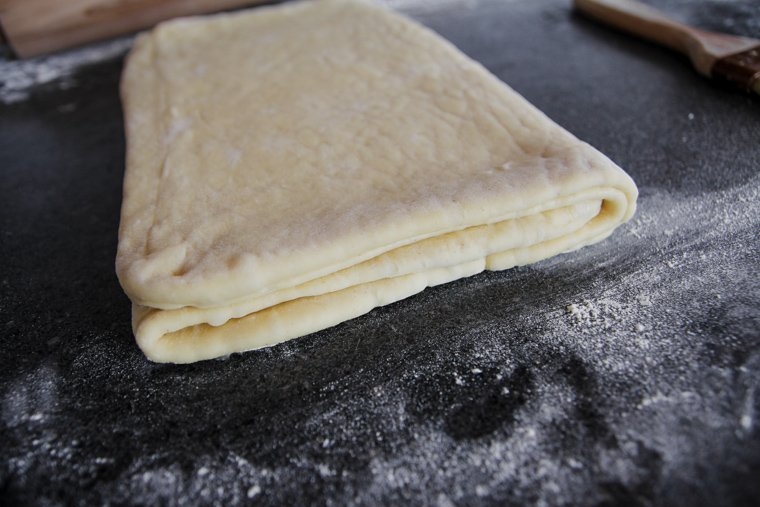
Then you’re going to close your new folded ends together like you’re closing a book.
Here is a side view after this first book fold:
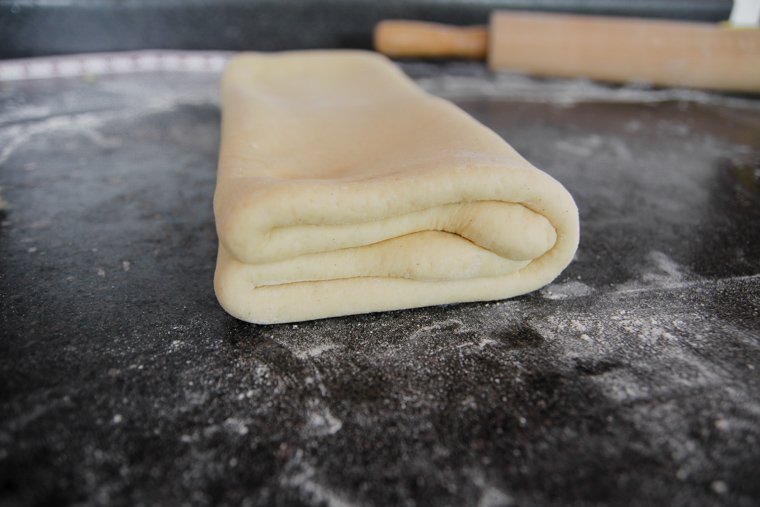
Wrap the “book” in plastic wrap and chill for 20 minutes in the refrigerator. This will keep the sourdough danish dough and butter from softening too much.
The time will also allow the dough to relax so it won’t bounce back when you roll it again.
Step 5 – Second Lamination Fold (Tri-Fold or Letter Fold)
For the second fold, we are going to roll the dough again and fold it in thirds like a letter.
Take the plastic off your dough “book” and lay it on the counter so the fold is facing you. Roll it to a 20 x 12-inch rectangle again. Brush away loose flour.
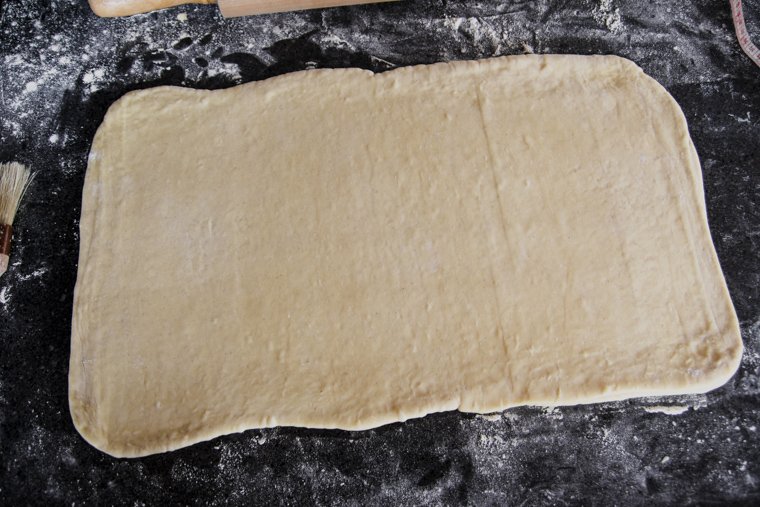
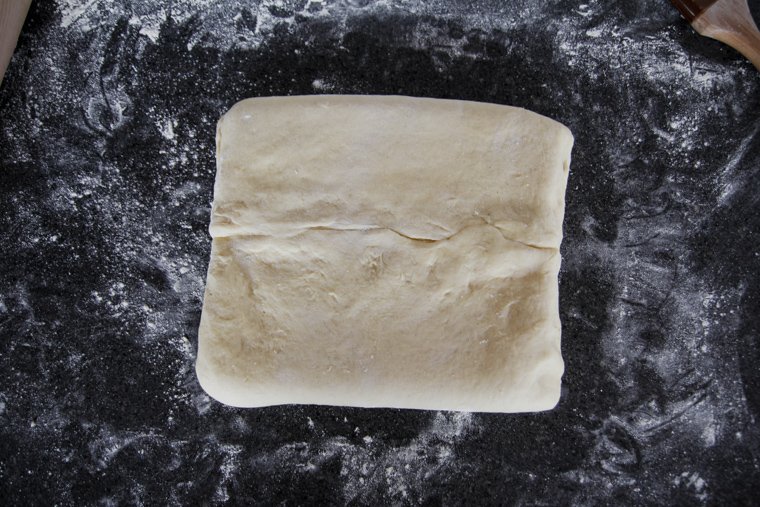
Now fold the sourdough Danish dough in thirds like you’re folding a letter.
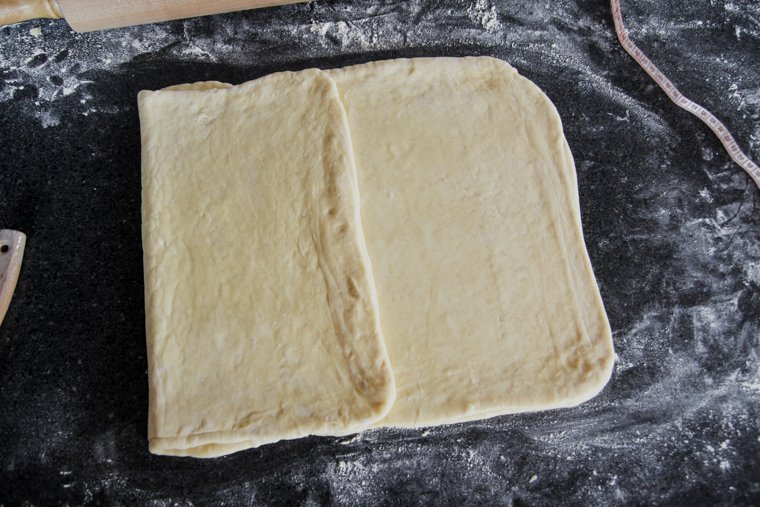
Here is the side view after the letter fold.
Your dough is now laminated. Wrap it in plastic again and refrigerate for 1 hour or overnight.
Step 6 – Cutting, Shaping, and Proofing Sourdough Danishes
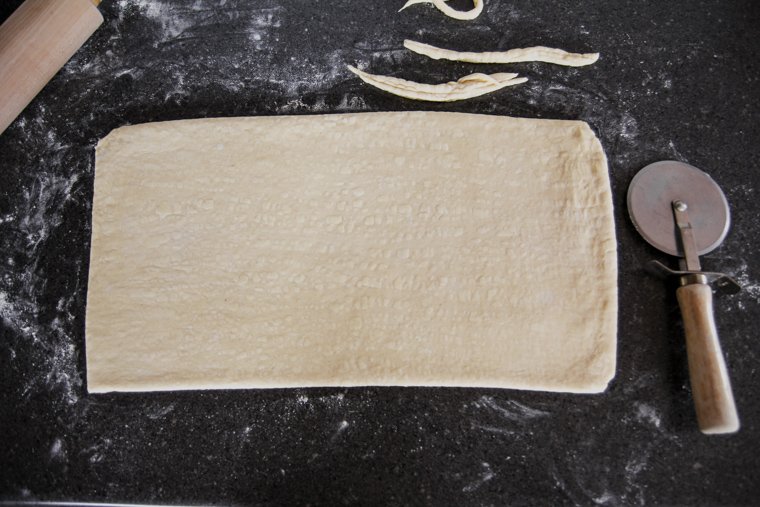
Slice your laminated dough in two equal halves and set one half aside.
Roll the first half into a 16 x 8-inch rectangle. Use a pizza cutter to trim the ends (this will expose the layers so the Danishes rise properly during baking).
Cut the rectangle into eight squares.
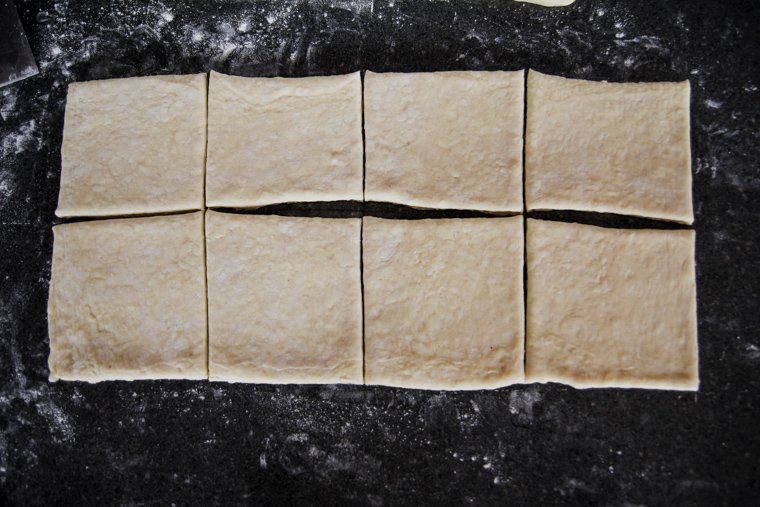
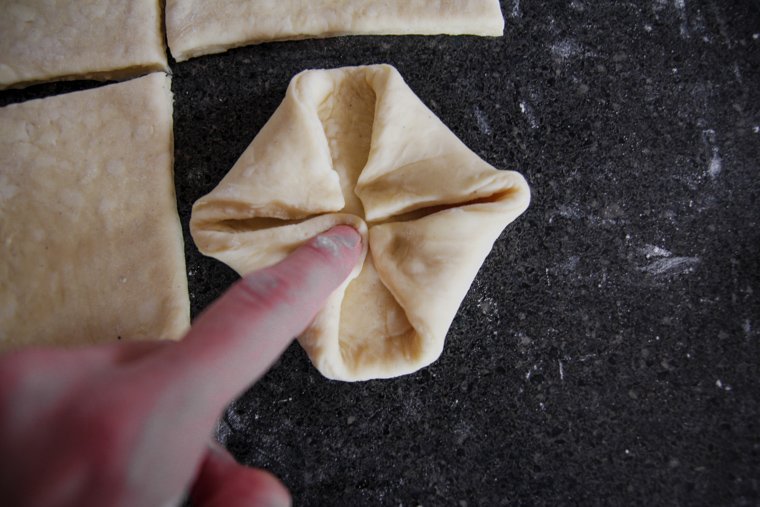
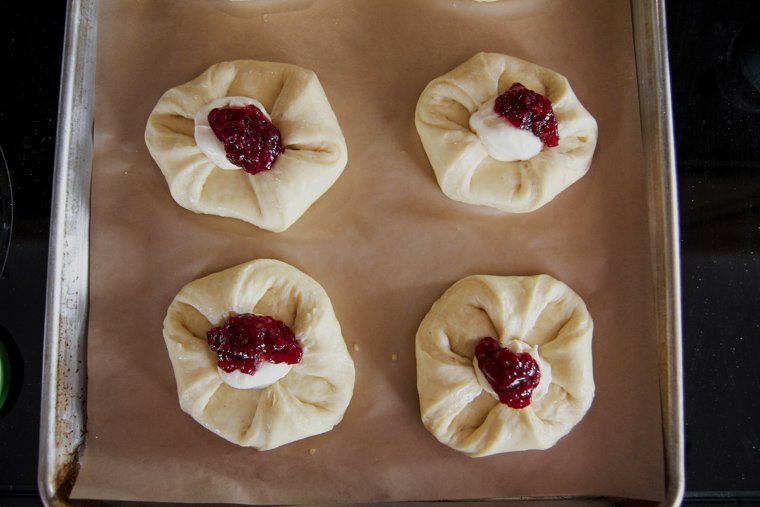
To shape your Danishes, brush a dot of egg wash in the center of each square. Fold each of the four corners to the middle and press them down to seal.
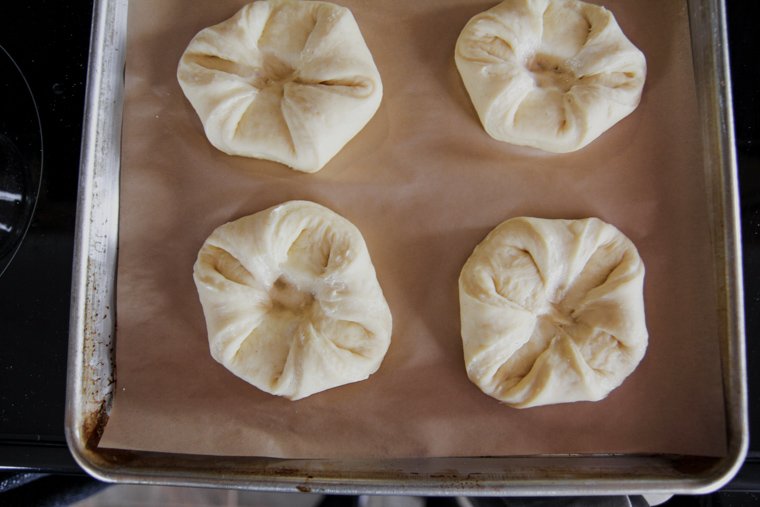
Roll, cut, and shape the second half of your dough in the same manner or freeze it for another time.
Place Danishes on parchment-lined half sheet pans, no more than 6 to each pan.
Cover the pastries loosely with plastic wrap and proof them at room temperature until they look puffy. This could take 1-2 hours or more.
If you do want to bake all 16 sourdough Danishes but don’t have enough pans or oven space to bake all of them at once, you can refrigerate shaped pastries wrapped in plastic wrap until you are ready to proof and bake them.
Preheat your oven to 425°F, and make your egg wash and cheese filling (or whatever toppings you want to use) while you’re waiting for them to proof.
For the egg wash, simply beat together the egg and milk in a small bowl. Set it aside.
In a medium-sized bowl, beat your softened cream cheese until it’s smooth. Then beat in the remaining cheese filling ingredients until smooth again. Set your cheese filling aside.
Step 7 – Filling Sourdough Danish Pastries
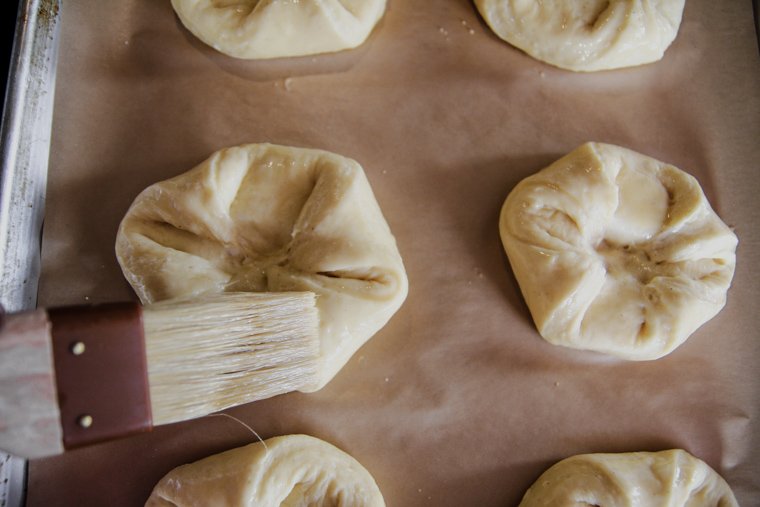
After proofing your Danishes, wet your fingers and press the corners of the pastries down into the center again to make room for the filling. Don’t disturb the edges of the pastries.
Brush the top of each one with the egg wash, but use a light hand so you don’t deflate the dough.
Drop about a tablespoon of cheese filling onto the center of each pastry. Then drop on about half as much fruit preserves.
(If you use preserves in addition to the cheese filling like I do here, you may not use the entire amount of cheese filling that the recipe makes.)
This is the point where you would add an optional streusel topping or nuts.
Step 8 – Baking Sourdough Danishes
Bake one pan at a time on the center rack in a 425°F oven for 12-15 minutes, or until the pastries are golden brown.
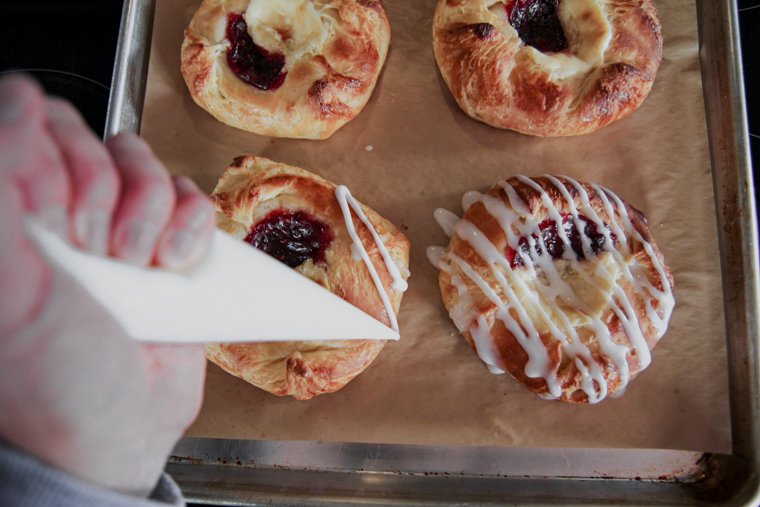
Step 9 – Glaze Sourdough Danish Pastries
For the glaze, whisk the powdered sugar and milk together in a small bowl.
Pipe the glaze on your Danishes using a piping bag or zipper bag with the very tip cut off, or you can simply drizzle the glaze on with a fork. The Danishes can be warm when you glaze them.
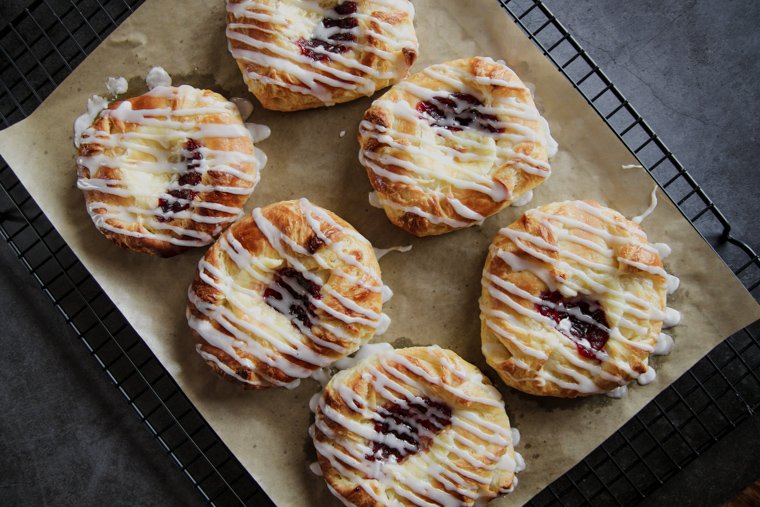
Can you believe it? After a long process, you have a beautiful final result and maybe even some new baking skills in your repertoire.

How to Store Sourdough Danish Pastries
My favorite way to store these homemade pastries is in the freezer in a zipper freezer bag. Freeze them right after they cool completely. They reheat tasting almost the same as when they go in the freezer.
I just place one sourdough Danish on a plate and microwave for 20-30 seconds to warm it back up for breakfast.
I’m so grateful for your comments, reviews, and questions! Your star ratings help others discover my recipes, and your feedback helps me make improvements. Thank you for your support!
Sourdough Danish Pastries
These sourdough Danish pastries are naturally leavened with a long ferment. No stand mixer required! They are flavorful (but not sour), tender, and flaky with a cheese and fruit filling and a beautiful glaze to finish them off. After you get the hang of the recipe, you can experiment with alternate shapings and toppings.
Ingredients
Sourdough Danish Dough
- 1 cup (196g) active sourdough starter (100% hydration)
- 1/3 cup (70g) sugar
- 1 1/4 teaspoon (8g) kosher salt
- 1/2 teaspoon ground cardamom (optional)
- 1/4 cup (57g) unsalted butter, melted
- 1 egg + 2 egg yolks
- 3/4 cup (184g) whole milk
- 1/2 teaspoon pure vanilla extract
- 4 1/3 cups (540g) unbleached all-purpose flour
Butter Block
- 1 cup (227g) unsalted butter, cold (European-style at 82% fat is preferable)
- 1 tablespoon (8g) unbleached all-purpose flour
Egg Wash
- 1 egg
- 1 tablespoon (15g) milk
Cheese Danish Filling for 16 Pastries
- 8 ounces cream cheese, softened
- 1/2 cup (50g) powdered sugar
- 1 egg yolk
- Pinch of salt
- 1/2 teaspoon pure vanilla extract
Glaze for 16 Pastries
- 1 1/4 cup (125g) powdered sugar
- 2 tablespoons (31g) milk
Instructions
Day 1
Feed starter several hours prior to making dough and allow it to peak.
Sourdough Danish Dough:
1. Combine sourdough starter, sugar, salt, cardamom, melted butter, egg and egg yolks, milk, and vanilla extract to a large bowl and stir to combine (weigh ingredients for the best results). Add the flour and stir until a shaggy dough forms.
2. Turn the dough out onto a clean countertop and knead for a few minutes until the dough smooths out.
3. Form the dough into a ball and place in a bowl with a lid propped on the top or cover with plastic wrap. Set in a warm place to ferment for 5 hours, or until the dough has increased in size by about 1/3. Cover tightly and refrigerate for 12 hours (or up to 2 days).
Day 2
Butter Block:
1. Just before you are ready to laminate your dough on day two, make your butter block. Place the cold butter on a sheet of parchment paper and sprinkle with the flour.
2. Cover the butter loosely with the parchment and begin to beat the butter gently with your rolling pin until butter begins to flatten. (Update: I now find it easier to measure and fold the parchment before placing the butter inside.)
3. Crease the edges of your parchment paper and fold the top and bottom ends over your butter in the shape of an 8 x 7-inch rectangle (measure for accuracy).
4. Roll and press your butter to fill the rectangle evenly.
Chill for a few minutes if your butter has begun to melt on the edges. The butter should be cold but very pliable and the same consistency as the dough for the next step.
Lock in Butter Block:
1. Remove dough from refrigerator and roll it out to a 16 x 9-inch rectangle, keeping the corners as square and even as possible.
2. Place your butter block in the center of the rectangle and fold the edges of the dough over the butter so they meet in the middle of the butter block. Brush away any loose flour with a pastry brush.
3. Press the center seam together to seal it shut. Then press the top and bottom edges to seal them so the butter won't escape during rolling.
First Fold (Book Fold):
1. Rotate your dough so your center seam is horizontal to you. Roll out to a 20 x 12-inch rectangle, focusing on keeping the corners even. Using the rolling pin to pound the dough gently can help you begin to flatten it evenly before you roll.
2. Bring each of the short ends to meet in the center of the rectangle, and then fold the rectangle in half like a book. Brush away loose flour as you go.

3. Wrap your dough in plastic wrap and place in the refrigerator to chill for 20 minutes.
Second Fold (Tri-Fold or Letter Fold):
1. Remove dough from fridge and unwrap. With the fold of the "book" horizontal to you, roll the dough into another 20 x 12-inch rectangle, still making sure the corners are even.
2. Fold the dough in thirds as if your are folding a letter.
3. Wrap your dough in plastic wrap and chill for 1 hour or overnight.
Make the Pastries:
1. Unwrap dough. With the folded side horizontal to you use a knife to cut the dough in half from bottom to top. Set one half aside. Roll the other half into a 16 x 8-inch rectangle.
2. Trim the edges with a pizza cutter, then cut the dough into eight squares.
2. Brush a little egg wash in the center of one square. Fold the corners to the middle and press them down to seal.
3. Repeat with remaining squares. Arrange pastries on parchment-lined half sheet pans (no more than 6 to a pan) and cover loosely with plastic wrap.
4. Roll, cut, and shape remaining dough in the same manner (wrap shaped pastries in plastic and refrigerate until ready to proof and bake if you don't have enough baking sheets or oven space to bake more than one pan at once).
5. Leave the pastries at room temperature (preferably under 75°F) to proof until they look puffy (1-2 hours or more).
6. Meanwhile, prepare your egg wash and cheese filling. Beat egg and milk in a small bowl until well combined. Set aside. In a medium-sized bowl, beat softened cream cheese until smooth, then beat in remaining cheese filling ingredients until smooth. Set aside. (If making streusel, prepare now and chill *recipe can be found in blog post body.) Preheat oven to 425°F.
7. After proofing, wet your fingers and press down the centers of the pastries again to make room for the filling. Gently brush the surface of the pastries with egg wash.
8. Drop about a tablespoon of cheese filling into the center of each one. Then drop about half as much preserves on top of the cheese. (At this point, sprinkle on nuts or streusel if using.)
9. Bake one pan at a time on the center rack in a 425°F oven for 12-15 minutes or until golden brown.
10. To make glaze, whisk together powdered sugar and milk until smooth. Pipe glaze on pastries with a plastic piping bag or plastic zipper bag with the very tip cut off, or drizzle on with a fork.
Notes
- If your dough and butter get too soft during lamination, wrap and refrigerate for 15 minutes to chill it again. If butter is too cold and starts cracking under the surface of your dough, allow your dough to sit covered on the counter for a few minutes to warm up a bit before continuing to roll.
- Under-proofing or proofing at a high temperature can result in butter leaking from the layers during baking. It's best to proof at room temperature even if it takes longer.
- Cooled pastries store well in a single layer in a gallon-size zipper bag in the freezer. Thaw a pastry on a plate in the microwave for about 20-30 seconds or in a 475°F oven for 5 minutes or until warmed through.
Recommended Products
As an Amazon Associate and member of other affiliate programs, I earn from qualifying purchases.


Nutrition Information:
Yield: 16 Serving Size: 1Amount Per Serving: Calories: 264Total Fat: 8gSaturated Fat: 4gTrans Fat: 0gUnsaturated Fat: 3gCholesterol: 75mgSodium: 122mgCarbohydrates: 39gFiber: 2gSugar: 2gProtein: 8g
*Nutrition information is not always accurate.
Can you freeze the dough to bake later after shaping into the square design?
Hi Karsyn! You should be able to freeze the shaped pastries for up to two weeks.
Is it ok to shape them and let them sit over night vs the 1-2 hours before baking? Seems all my sourdough is taking overnight to have any significant rise. I am doing a test batch of sitting 3 hours and it’s in the oven. Looks like it’s having that butter leak problem you mentioned
Lastly, how do I get the ends to seal better to the middle when shaping? Even egg washing and pressing it’s still pulling apart
So far I love this recipe and I have not even took a bite yet. So many beautiful flaky layers. Its amazing! I always wanted to make my own bakery quality danishes at home. Thank you for allowing me and teaching me to do it!
Thank you!
Hi Chelsey! I might be misunderstanding you, but if you’re trying to proof in the oven with the light on, the pastries may be getting too warm and that’s why the butter is leaking during proofing. If you mean they are leaking during baking, you likely didn’t proof long enough. It might work to proof overnight if your house is very cool. Don’t be afraid to firmly press down the centers of the pastries if the ends won’t stay sealed. Feel free to email me through the contact form if you’re still having trouble, but thanks for your kind review!
Hello! I’m in the bulk fermentation process now. My dough was very sticky. This tends to happen when I use eggs/milk/butter. Any reason why this is happening? I used additional flour to get it to a point where it wasn’t AS sticky, but tried not to compromise the recipe too much. Hoping it turns out.
Hi Mallory! Hmm, the dough shouldn’t turn out very sticky for this recipe. It should look like the dough pictured even with the eggs, milk, and butter. I hope it turned out okay for you.
Thank you for a brilliant recipe and guide. Very helpful instructions. I used roughly 50% of the sourdough suggested, and let it rise at 25 degrees C for 9 hours before they were ready to bake. Thanks again!
Thanks for sharing your timeline and adjustments, Chris! So glad you enjoyed the recipe. 🙂
Hello! I’m in the process of the final proof but someone made a comment about the eggs and milk being in the dough would be bad to sit out as long as this recipe calls for when you first make the dough and now I’m second guessing feeding these to my kids. Is there any reason the sourdough starter makes those ingredients able to stay at room temp for longer than recommended? I’m using store bought eggs if that makes a difference. I’m hoping you can out my mind at ease because these look delicious!
Hi Jennifer, we’ve never had any issues long-fermenting dough with dairy or eggs. I think the acidic environment from the starter is what makes it a different scenario than leaving plain eggs or milk out for a long time before consuming. With that being said, please do whatever you’re most comfortable with for your family. 🙂
When laminating, after the first book fold, it says to have the fold facing you… then roll out again. Is the fold horizontal or vertical to you before you start the 2 nd roll out? These sound delicious and I want to try !!
Hello! I turn the book so the fold is horizontal to me and then roll horizontally with my countertop, if that makes sense. I hope you get to try them!
Hi! I have a batch of these in book mode in the fridge right now and I can’t wait to find up and devour them. If I decided to only make half, you mentioned freezing the rest of the dough for another time. My question is, if I did that, could I just thaw and pick up right at the shaping/proofing step or would I need to do anything differently? Or should I just plan on using the frozen dough for something different entirely?
Hi Kristina! I haven’t personally tried freezing the laminated dough yet. I imagine it should work to let it thaw in the fridge overnight then pick up with shaping/proofing after that. I’m planning to test this soon, but let me know if you try it!
Such a well written and illustrated recipe! I am truly impressed, thank you for all the time and effort you put into this. I was a bakery manager long ago, you did this recipe and process spot on. Thank you so much, can not wait to make this very soon.
Wow, thank you for your kind comment, Dave! I hope you enjoy the recipe!
I love making scones (for example with walnuts and blueberries) but haven’t found a good sourdough-only (i.e. no yeast/baking powder/soda/etc.) recipe. Have you tried this or are you aware of any such recipes?
Hi Jacob, I’m not aware of any sourdough scone recipes that don’t also contain baking powder or soda. I just don’t think starter alone can function that same way.
I have been making danish pastries for 20+ years but always with yeast dough. I would like to try this. But I also haven’t rveru proofed the final pastries. My recipe doesn’t call for it. I roll and fold and then bake immediately. Is this because the sourdough needs the proofing time? I am trying to make sure I can get these done before church on Christmas Eve. We always have them for breakfast but adding an hour proof time will be challenging. Thanks for any help!
Hi Rebecca! I think the butter would leak out of the layers if you skip proofing. You could bake them the day before and freeze them right after they have cooled completely. The next morning, warm them from frozen on a sheet pan at 375°F.
Do you think I can freeze after proofing and bake them from frozen?
Hi Melissa, I haven’t tested freezing after proofing, so I can’t say for sure. Sorry!
I discovered that there is a measurement error on the final dough rolling, it says to roll out to 16 x 18 when it is obviously 16 x 8. I ended up with extra laminations after I folded it to the correct size. This is a great recipe, thanks for sharing it. I like your precision.
Lelen, oh goodness, you are correct! Thank you for letting me know so I could fix that! Thank you for trying the recipe too. 🙂
Thank you so much. good detailed guidance, made very good danishes.
I have a question please: I can not proof pastries at room temperature because it is above 30 degree celcius here. How long do you recommend proving in the fridge? and is it right?
That is a tricky temp to make laminated pastries! Maybe you could proof a little at room temp and then chill for a couple hours before baking? I would also worry about your butter melting during lamination. I’ve seen people set bags of frozen vegetables on the dough in the fridge between folds to keep it even cooler. Let me know what you try!
Is there no need to do any stretch and folds?
Hi Caitlyn! Nope, no stretch and folds with this recipe!
I have been afraid of laminating dough for years, this step by step tutorial was awesome and walked me through it beautifully. The Danishes turned out absolutely delicious. I definitely need to work on the lamination skill as they were far from perfect, but I’ll get there. Thank you!!
Thank you so much for trying out the recipe, Aimee!
If I want to bake early, can I shape the night before and cold proof at just under say… 50F? Something cold enough to slow fermentation to a crawl, but not so low it takes forever to get the dough to room temp, for baking? I’m new to laminating and afraid it’ll take me a small eternity to get them shaped, proofed and baked before breakfast.
Hi Casey! I think that would work just fine… I often bake mine the day before for that same reason. I’d love to hear how yours turn out! 🙂
Hi!
How far ahead can a butter block be made?
Hi Tracie, you can definitely make the butter block the same day that you are starting the dough–just wrap it well and keep it in the fridge. The important thing is to let it warm up just enough that it’s pliable before you try to laminate your dough.
How long do you typically proof the pasties for I fear my starter wasn’t as active as it needed to be
Hi Angie! Proofing usually takes me around an hour–longer on a cooler day. If your dough is moving slowly, you could put your trays in a warm spot like an unheated oven with the light on.
Thank you for your detailed recipe. I have just baked both “normal” and sourdough danishes for breakfast for 65. Baked and froze then warmed up before serving. I wanted a comparison. One lot of sourdough that I left frozen until the day before (about 2 weeks in freezer) gave me the best results with very silky dough.
My question may sound silly but has anyone tried spreadable butter for danishes? Thank you.
Wow, you go, Tricia! Glad they turned out for you. 🙂
Thanks for sharing! Does it keep long?
Hi Vanessa! We always freeze our extra pastries. They stay fresh (and pretty flaky too) when we pull them out for another breakfast later on. I would probably refrigerate them with the cream cheese if I was going to keep them out longer than a day.
This looks so good! What a great way to incorporate sourdough into more bakes!
Thanks so much, Suzanne!
First time making a laminated dough, was much easier than I thought. I baked these last night and they are fabulous! My husband asked if I used Phyllo dough as they were so flakey. I will be saving this recipe. Thank you for sharing your recipe.
Oh good, Laurie! I’m so glad you both enjoyed the recipe. I agree–it really isn’t that hard to laminate dough once you get the hang of it.
I made these today and they are delicious. Your step by step directions with photos was so helpful.
I’m so glad, Jen! Thank you for taking the time to leave a comment. 🙂