This post may contain affiliate links. See my full disclosure. As an Amazon Associate, I earn from qualifying purchases.
Learn the ins and outs of milling flour at home. We’ll go over the pros and cons, using a small stone grain mill, buying and storing grain, and tips for baking with fresh flour. You may be surprised just how much flavor, variety, and nutrition freshly milled flour can bring to your home-baked goods!
My newest venture in the kitchen has been delving into the world of home milled flour.
We still use white flour for certain applications like homemade Sourdough Danishes and Sourdough Croissants.
But more and more, I’m feeding my family breads that I’ve made with these freshly ground organic grains. To my surprise, my family loves eating this bread!
You might like to take a look at my 100% Whole Wheat Soft Sourdough Sandwich Bread or my Easy Mixer Whole Wheat Sourdough Loaves.
I didn’t anticipate being so excited about the flavor and variety that these grains bring to my baking.
I had a lot of questions before I started grinding and using fresh flour at home. This post is a culmination of all that I’ve learned so far.
Hopefully I can give you the confidence to begin milling your own fresh flour at home!
After you’re finished here, visit my beginner’s guide to making and maintaining a Whole Wheat Sourdough Starter.
Is Milling Your Own Flour Healthier?
Freshly milled flour can be very beneficial for health.
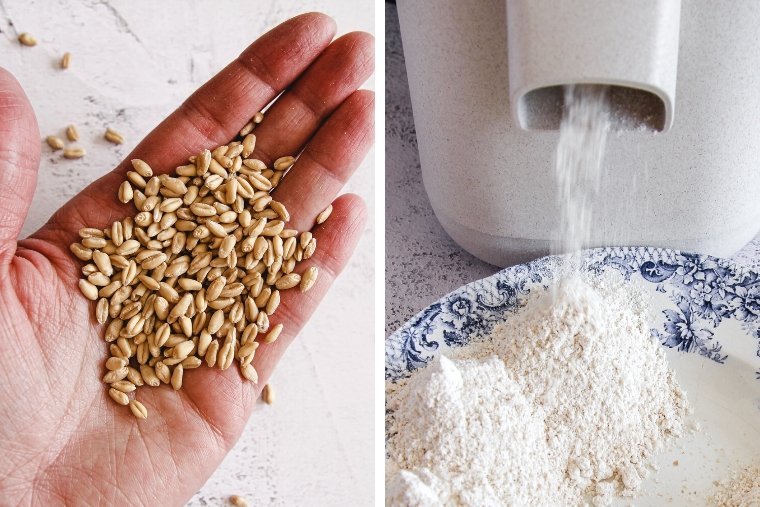
A kernel of grain is made up of three parts: the endosperm (starch), the bran (outer layer), and the germ (the part that would develop into a new plant).
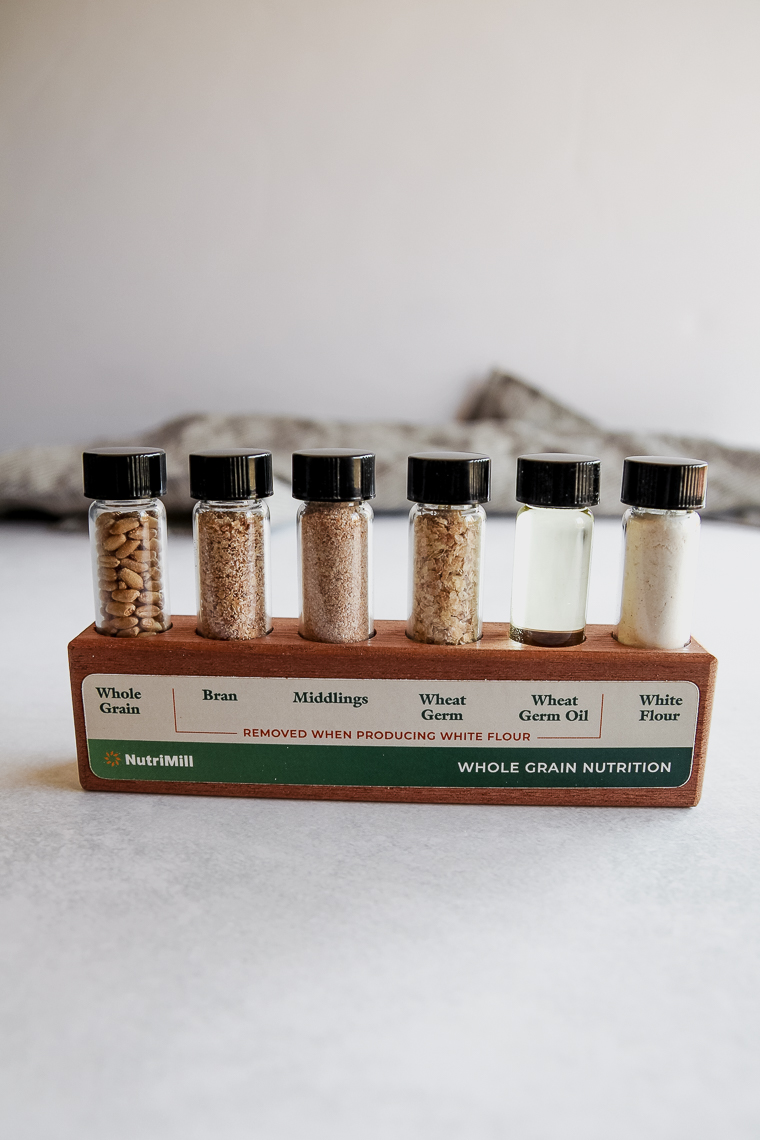
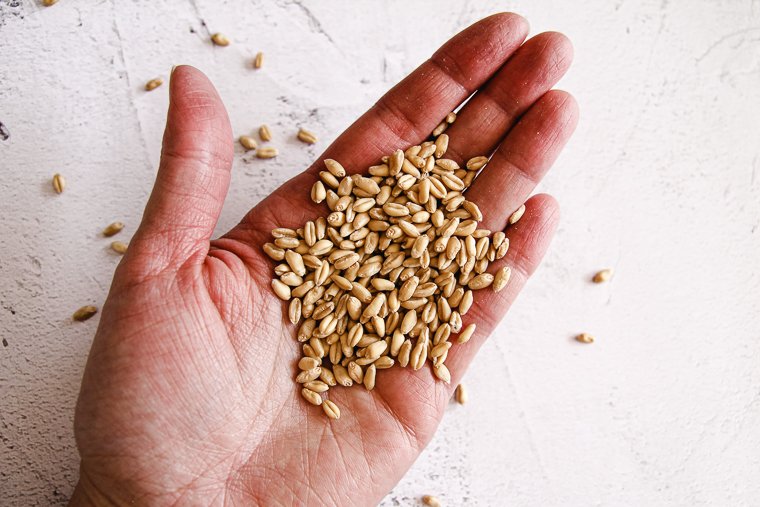
When milling at home, entire kernels (or berries) of wheat are milled into flour to use for baking.
In contrast, when refined white flour is made, the bran and germ are removed from the grain during processing.
The starchy white portion of the grain is then ground into flour (some brands may leave some portion of the bran and germ, aka “ash,” in the flour).
The white flour is often enriched to some extent, but the fiber and certain nutrients are not added back in. This is why eating whole grains is so important.
When a grain is consumed as a whole food, it’s naturally rich in fiber and nutrients to nourish the body.
You may enjoy learning more about the benefits of whole grains: Whole Grains 101
Another consideration is that some nutrition may be lost in store-bought flour as it ages and oxidizes. For that reason, it may be preferable to grind flour and use it while it is so fresh.
Is Milling Your Own Flour at Home Worth It?
Knowing that high quality wholegrain flours can be purchased these days (especially online), you’ll have to decide for yourself if it’s worth it to mill flour yourself.
If you’re already baking frequently, it may well be worth it to you. Let’s look at the pros and cons:
Cons
- It can be expensive upfront to start milling if you factor in the cost of a mill and grain (grain may not be cheap depending on where you live). You may need to purchase a mixer if you want to make soft-textured breads with the freshly milled flour.
- It takes a little extra time to mill the flour before you can bake a recipe.
- You will need space to store your mill and whatever grain you keep on hand.
- There is a learning curve to bake with fresh flour (and wholegrain flour in general). The crumb may be tighter in bread baked with fresh flour verses aged wholegrain flour from the store. That doesn’t mean the bread will have to be dry or dense, though.
Pros
For my family and me, it’s worth the small amount of extra effort to mill our flour for many reasons:
- Making our own freshly milled flour is a key to our family’s consuming a lot more wholegrain in many delicious ways.
- We can tell a difference in the flavor and smell of our baked goods when using fresh whole grains. Whole wheat flour from the store is just not the same.
- We love having a variety of our favorite organic grains to mill and use when we want. We don’t have to worry about flour going rancid, getting freezer burned, or losing flavor.
- We save money per pound when buying USA-grown organic wheat berries in bulk instead of purchasing flour of comparable quality.
- We can support local farmers or small businesses when purchasing grains.
- We like the security of having some grain stored at home.
Common Grains to Mill and Their Uses in Baking
Here are some common grains and their uses in baking:
- Hard Red Wheat (medium to high protein) – Hard red wheat is what the whole wheat flour at the grocery store is made from. Red wheat has a nutty, wheaty flavor and the right percentage of protein for baking yeasted and sourdough breads.
It comes in two sub-categories: spring wheat or winter wheat. Spring wheat has a higher protein than winter wheat, but you can use the two interchangeably in baking.
- Hard White Wheat (medium to high protein) – Similar to the hard red wheat, this variety has the protein necessary for baking yeasted or sourdough breads, but has a lighter color and a more mild flavor than the red wheat has.
- Soft Red Wheat (low protein) – Don’t use this wheat on its own for yeasted or sourdough breads. However, you can sub it for white flour at a 1:1 ratio for pancakes, waffles, biscuits, muffins, crackers, pie crust, and cookies for a softer texture than the hard wheats.
- Soft White Wheat (low protein) – suitable for the same baking projects as soft red wheat, but with a lighter color and more mild flavor. You’ll see these wheat berries for sale more commonly than the soft red wheat.
- Ancient/Heritage/Heirloom Wheats – Without going into great detail, grains like einkorn, emmer, khorasan (Kamut® is a brand of khorasan), spelt, Turkey Red, Rouge de Bordeaux, Red Fife, White Sonora, and others can be wonderful additions to your pantry at home.
Each variety has its own characteristics, flavor profile, and nutritional properties. If you learn how to handle them properly, you can use them to make delicious loaves of bread.
Spelt can also be used for the same baking projects as the soft wheats listed above if a sweet, nutty flavor and deeper color is desired. You can substitute spelt at a 1:1 ratio for those flours or all-purpose flour.
- Durum Wheat (highest protein) – Durum is suitable for pasta and certain bread and pizza recipes.
- Other Grains/Foods to Mill Into Flour – Rye, buckwheat groats, oat groats, rice, dry legumes, barley, millet, quinoa, amaranth, triticale, and food-grade (field or dent) corn* can all be ground into flour at home to use for baking.
*I’ve heard of people milling popcorn kernels into cornmeal, but you’ll want to check the instruction manual for your mill before attempting this. Popcorn should not be milled in a Mockmill.
Where to Buy Whole Grains for Milling into Flour (Plus Coupon Codes)
You may be able to secure a local source for grain so you can save money on shipping costs.
Maybe you could purchase directly from a local farmer or wholesaler that sells to the public.
You could also check a local Amish or Mennonite store or health food store (I’ve found wheat berries at Natural Grocers) to see if they offer any wheat berries or grains for grinding. I’ve heard that some health food stores offer a discount for bulk orders.
Many people find great prices buying in bulk from a co-op like Azure Standard.
I routinely purchase many affordable bulk organic foods from Azure Standard for our family. You too may have a pickup location very close to you! *please note some people have complained of grains with too much debris/chaff from Azure or lower standards in protein content. I’ve not had an issue personally.)
Use my Azure Standard affiliate link and enter the code NEW15 at checkout for 15% off your first order over $100 delivered to your drop location of choice.
Finally, some online companies are wonderful sources for organic ancient, heritage, or heirloom wheats that you can’t find locally. You might want to check out these reputable sources (some I’m affiliated with, many I am not):
- Grand Teton Ancient Grains (Where I purchase most often. Organic, regeneratively grown ancient grains and hard wheat, also bulk buckets already sealed for long-term storage; enter code ABERLEHOME at checkout for 10% off your order.)
- Barton Springs Mill (organic modern and heirloom varieties; they gifted me some samples of wheat berries to try and the quality was great.)
- Bench View Farms (organic)
- Breadtopia (organic standards, sprouted options)
- Central Milling (organic)
- Country Life Natural Foods (organic; save 10% through this affiliate link)
- 4 Generations Organic Farms (organic)
- Grains from the Plains (organic standards)
- Guardian Grains (regeneratively grown, well known for their beautiful spelt; save 15% off your order with my coupon code ABERLEHOME (coupon is not honored for grain mills)
- Janie’s Mill (organic)
- Montana Flour (organic or conventional options, KAMUT® brand grain, sustainability)
- Palouse Heritage Grains (also on Amazon) (grown sustainably without glyphosates)
- Pleasant Hill Grain (organic, offer bulk buckets already sealed with O2 absorbers for long-term storage)
Make sure you inspect any grain upon purchasing to insure that it is clean and bug-free.
Excessive debris or signs of bugs may be reason to return the grain for a refund (excessive powdery flour at the bottom of the grain bag, and holes/damage in the berries are other signs of bugs).
As soon as you procure your grain, you’ll want to store it properly.
Choosing a Grain Mill
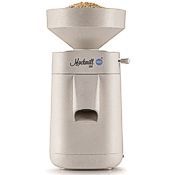
My Mockmill 200
I own a Mockmill 200 stone grain mill to grind my flour, and I am very pleased with this mill.
Though Mockmill offers different models, this particular one has the features and affordability I was after.
It has a small footprint on the countertop, is fairly quiet as far as mills go, and doesn’t blow much flour dust while milling. It has a powerful enough motor for our needs.
Since it grinds with stones, it can make very fine flour. It can also grind a coarse cereal texture (crack grains) and every texture in between.
Other Quality Grain Mills
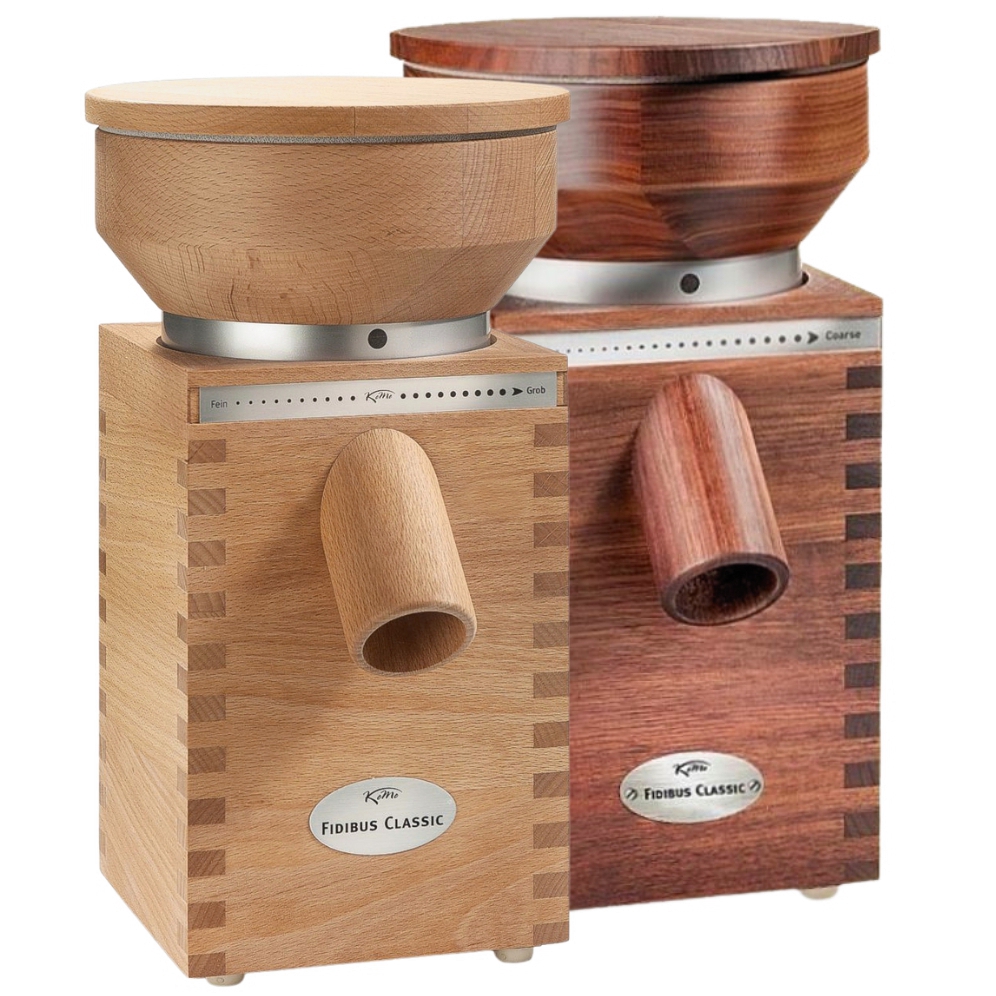
KoMo is another high quality brand of stone mill that I would highly recommend with different models to choose from.
There are also some nice manual mills on the market if you want to be able to mill in the absence of electricity.
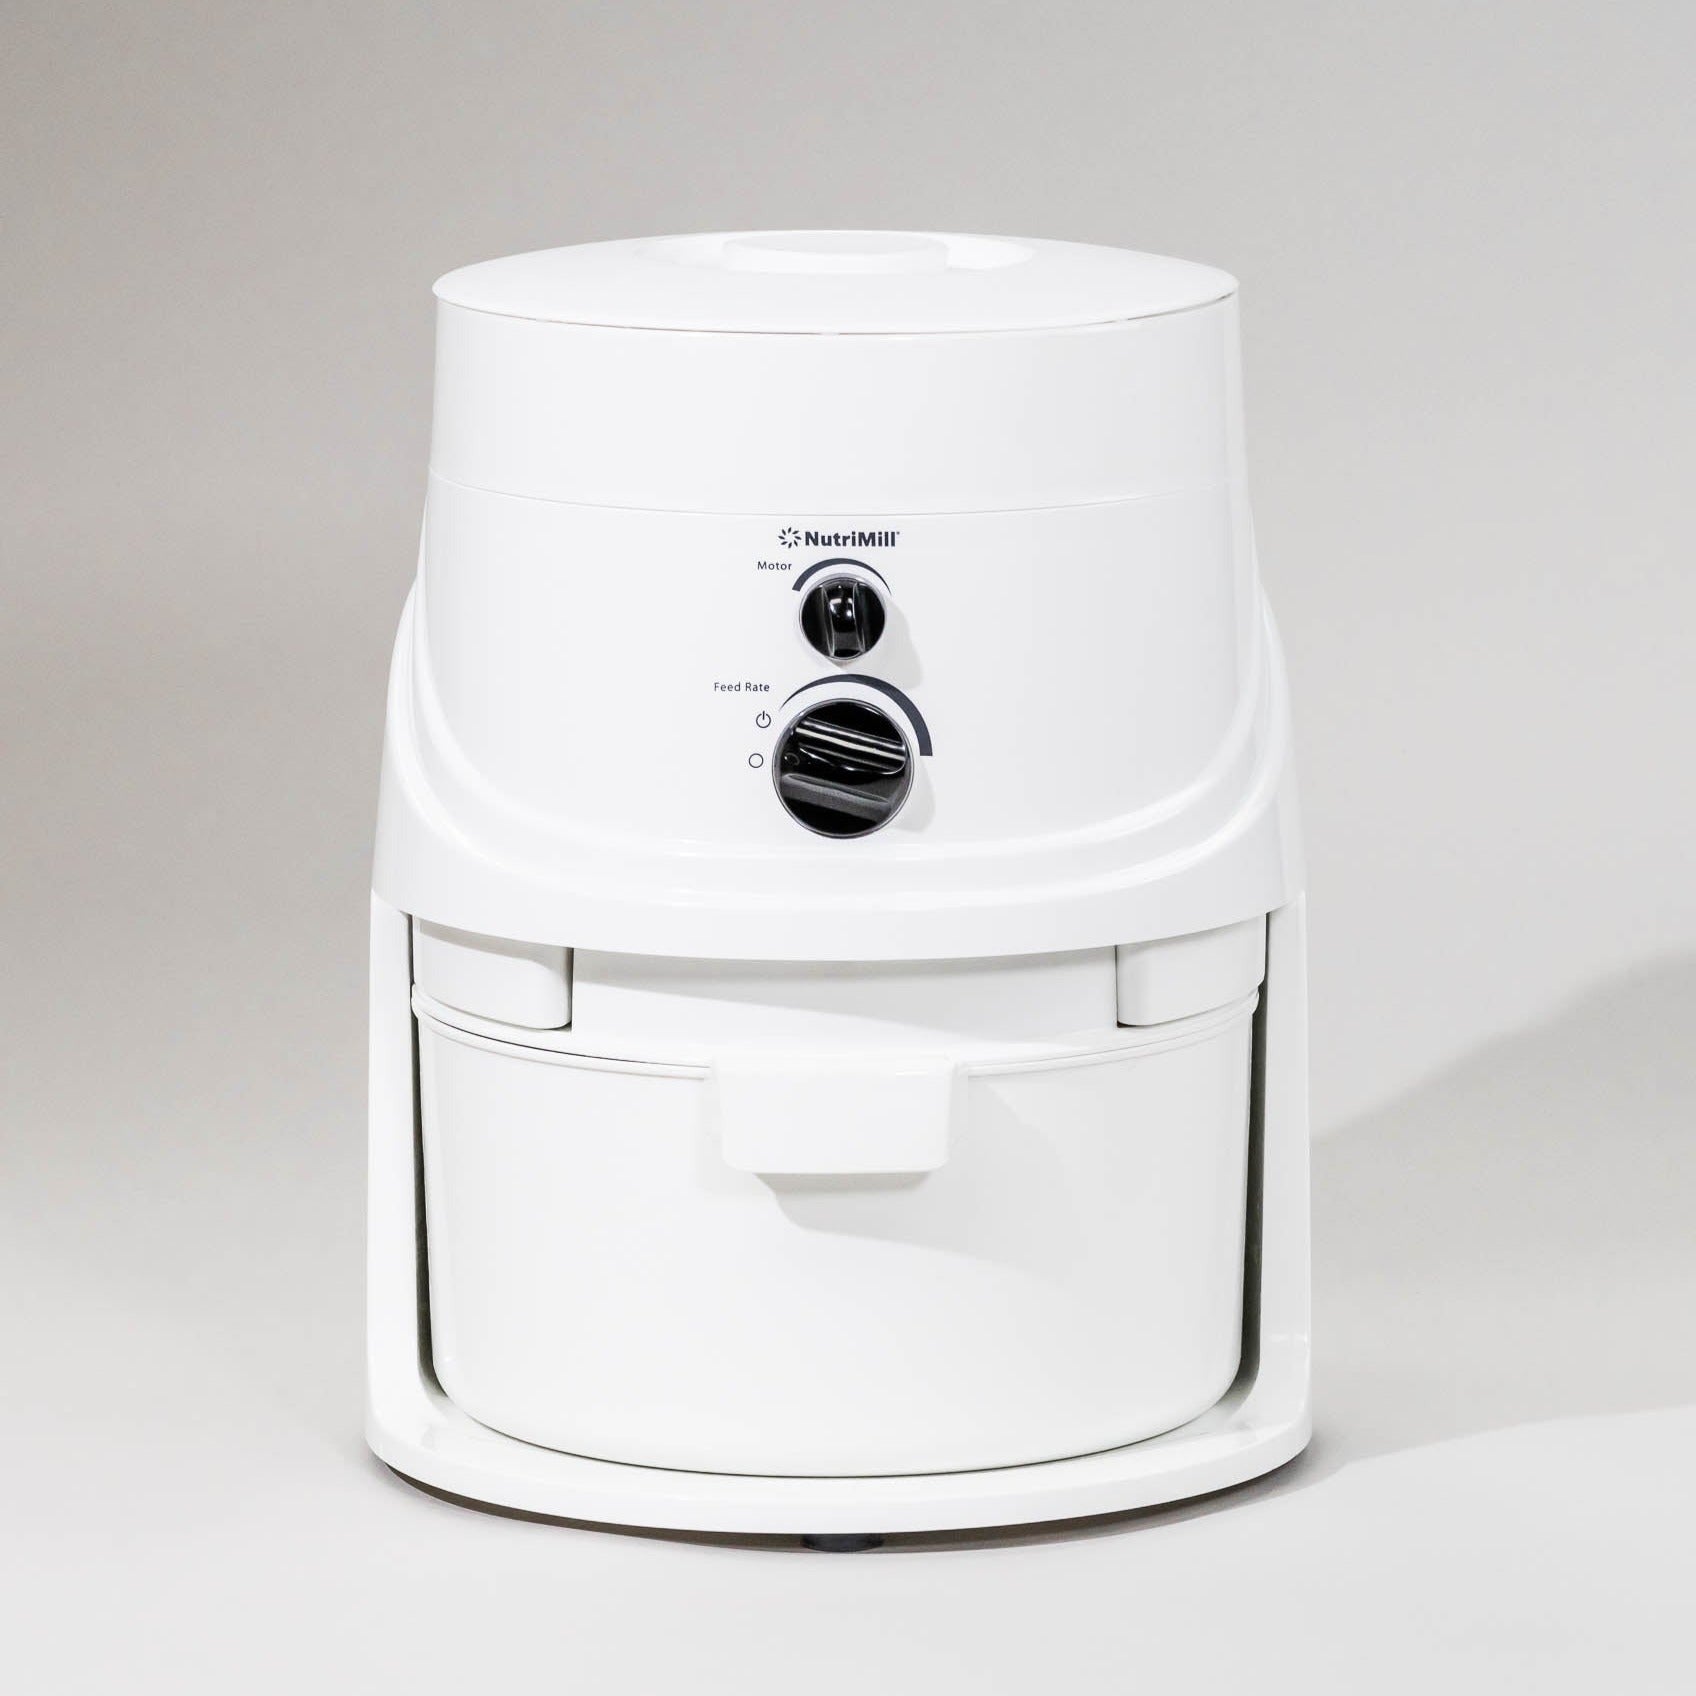
The WonderMill and Nutrimill Classic (get $20 off Nutrimill with my code aberlehome) are well-loved impact mills (with stainless steel plates) that are reliable workhorses for grinding flour. They can also grind popcorn.
Depending on your needs and desires, they may have some drawbacks in comparison to a stone mill.
Though the fineness can be adjusted between a fine flour and cornmeal texture, they aren’t able to grind a coarse “cereal” texture. They typically take up more space on the counter, blow more flour when milling, and are louder than a stone mill.
Still, they may be more budget-friendly than a stone mill and they grind a very fine flour.
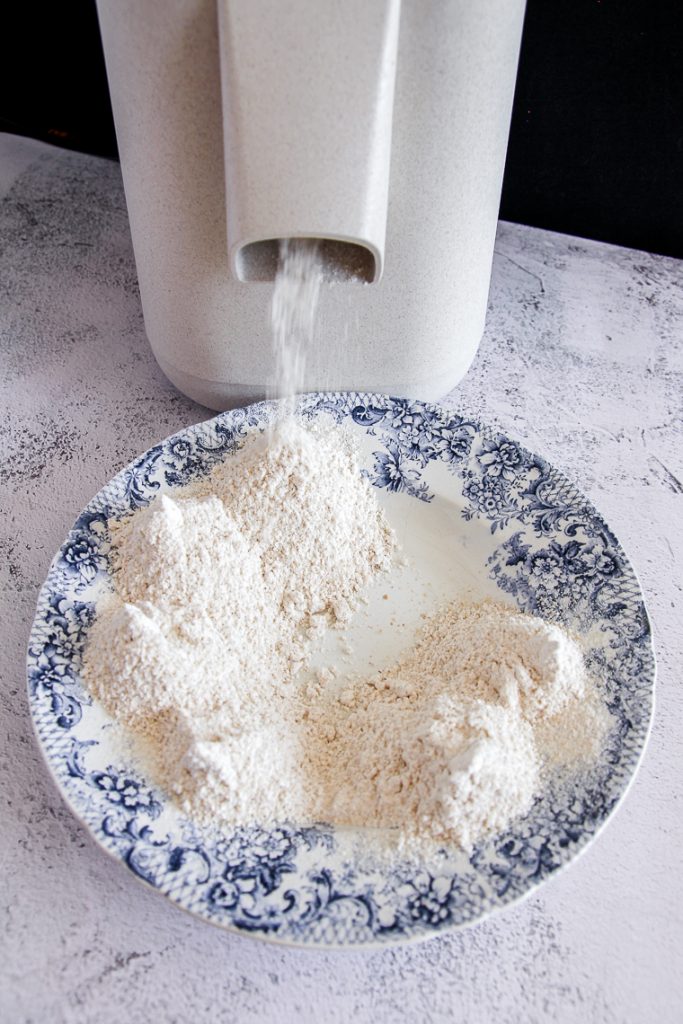
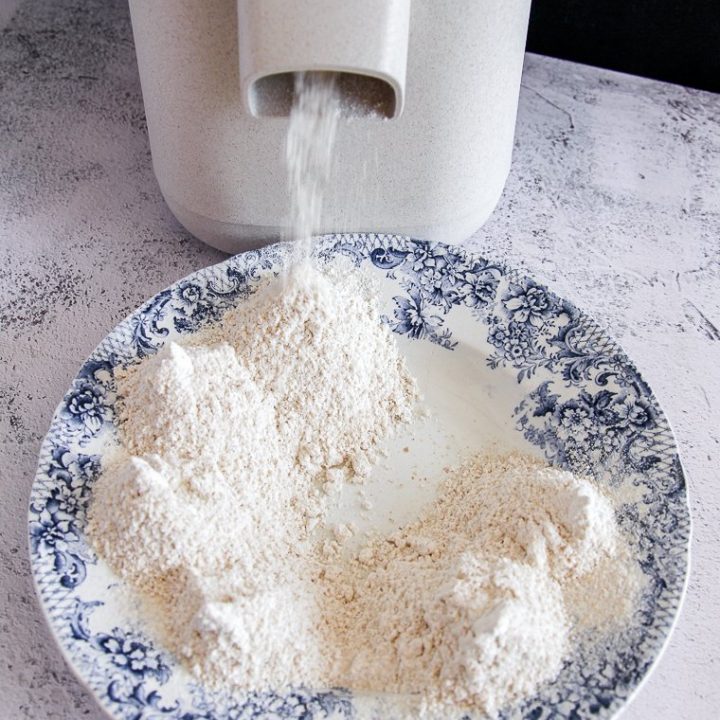
How to Grind Wheat Into Flour With a Stone Mill Grinder
You’ll want to read the instruction manual for your mill to learn what you can and cannot grind. Generally, you shouldn’t grind oily seeds, oily grains, nuts, or coffee beans since these can clog your mill.
When I’m ready to mill in my Mockmill, I start by weighing out the grain I need.
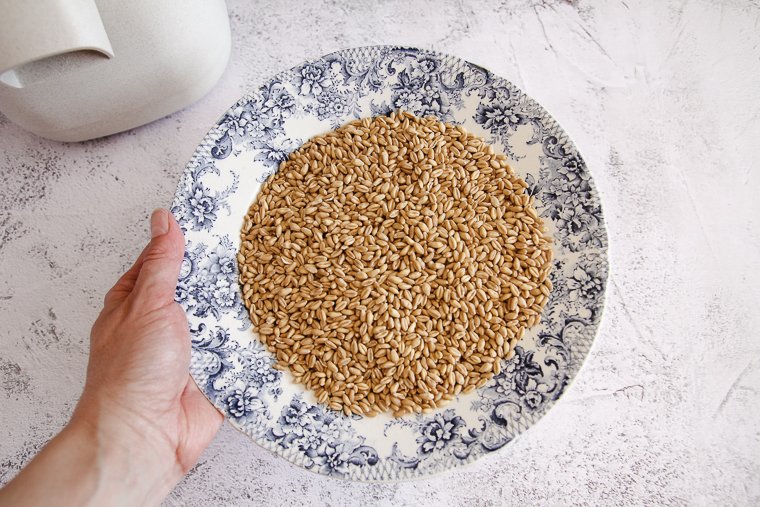
Pick through the grain prior to milling to remove any stones or debris that could damage your mill. To do this, simply pour the grain out into a single layer on a baking sheet so you can look through it quickly.
Then I turn on my mill with the switch, set the fineness with the lever on the side of the mill, and dump the berries into the hopper at the top. I hold a bowl under the shoot to catch the flour as it comes out.
I grind my flour on the finest setting (where the stones are touching) for most applications. A coarse setting can be used to “crack” grains. These can be used to make a soaker that can be added to dough or used as a topping.
Some grains can be sent through this mill twice for finer flour.
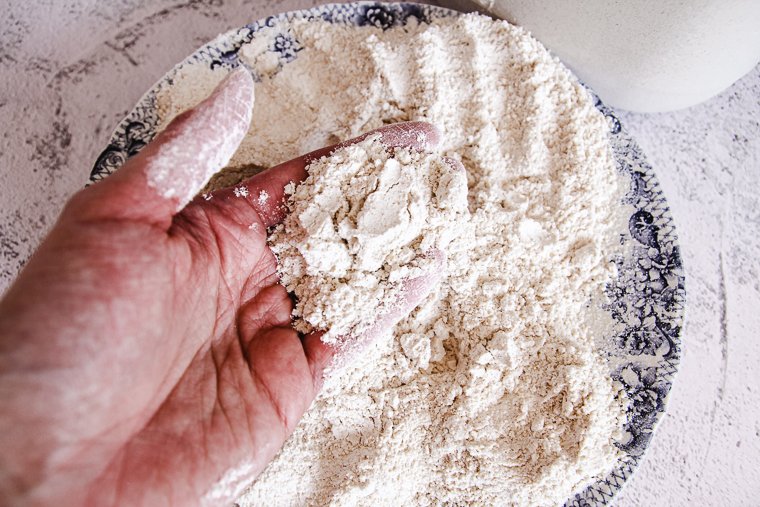
Sifting (Bolting) Home Milled Flour
For certain applications, you may wish to remove some percentage of the bran and germ in your wheat flour using a fine mesh sifting screen.
You could add the bran back to the bread later as a topping or use it in another recipe.
The higher the number on the sifting screen, the finer the screen and the more bran and germ it will remove. 40 mesh and 60 mesh are common sizes.
The more bran and germ you sift away to make the flour “whiter,” the lower the “extraction” of the flour.
Storing Whole Grains and Milled Flour
Storing and Aging Milled Flour
Since I typically mill only the amount I need to bake with, I don’t often have flour leftover to store.
If I ever do have extra, I will put it in a zipper bag in the freezer to keep it fresh until I can add it to another bake.
To use freshly milled flour to feed your sourdough starter, mill enough for a week or two at a time. Store the flour in an airtight container in the refrigerator or freezer so it’s ready for you in a pinch.
You can purposely allow flour to age for a couple weeks to increase its gluten-forming ability.
Storing Unmilled Grain
Unmilled wheat can store well for years since the outer shell is protecting the grain on the inside. Your job is to protect the grain from moisture and pests.
If you’re curious how much flour you’ll get from the wheat berries you’ll be storing, expect 1 cup of wheat berries to yield about 1-1/2 cups of milled flour.
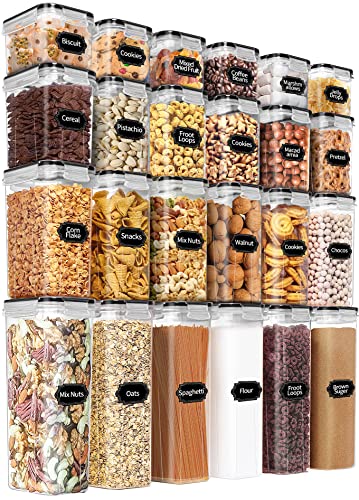
You can store small quantities of grain in your pantry or refrigerator in airtight containers for easy access. Glass jars or pantry storage containers would be ideal.
Bulk Grain Storage
If you purchase grain in bulk, you’ll want to put the grain in a food grade bucket with an airtight lid to protect it from rodents, moisture, and insects.
Store the bucket in a cool place such as a pantry, closet, or basement. Don’t store buckets in the garage if there are gasoline fumes.
When choosing buckets, consider how much grain you will be storing and what size buckets you can move around easily. You may find them locally at Home Depot, Lowe’s, or a ranch supply store like Tractor Supply.
For easy access to the grain in the bucket, you can purchase a gamma seal lid. This type of lid keeps an airtight seal, but has a screw top. If you order buckets online, you can purchase buckets that come with gamma seal lids.
25 pounds of wheat berries will fit in a 3.5 gallon bucket or will fill a 5 gallon bucket over two-thirds full (35 pounds should fill the bucket).
I will note that there is a lot of discrepancy online when it comes to grain storage.
Some people recommend freezing grain to prevent a future bug infestation. The greatest concern with freezing is dealing with moisture from condensation when the grain is brought back to room temperature. This moisture can cause mold and spoilage.
Others recommend sealing the grain in mylar bags with oxygen absorbers for long-term storage. However, there is argument that doing so could increase the risk of bacteria growing in the grain.
Do your own research to make an informed decision about your grain storage.
After my own research, I’m content storing my bulk grain in food grade buckets with airtight lids. My buckets are stacked together in a cool storage room in my home.
Tips for Baking with Fresh Milled Flour
Whether you’re using fresh flour in place of store-bought wholegrain flour in a recipe (which has been aging to some extent) or in place of white flour, there are some differences to be aware of.
If you are new to baking with freshly milled flour or whole grains in general, you might find it helpful to follow recipes that are developed specifically for wholegrain flour instead of jumping right in to converting your own white flour recipes.
Some recipes will call for 100% wholegrain flour while others use wholegrain for only a percentage of the flour.
Here is my collection of recipes with 100% home milled flour (more to come!).
Follow recipes that list ingredients in weight instead of volume for ease and consistency. I highly recommend this digital kitchen scale for its quality, but any one will do.
Weigh out your grain prior to milling to avoid making extra flour. For example, if a recipe calls for 100g whole wheat flour, you’ll weigh out 100g of wheat berries to mill.
Subbing in Fresh Flour for “Aged” Store-bought Wholegrain Flour
- You might need even slightly more water when using fresh flour in place of aged wholegrain flour from the store. And since the protein content in wheat can vary slightly from crop to crop, you may find that you need slight adjustments in hydration even when baking a recipe formulated for freshly ground flour. Use the dough as your guide.
- Fresh flour is generally a little lower in protein than aged flour. You may have to knead/stretch-and-fold the dough longer. If you’re consistenly making bread for your family, I highly recommend a high-quality mixer with a strong motor like the Bosch Universal Plus. (Get $20 off a Bosch mixer with my code aberlehome)
- When using fresh flour in a recipe that calls for cups of whole wheat flour, you may need to add about 1/4 cup extra flour per 1 cup of flour listed in the recipe. This is due to the milling process aerating the flour.
- Use the dough as your guide to know if the extra flour is necessary. For more precision, you can convert the cups of flour in the recipe to grams so you can weigh the grain prior to milling. 1 cup of whole wheat flour weighs 130 grams.
- Another consideration: friction from the milling process will heat the fresh flour to a certain extent. This may be to your advantage during a chilly time of the year. If your house is warm, you can use cold water in your bread recipe to prevent the dough from rising/fermenting too fast. Or you can mill the day before baking to allow the flour to cool to room temperature before you use it.
Replacing White All-Purpose Flour with Freshly Milled Flour
- Whole wheat flour is often “thirstier” than white flour. You may need to increase the water in the bread recipe to reach the proper dough consistency. If the dough is dry and dense, your bread will be as well. (There are a couple of exceptions: When replacing white flour with ground spelt or white wheat in a quick bread/muffin/cookie recipe, you can usually make a 1:1 substitution without altering the recipe at all. If you use einkorn flour in place of white flour, you may actually need less water in the recipe.)
- Even if you sift the germ and bran out of the fresh whole wheat flour, you will probably still need to use slightly more water when making a yeasted/sourdough bread.
- When baking with a high percentage of whole grain, some breads benefit from enriching ingredients to improve the texture of the finished bread. Possible enrichments include sunflower or soy lecithin, eggs, milk, fat (like butter or oil), vital wheat gluten, vinegar, and sugar. Cooked porridge or mashed potatoes can also be used to enrich and soften dough in certain applications. In some recipes, a portion of the flour can be “scalded” using the Tangzhong or Yundane methods to soften the bread.
- Gluten has a harder time developing in whole wheat flour (especially fresh flour). Soak the water and flour for an hour or two before other ingredients are added to help the dough along (called an “autolyse“). This time will allow the flour to fully absorb the water, helping the gluten to develop. Then you can strengthen the dough further by kneading/folding.
Conclusion
Though there are some skills to learn to begin milling your own flour at home, the process really isn’t too complicated once you get going.
Fresh flour is a wonderful next step to elevate the flavor and nutrition of your homemade bread!
How to Mill Flour at Home
Learn the ins and outs of milling flour at home with a stone grain mill. You may be surprised just how much flavor, variety, and nutrition freshly milled flour can bring to your home-baked goods!
Materials
- Clean whole grains (preferably organic)
Tools
- Pantry storage containers - glass jars or clear airtight containers work well
- Bulk storage containers - food grade buckets with gamma seal lids are ideal (25 pounds will fit in a 3.5 gallon bucket or fill a 5 gallon bucket over 2/3 full.)
- Digital kitchen scale
- Mill (I use a Mockmill 200 stone grain mill)
Instructions
- Purchase wheat berries from a trusted source (a local source would be most economical) and inspect grain to insure its cleanliness and quality.
- Store grain properly in a cool place in an airtight container to protect it from moisture and pests. A food grade bucket with a gamma lid is ideal for bulk grains.
- Weigh out the amount of grain needed for your recipe on a digital kitchen scale.*
- Pour out the grain on a baking sheet to remove any stones/chaff/debris before milling.
- Mill in an electric mill according to the manufacturer's instructions. (For a Mockmill, set a clean bowl under the spout, turn on the mill, use the lever to set the mill to the finest setting with the lever (stones touching), and pour the grain in the hopper.)
- Use the flour in a recipe, bearing in mind that the warm flour may speed rise/fermentation times.
Notes
*I recommend using recipes that list ingredients in gram weights for ease and accuracy. The berries will weigh the same as the flour called for in the recipe and can be weighed out prior to milling.
Recommended Products
As an Amazon Associate and member of other affiliate programs, I earn from qualifying purchases.
-
 Classic Grain Mill (Use code ABERLEHOME for $20 off)
 -
KoMo Classic
-
Mockmill 200
-
Bakers Math Kitchen Scale - KD8000
-
PRAKI Airtight Food Storage Containers Set with Lids - 24 PCS, BPA Free Kitchen and Pantry Organization, Plastic Leak-proof Canisters for Cereal Flour & Sugar - Labels & Marker
-
House Naturals 3.5 Gallon Food Grade Bucket Pail with Gamma Screw on Lid (Pack of 3) BPA Free containers -Made in USA
-
House Naturals 5 Gallon Plastic Bucket Pail Food Grade BPA Free with Blue Gamma Screw on Lid( Pack of 3) Made in USA


What kind of grains are best for bread making. I make my own now but it is with ordinary enriched white flour from the store. I would like to get away from using this.
Hello,
Thank you so much for the detailed information. I have just started to research this and came across your site, very helpful!!! I have a question about the mixer, I clicked the link and it took me to a mixer. Do I have to have a special type of mixer? I have a Hamilton stand mixer that I use now for bread and baking, wouldn’t that work?
Hi Teresa! No, you don’t have to have a special type of mixer. Any stand mixer with a dough hook attachment will work. I personally prefer the Bosch mixer because it has a powerful motor that can handle big batches without burning out.
Good shout.
Hey,
Thank you for all this info! I’ve been grinding einkorn wheat berries for a few years now with the kitchen aid grain mill attachment, but I always mix that flour with store bought flour. I want to get a nicer
Mill that will grind more fine flour so I don’t have to use store bought flour. Do you sift your flour for baking? Or are there certain recipes you’d sift flour for like maybe cookies but not sourdough loaf? Or do you not sift if you have a high quality grain mill? Thanks!
Hi Abby! It’s all up to personal preference whether a person sifts or not. I personally do not sift because I want all the bran in the flour for the nutrition and fiber. I mill a soft wheat for cookies, muffins, pie crust, etc. to help those baked goods have a lighter texture. It can be tricky baking with 100% whole grain einkorn even if it’s milled finely because einkorn doesn’t develop very stretchy gluten. I’ve seen some great recipes out there, though.
I have a VitaMix with a Whole Grain container. Have you had any experience with this? If so, any tips?
Hi, I don’t have experience with the VitaMix personally, but I’ve heard it works well with the grain container. Have fun! 🙂
Wonderful article. Thank you so much for all your time and effort put into this project. One question I do have is how high can the temperature go in the ground wheat before its detrimental? And is it better to put the grains through twice to get a fine flour and should it be cooled between grindings?
Hi Marlene, I send my grains through my Mockmill only once to get a nice fine grind (with the exception of dent corn which needs to go through twice). The manufacturer of your mill will be able to give you a better answer depending on your mill. I really don’t know much as far as temperature and nutrient degradation in the flour. I’d love to find a study about that.
I’m so thankful for that details infs. I’m so glad that, now, I feel confident.
You are inedible, God bless you.
I wonder if I can find somewhere the infs about manual mills too, I wish to buy both of them.
I checked today already on line but they don’t have any explanation how long take me to mill 100g of flour. I saw Moroccan mill, it looks good but they explain it.
If you know any think please inform me.
[email protected]
Hi Bo, I’m glad the info helped you! I’m sorry to say I don’t yet have experience with manual mills. I would try looking on YouTube to see if you can find some of those mills in action. I’m sure if you contacted customer service for the mills you are interested in, they could give you info about how long it would take to mill 100g. Blessings. 🙂
Hi Bo,
I bought the Wonder Jr Deluxe handcrank mill. I find that at 70 yrs old and in decent shape, it was a LOT of work. My husband decided to help and started doing my grinding. You almost HAVE to use 2 hands to turn the crank if you have the stones set tight enough to mill fine flour. Mike started counting the number of turns and came up with 224 turns to grind 1 cup of flour. If I remember correctly that took 20-30 minutes. …..We now have an electric grinder LOL!!
Great post! As a beginner to this, you have just saved me hours of research
Thank you
So glad the post was helpful, Mark! Thanks for reading.
Thank you. This was very helpful and useful information. My friend recently got me interested in milling my own flour and I’m trying to decide if it’s worth the investment. I’m more of a sweets baker than bread baker but more and more I’m trying to get back to the basics with the food I eat. Homemade is always better.
I’m so glad you found the post helpful, Angie! 🙂
So much useful information Leanna! Thank you!
Thank you for reading! 🙂