This post may contain affiliate links. See my full disclosure. As an Amazon Associate, I earn from qualifying purchases.
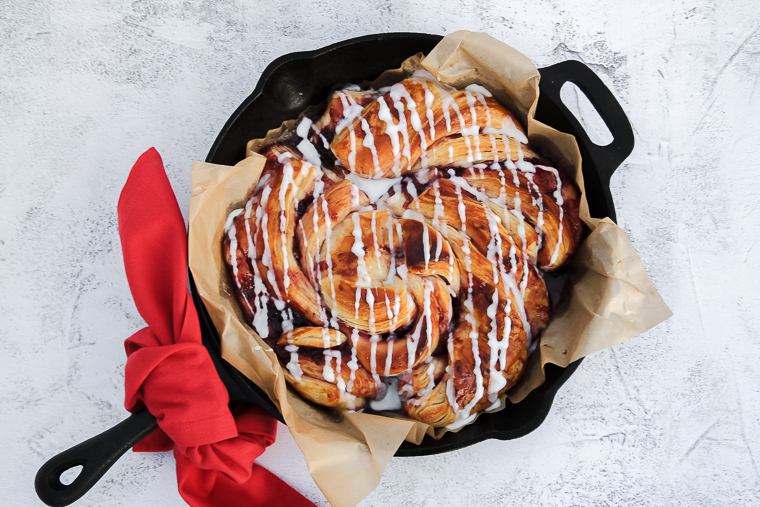
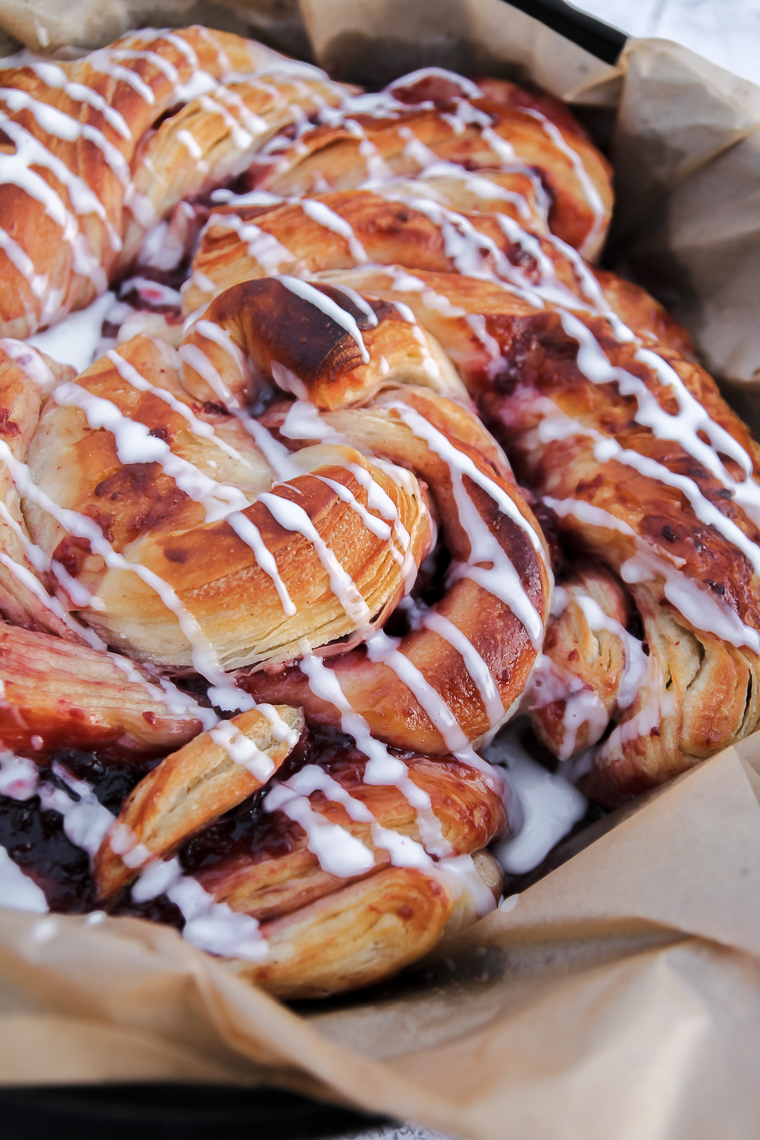
A sourdough pastry skillet with fruit preserves is twist on traditional Danish pastries. It’s a showy breakfast or brunch recipe to share!
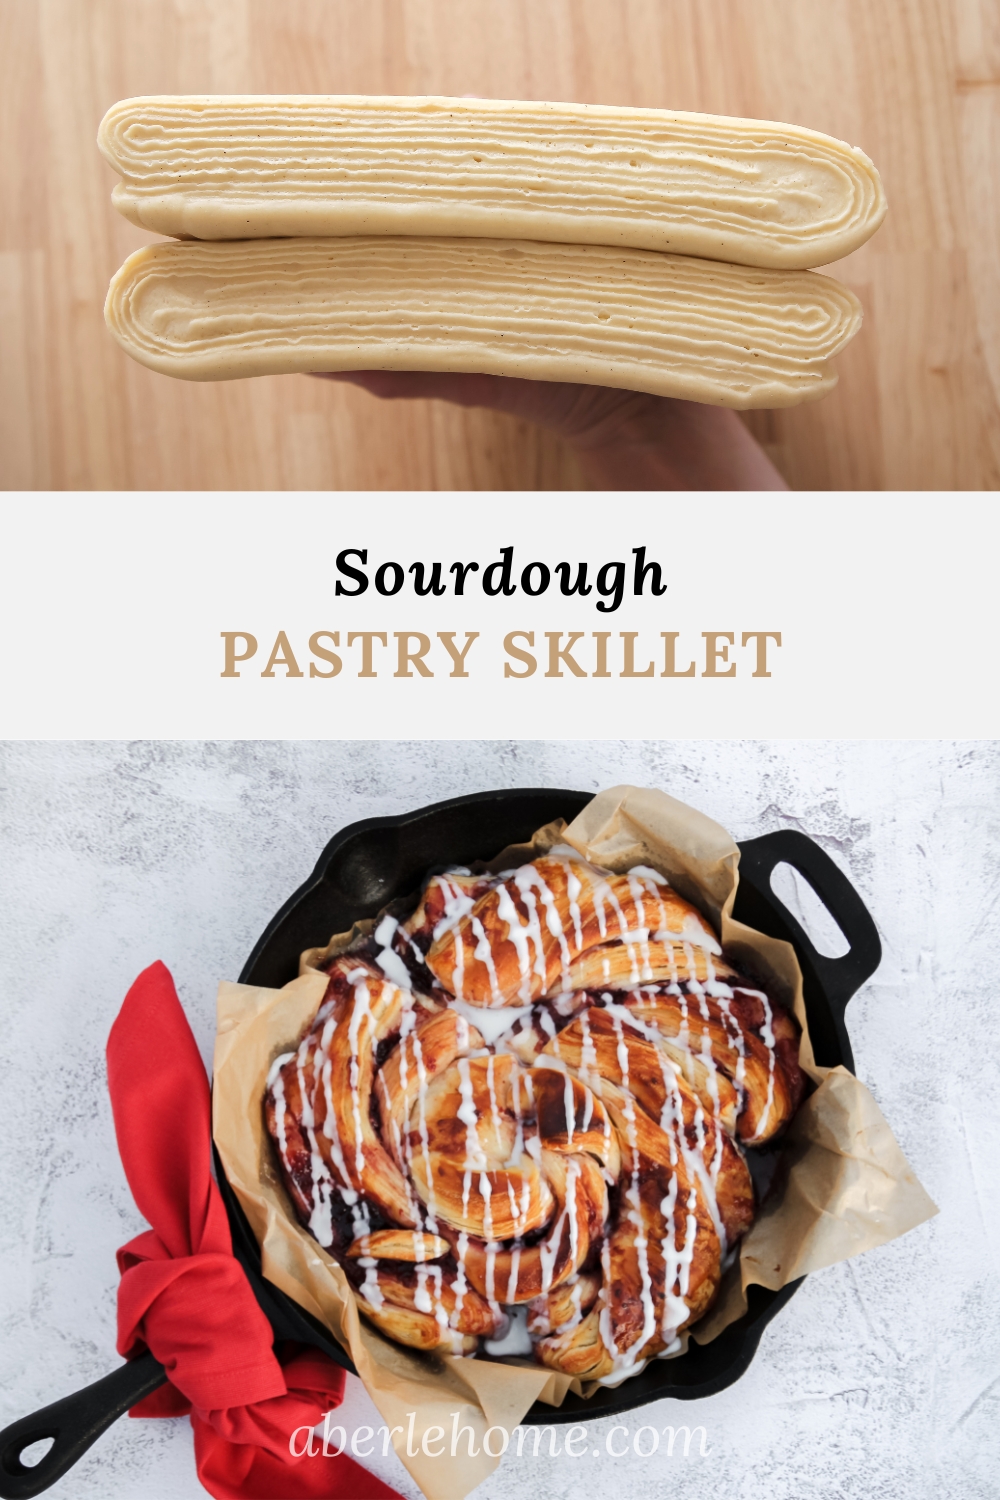
The pastry skillet starts with half of the laminated dough from my well-loved sourdough Danish recipe.
A pastry skillet is a beautiful way to form the dough as an alternative to individual sourdough pastries.
The sourdough pastry dough is enriched with sugar, butter, egg and egg yolks, and milk. Vanilla extract and ground cardamom give the pastry its iconic flavor.
The dough is fermented, and then laminated (layered with butter though a series of folds).
Laminating dough is a labor of love, but it’s really not as difficult as you may think. You’ll also be glad to know that the baking schedule is flexible and easy to manipulate!
Because the dough doesn’t require much kneading, it can be made in a mixer or by hand. Be sure to read the “Tips” section before you begin!
Why make homemade pastries using a sourdough starter?
Did you know that sourdough starter can be used to leaven any kind of sweet or savory bread dough?
Naturally leavened sourdough bread is more digestible than bread leavened with commercial yeast, and sourdough pastries are no exception.
The finished sourdough pastry dough is usually not sour (or only minimally so if a lengthy refrigeration time is used).
After you try this recipe, you may enjoy making sourdough croissants, sourdough brioche, or the softest filled sourdough donuts!
Notes About Butter Selection
Choose unsalted butter. Salted butter can pull moisture from the dough during lamination which can thwart clean layering.
A higher-quality European butter is more forgiving for laminating sourdough pastry dough. With a higher fat content, it will stay pliable at a colder temperature than a lower-quality butter would.
A butter like this would also impart additional flavor to your sourdough pastry since it’s cultured.
Sourdough Pastry Skillet Baking Schedule
*The strength of your starter, the temperature in your home, and other factors will affect how long each step will take.
Approximate timing:
- Mix: 15 minutes
- Bulk fermentation: 5+ hours
- Retard in refrigerator: 12+ hours
- Laminate dough: 1 hour
- Chill: 1 hour (or overnight)
- Shape: 25 minutes
- Proof: 4.5 hours+ (75°F)
- Bake: 45 minutes
My preferred schedule is to start the dough in the morning on Day 1, then begin laminating in the morning on day 2.
I either chill the laminated dough for one hour, then proceed to shape and proof the pastry skillet to bake the same evening, or I chill until evening so I can proof in my cool kitchen overnight to bake in the morning.
Tips for Making This Sourdough Pastry Recipe
- Insure your butter block and your dough are the same consistency so they will roll out nicely together during lamination. Your butter should be cold and firm, but still bend easily without cracking. The dough should be chilled through. If your butter is too cold, it will crack like broken ice beneath the dough. If it’s too warm, it will meld into the dough and you won’t achieve clean layers.
- Chill your dough as needed though the laminating process to keep your dough and butter from becoming too soft. If your butter becomes too cold, leave your wrapped dough on the counter for a few minutes to warm up a bit before you try to roll it out.
- If you’ve made my sourdough Danish pastries, you’ll notice that the pastry skillet takes much longer to proof. Since it’s the same dough recipe, I chock this difference to the dough being chilled in the freezer prior to cutting and twisting (for a cleaner cut with less filling leaking out). It takes a while for the pastry to warm back up to room temperature. Plus, it’s a larger mass of dough compared to an individual pastry. Proof sufficiently until the dough has doubled in size and you begin to see some separation between the laminated layers. Don’t rush the proof!
- A warm proof is beneficial, but avoid proofing warmer than 75°F to prevent the butter from melting out of the layers. I’ve made this mistake more than once by leaving my pastry to proof on my stove when the oven below was on.
- Don’t cut into the baked sourdough pastry skillet while it’s hot, or the center will seem under-done.
Recommended Equipment
- Digital kitchen scale (this one is my favorite, but any one will do)
- Parchment paper
- Measuring tape or ruler
- Rolling Pin
- Pastry brush
- 10 or 12-inch cast iron skillet or similar-size baking pan (pictured is a 12-inch skillet)
- Offset spatula for spreading filling
- Large, sharp knife
How to Make A Sourdough Pastry Skillet (Step-by-Step Instructions)
Remember, the printable sourdough pastry dough recipe can be found here. I will still go over the steps in this post to make the dough:
Step 1 (Day 1) – Make the Sourdough Pastry Dough
Though I include both volume and weight measurements in the dough recipe, I would highly recommend you weigh your ingredients.
Start by whisking together active starter with granulated sugar, kosher salt, ground cardamom, melted butter, an egg plus two egg yolks, whole milk, and vanilla extract.
Then stir in unbleached all-purpose flour until a shaggy dough forms.
Turn the dough out onto a clean countertop and knead for a few minutes until the dough becomes smooth (or use a mixer fitted with a dough hook, if you would like).
Form the dough into a ball and place into a bowl. Cover the bowl with a lid or plastic wrap and leave in a warm place until the sourdough pastry dough has grown by about 1/3 its volume (expect this to take somewhere around 5 hours). If your house is chilly, allow the dough to rise just shy of doubling instead.

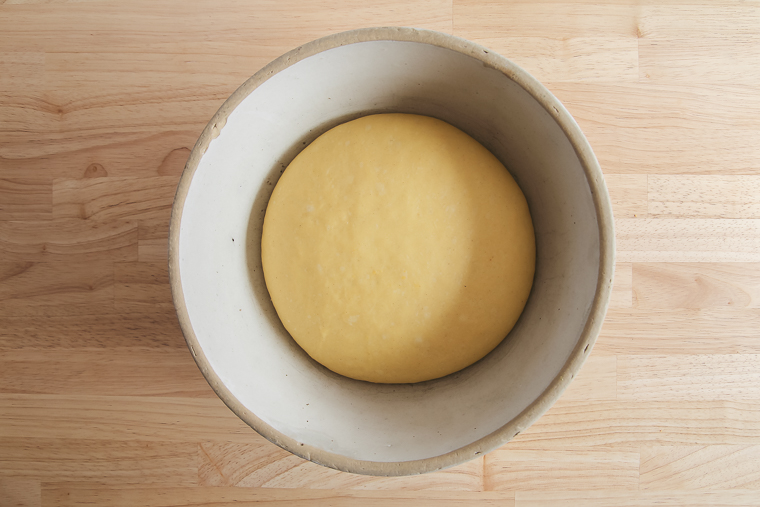
Cover the dough tightly and refrigerate for 12 hours or until the next day. It will continue to rise in the refrigerator until it cools down.
Step 2 (Day 2) – Make the Butter Block
The next day, fold a sheet of parchment paper into a rectangle measuring 8 x 7 inches. Open the parchment again and place the butter in the center.
Sprinkle the butter with one tablespoon of flour and fold the parchment paper again over the butter.
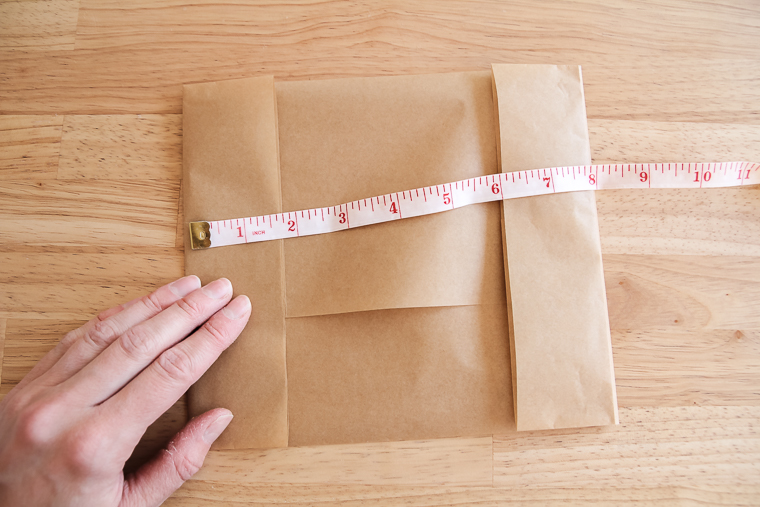
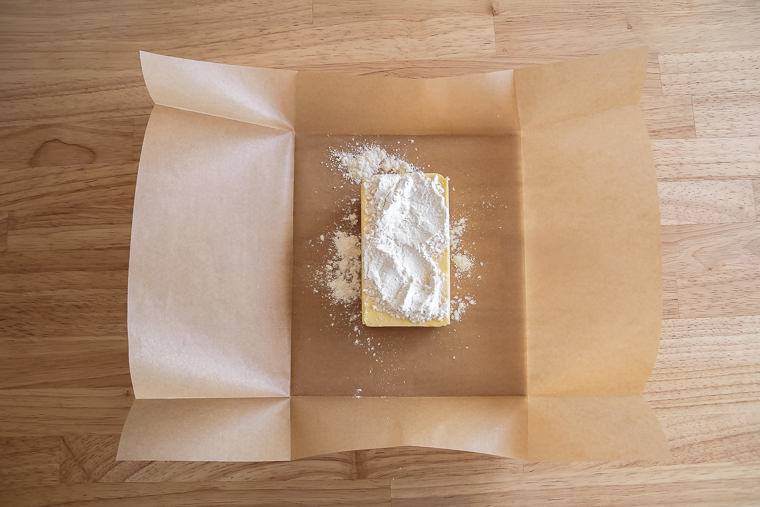
Beat the butter with a rolling pin to begin to flatten it inside the paper. Roll the butter or press it into the corners with your fingers to evenly distribute it into the parchment rectangle.
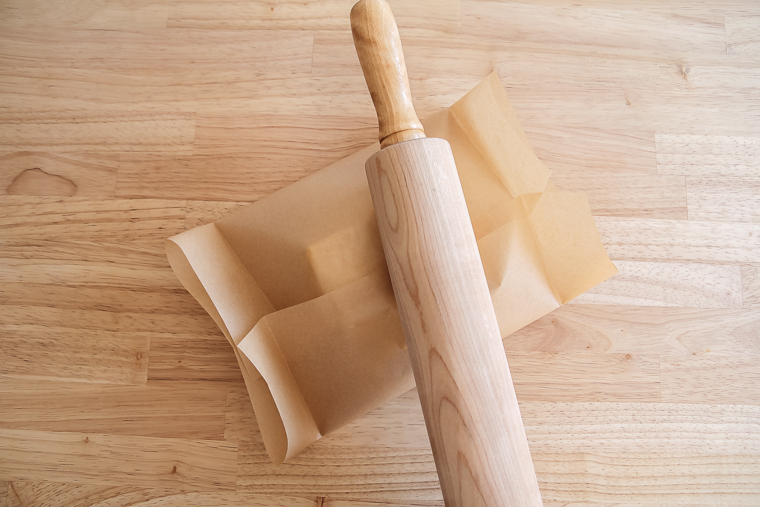
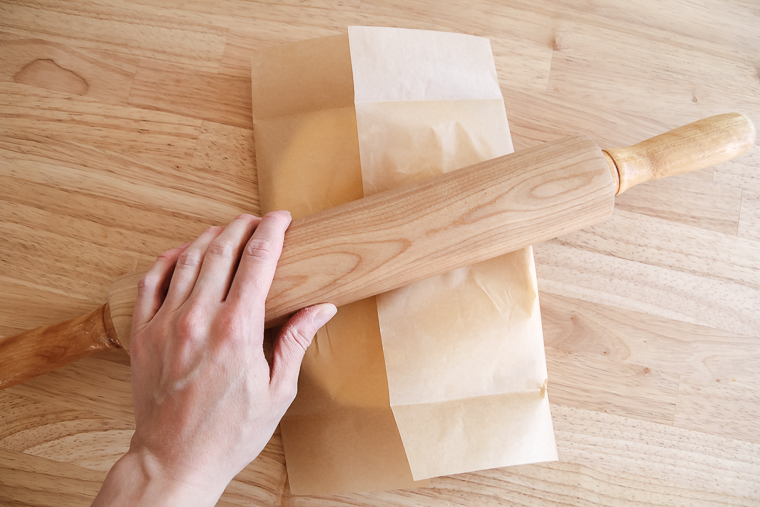


Place the wrapped butter block in the refrigerator to chill while you move on to step 3.
Step 3 – Laminate the Sourdough Pastry Dough
Lock in the Butter Block
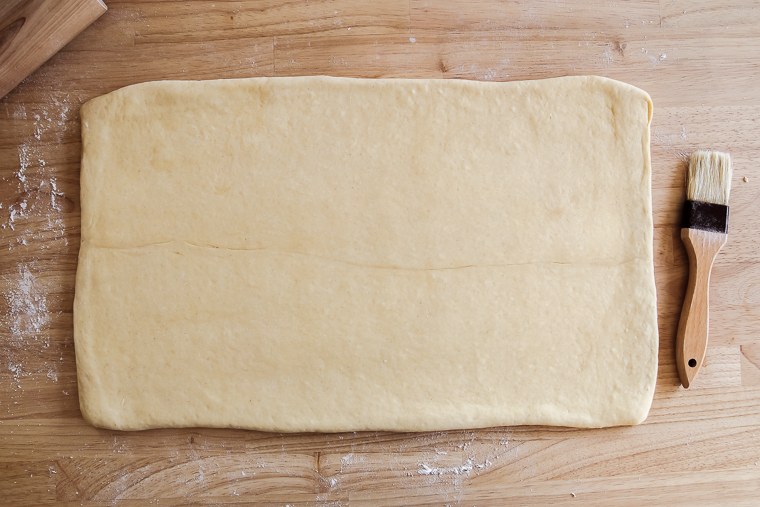
Remove your fermented dough from the refrigerator and turn it out onto a lightly-floured surface. Roll to a 16 x 9-inch rectangle, pinching the corners to keep them square as you go.
Use a pastry brush to brush away any loose flour from the top of the dough.
Unwrap the chilled butter block (butter should be cold and firm, but still pliable to match the consistency of the dough). Place the butter in the center of the dough as pictured below.

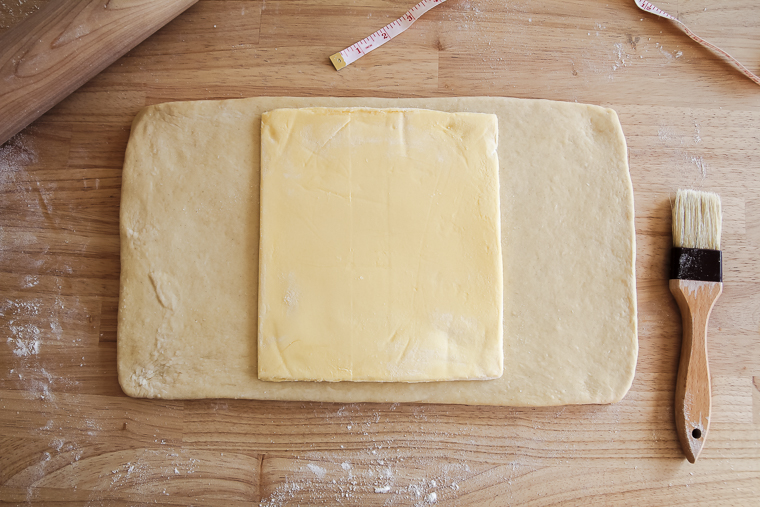
Fold each side of the sourdough pastry dough over the butter block so the ends meet in the middle.

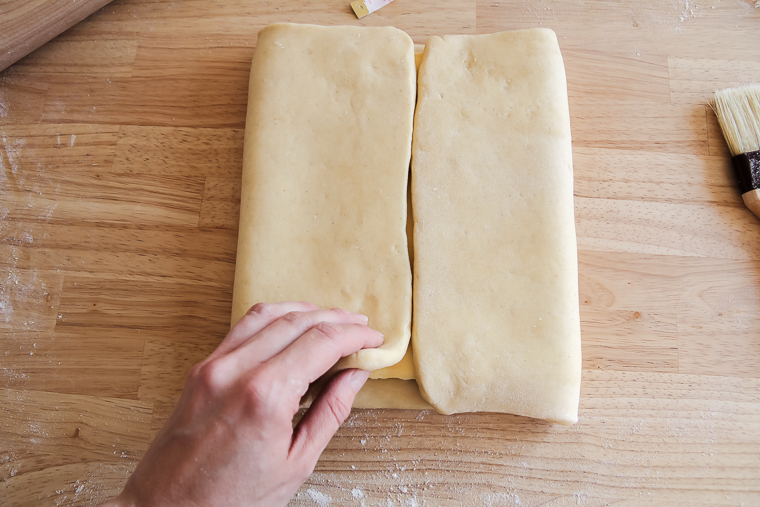
Pinch/press the edges of the dough to seal them closed around the entire butter block.
Brush away any loose flour as necessary.
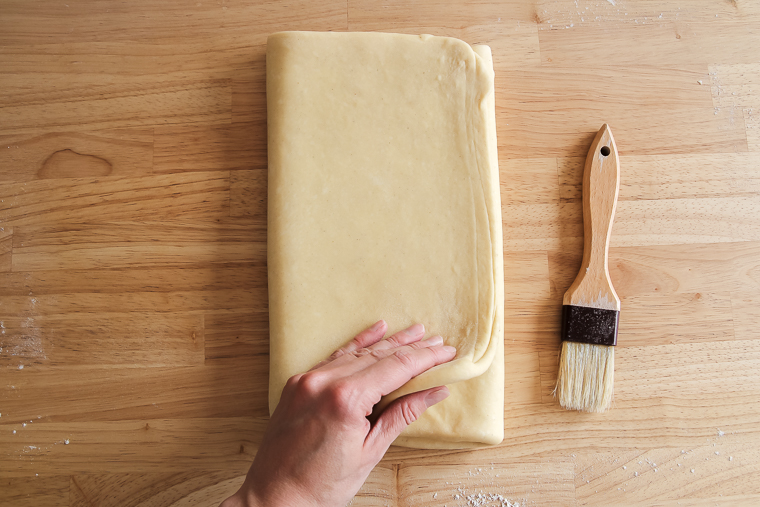
First Fold (Book Fold)
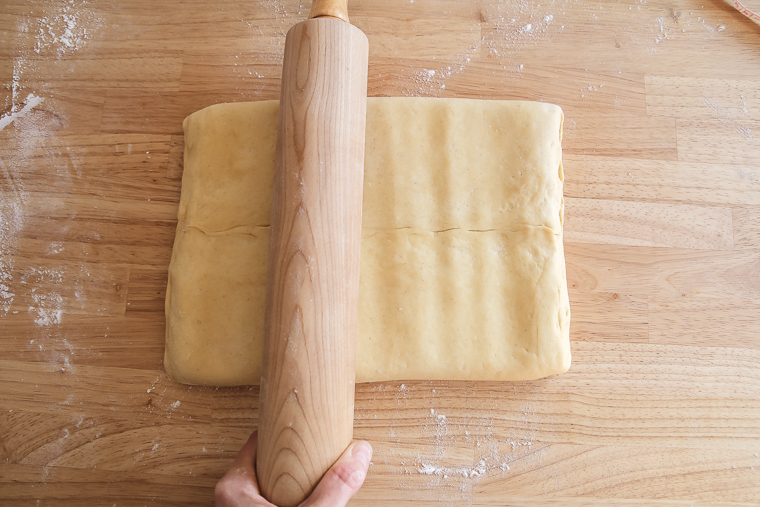
Rotate the dough so the long side is facing you. Begin to lengthen the sourdough pastry dough by pounding it with your rolling pin.
This step helps to distribute the butter evenly in the dough without developing the dough’s gluten any more than necessary while rolling (to prevent the dough from shrinking back).
Then begin to roll the dough. Use a gentle outward motion when rolling instead of pressing hard downward into the dough.
Insure the dough always has a light dusting of flour underneath so it can move freely as you roll it out, and avoid tearing any holes as you go.
Roll the dough to a 20 x 12-inch rectangle. I like to get to the correct length first, and then finish rolling the width.
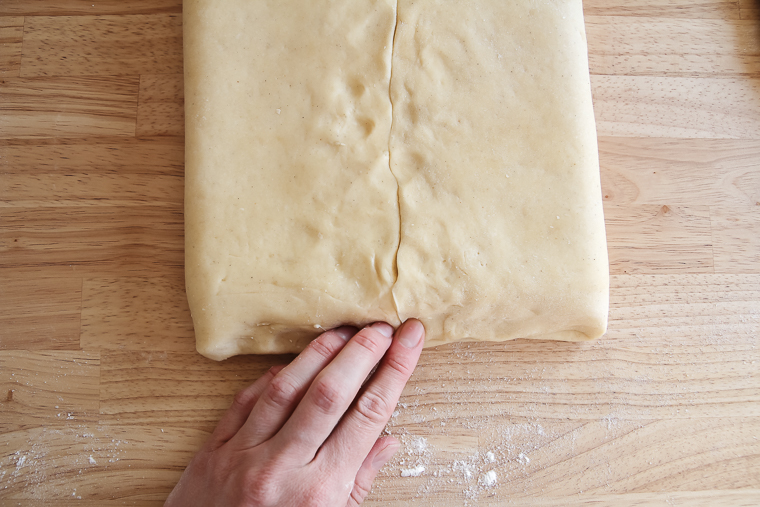
Again, brush away loose flour. Now fold each end to meet in the middle. Finally, fold the dough in half as if you are closing a book.
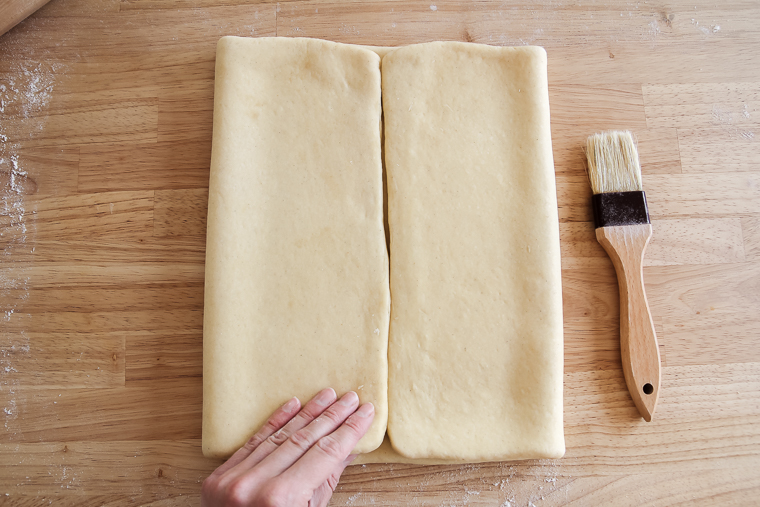
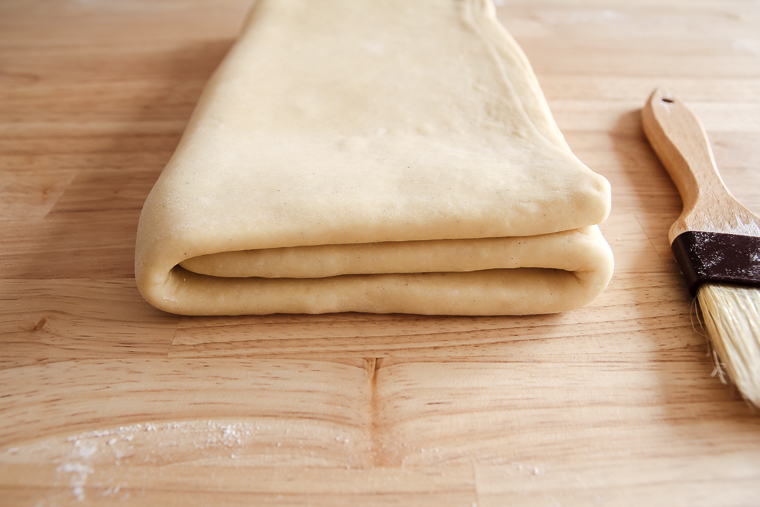
Here is the side view after the book fold:

Wrap the dough in plastic wrap and chill for 20 minutes. This will chill the dough and butter back down and allow the gluten in the dough to relax before the next and final fold.
Second Fold (Tri-Fold)
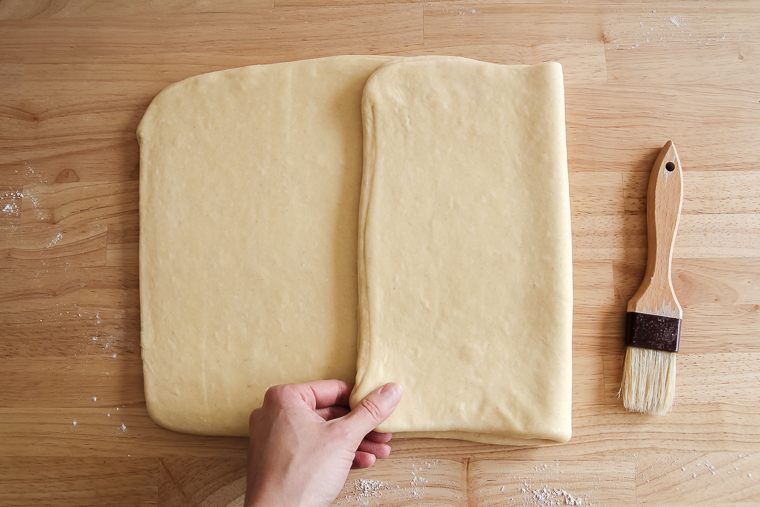
Unwrap the dough and place on the lightly floured counter with a long side facing you again.
Just like before, roll to a 20 x 12-inch rectangle, pounding the dough first, and then rolling with a gentle outward motion.
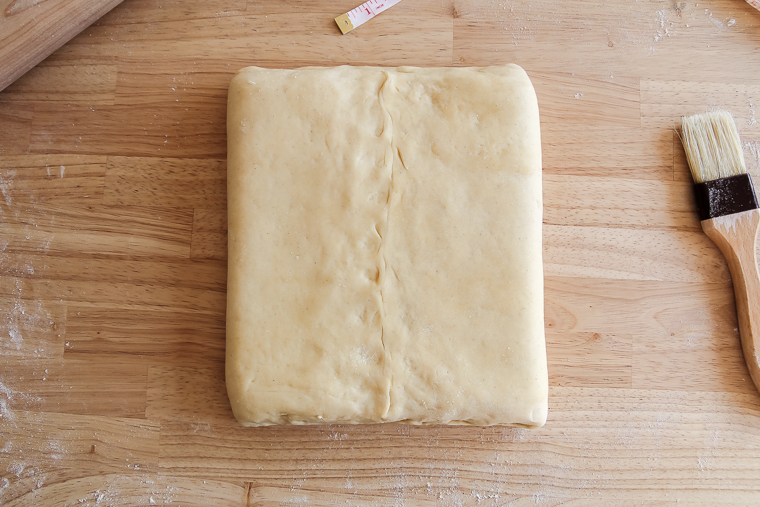
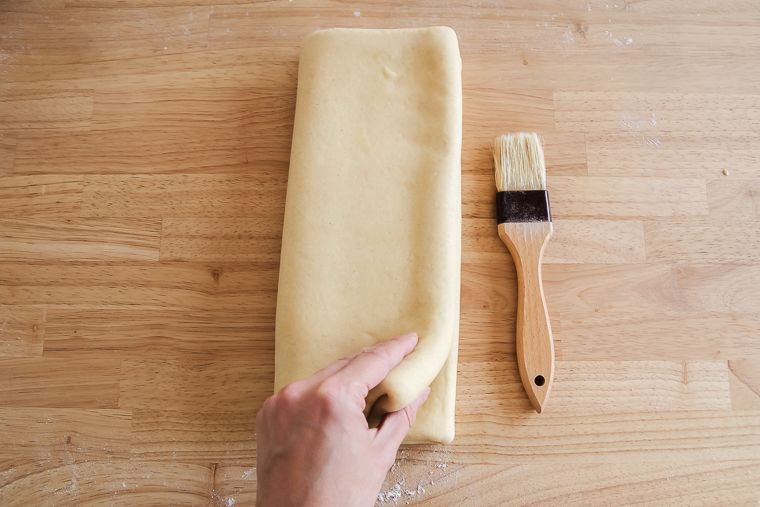
For this final fold, we are going to perform a tri-fold. Fold the right third of the dough over itself, and then the left third over the right like you would fold a letter.

Don’t forget to continue to brush away loose flour as you go.
Here is the side view after performing the letter fold:
Wrap the laminated pastry dough again, and this time chill for at least an hour or overnight.
Step 4 – Shape the Sourdough Pastry Dough
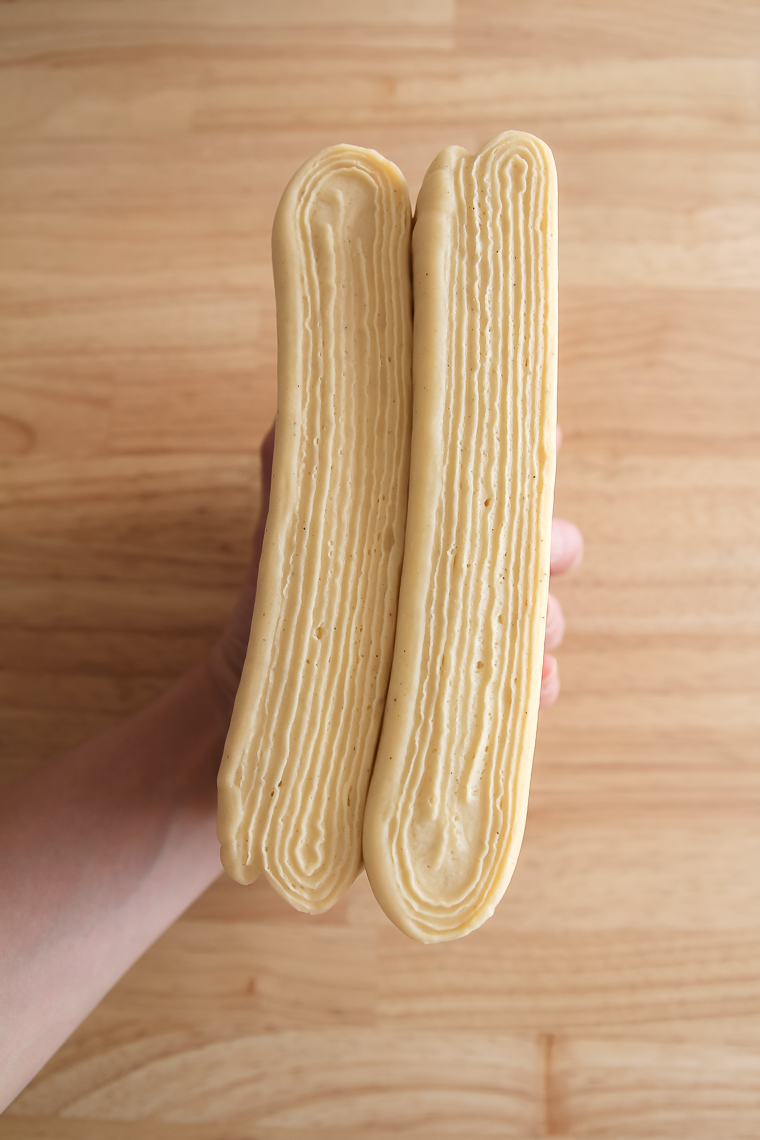
When you’re ready to shape the pastry skillet, unwrap the laminated sourdough pastry dough and slice it cleanly in half widthwise with a large, sharp knife.
Re-wrap half of the dough and return to the refrigerator to be used for another purpose.
Place the other half of the pastry dough on a lightly floured surface and roll to a 20 x 10-inch rectangle.
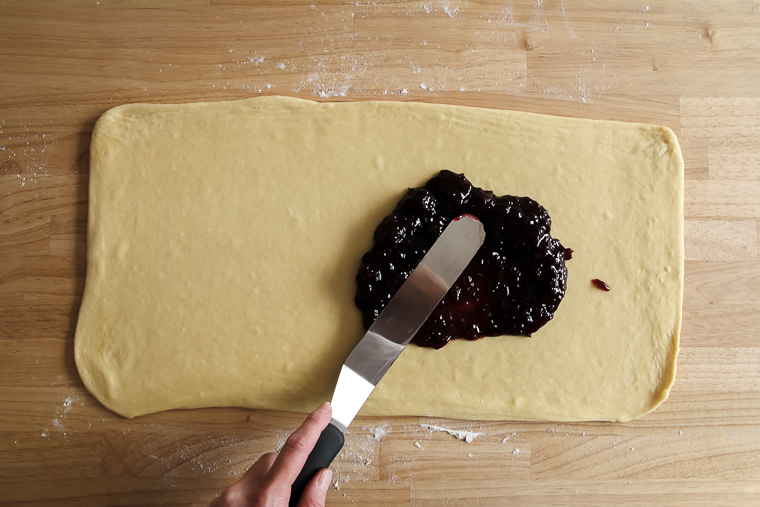
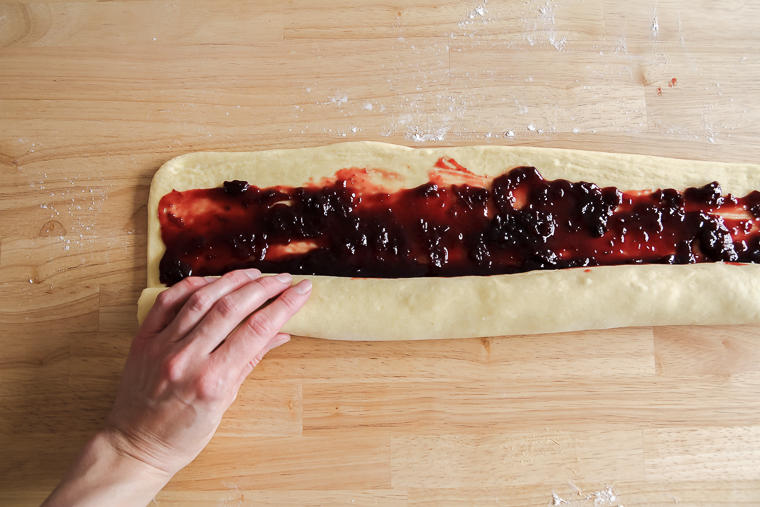
Warm your fruit preserves or jam in the microwave in a microwave-safe bowl for about 15 seconds, then stir with a spoon until it’s smooth.
Use an offset spatula to spread the preserves over the surface of the sourdough pastry dough, leaving 1-inch of dough clean on the long side farthest from you.

Begin rolling the dough from the bottom like you would roll up dough for cinnamon rolls. Roll tightly, but also with finesse, to keep the filling in place the best you can. Pinch the seam closed.
Using your knife, cut the log of dough in half widthwise to make two logs.
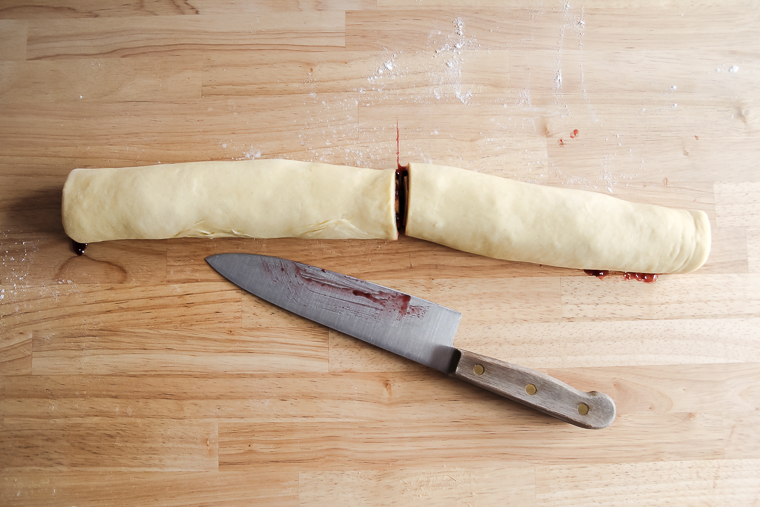
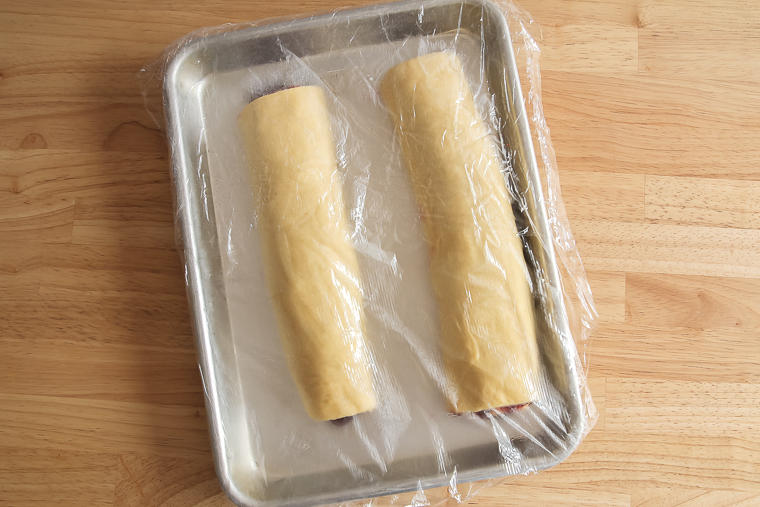
Place the pieces onto a plate or quarter sheet pan. Wrap the tray and freeze for 13 minutes before proceeding onto the next step.
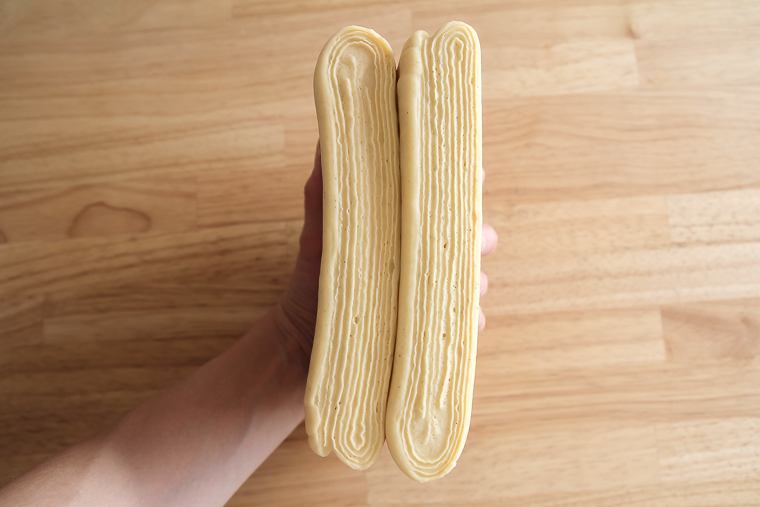
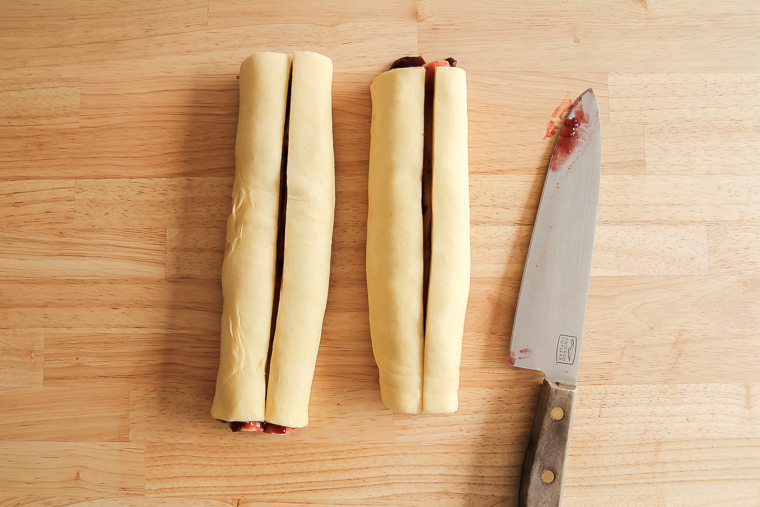
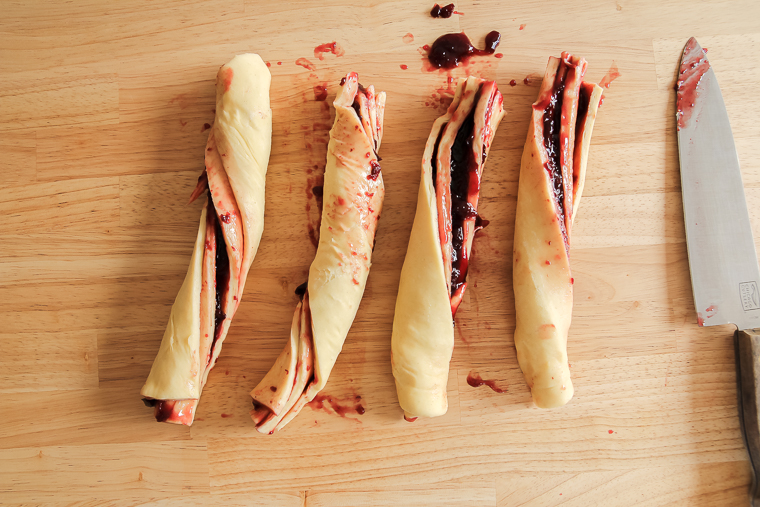
Remove from the freezer and cut the logs in half lengthwise. Do this by cutting straight down with a large, sharp knife instead of using a “sawing” motion.
You will lose a little filling. You can use a spoon to scoop it back between the layers of pastry, if you wish.
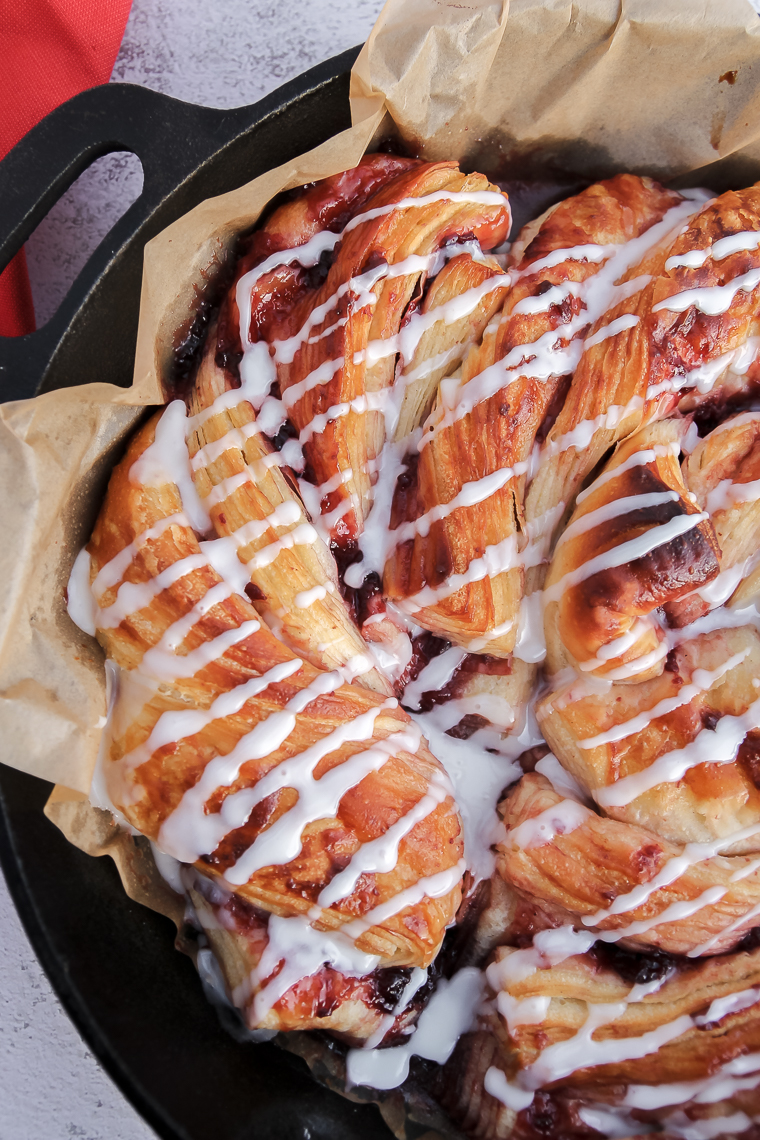
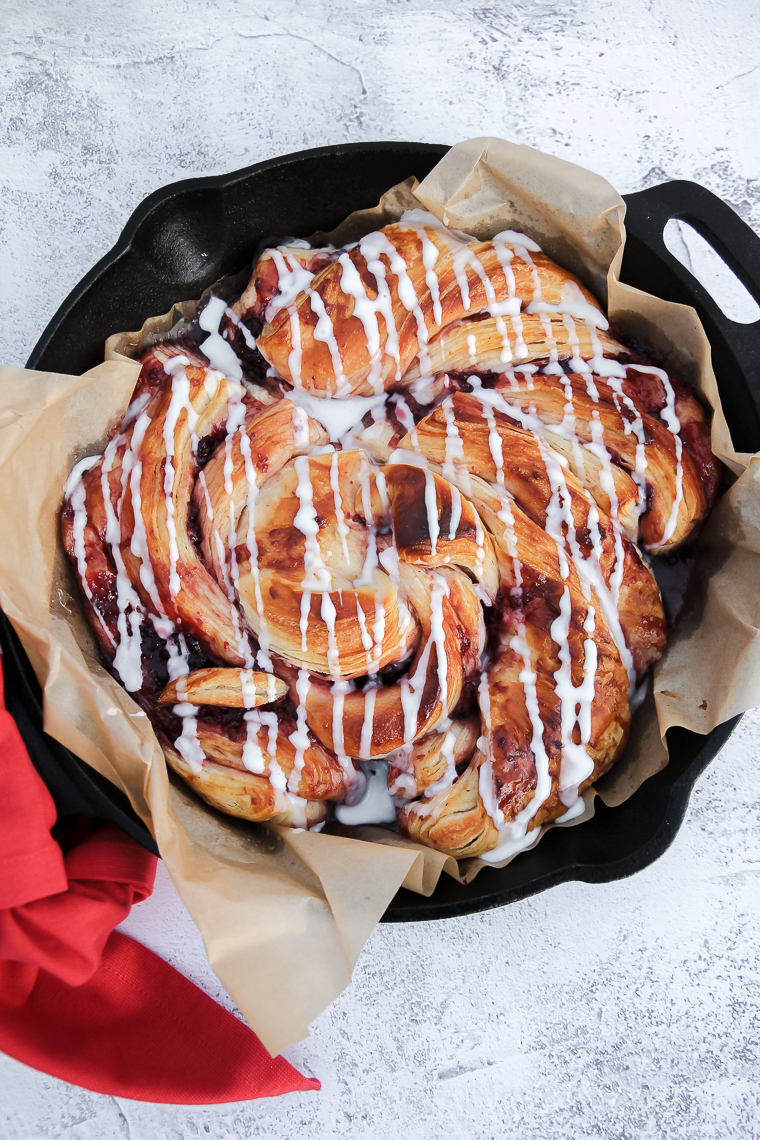
Twist each piece to expose the preserves and layered sourdough pastry dough.
Line a 10 or 12-inch cast iron skillet with a sheet of parchment paper.
Arrange the pastry twists in a spiral shape in the prepared pan, starting in the center of the pan and working your way out. Leave a little space between the twists for expansion.
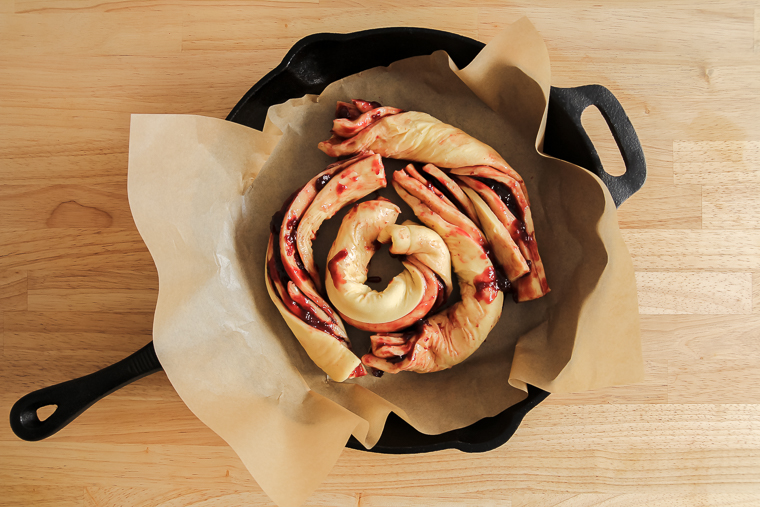
If you lost any filling during shaping, you can spoon it back in at this point.
Cover with plastic wrap. Set in a warm place to proof (although don’t exceed 75°F or the butter may melt out of the sourdough pastry during proofing.)
Step 5 – Proof and Bake
Meanwhile, preheat your oven to 375°F with a rack set in the center.
Proof until the sourdough pastry dough has doubled in size and you can see some separation between the laminated layers of the pastry. The dough should look nice and puffy and be soft to the touch.

Prepare the egg wash by beating together the egg and milk.
Use a pastry brush to apply egg wash evenly to the pastry, avoiding the exposed preserves and the laminated edges of the dough.
You can optionally tuck in a few small pieces of fresh or frozen fruit that match the fruit in your preserves for added decoration.
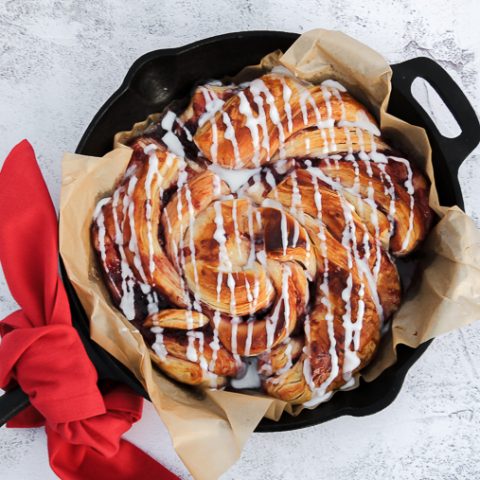
Bake the sourdough pastry skillet on the center rack for 40-45 minutes or until golden brown (if pastry is browning too much after 30 minutes, tent the pan with foil).
Remove the skillet from the oven and set it aside to cool for at least 30 minutes before glazing and serving.
To make the glaze: Whisk together the powdered sugar and milk until smooth. Drizzle the glaze over the top of the pastry skillet.
How to Store Leftover Sourdough Pastry
The sourdough pastry is best consumed the first day when the outside edges are crisp and the inside is tender.
Though the pastry will keep just fine for 2-3 days in an airtight container at room temperature, I would suggest slicing and freezing leftovers on day one after the pastry has cooled completely.
The pastry will taste almost as fresh when you pull it back out another day. Warm a serving on a plate in the microwave for 20-30 seconds for a quick breakfast.
Sourdough Pastry Skillet
A sourdough pastry skillet with fruit preserves is twist on traditional Danish pastries. It's a showy breakfast or brunch recipe to share!
Here is the link to the sourdough pastry dough. https://aberlehome.com/sourdough-danish-pastries/
Ingredients
- Half the laminated dough from my Sourdough Danish Pastries recipe (linked above)*
- 10 ounces high-quality fruit preserves or jam, slightly warmed and stirred smooth
Egg wash
- 1 egg
- 1 Tablespoon milk
Glaze
- 63g powdered sugar
- 15g milk
Instructions
- Roll out laminated dough:Set half the laminated dough onto a lightly floured surface with a long side facing you (insure the dough isn't so cold that the butter will crack beneath the surface when rolling). Roll to a 20 x 10-inch rectangle.
- Shape: Spread the preserves onto the dough using an offset spatula, leaving the top 1-inch of the dough bare on the long side farthest from you.

- Roll up the dough from the bottom into a log as if you are rolling cinnamon roll dough. Roll tightly, but not so tight that the preserves are squeezed out. Pinch the seam closed.
- Cut the log in half widthwise into two short logs. Place each piece on a baking tray or plate, cover with plastic wrap, and place in the freezer for 13 minutes.
Return the pieces to a cutting board and, using a large sharp knife, cut each piece in half lengthwise this time. (Avoid using a "sawing" motion when cutting." Give each piece a twist to expose the preserves. If any preserves have leaked out, you can spoon them back onto the pastry twists once they are in the pan. - Arrange pastry twists in prepared pan: Arrange the 4 pastry twists into a parchment-lined 10- or 12-inch cast iron skillet (or similar size baking pan) in a spiral shape, working from the center of the pan outward and leaving a little space between each piece for expansion.
- Proof: Cover with plastic wrap and set in a warm place to proof until the dough has doubled in size, feels soft to the touch, and you see some separation between the laminated layers of sourdough pastry. Don't exceed 75°F when proofing, or the butter can melt out of the pastry! (Proofing took me about 4.5 hours at 75°F.) Preheat oven to 375°F with a rack set in the center.
- Egg wash: Prepare the egg wash by beating the egg and milk together until well combined. Apply an even layer to the proofed pastry, avoiding the exposed preserves and laminated edges.
- Bake: Bake on the center rack for 40-45 minutes, or until golden brown (if pastry is browning too quickly by the 30-minute mark, tent the pan with foil for the remaining bake time. Set the pan aside to cool for at least 30 minutes before glazing or slicing.
- Glaze Pastry: Whisk together powdered sugar and milk until smooth. Drizzle glaze over the top of the pastry skillet.
Make and laminate sourdough pastry dough ahead of time: Prepare sourdough Danish dough according to the recipe instructions.You'll be instructed to chill dough after laminating for 1 hour or overnight before rolling and shaping. Use only half the dough for one sourdough pastry skillet. Use the second half for another skillet or for individual pastries.


Notes
- Proofing sufficiently will give you a light, flaky texture and prevent the butter from leaking out of the layers during baking. The proof can take a while, so don't rush it.
- Cutting into the pastry before it has cooled can result in an under-done texture.
Recommended Products
As an Amazon Associate and member of other affiliate programs, I earn from qualifying purchases.


Nutrition Information:
Yield: 8 Serving Size: 1Amount Per Serving: Calories: 302Total Fat: 8gSaturated Fat: 3gTrans Fat: 0gUnsaturated Fat: 4gCholesterol: 39mgSodium: 205mgCarbohydrates: 54gFiber: 1gSugar: 31gProtein: 4g
*Nutrition information is not always accurate.
I’m so grateful for your comments, reviews, and questions! Your star ratings help others discover my recipes, and your feedback helps me make improvements. Thank you for your support!
Can’t wait to try! The other half of the pastry dough that is unused snd out back in the fridge…..can I also freeze that? And if so, how long does it keep for? Thanks!
Hi M.H., I’ve tried freezing dough like this for up to two weeks before the starter is affected. You can also freeze the baked pastry for another time.