This post may contain affiliate links. See my full disclosure. As an Amazon Associate, I earn from qualifying purchases.
More than just a recipe, this is a tried-and-true method for making a long-fermented artisan sourdough bread that you’ll be proud to share with your family and friends! Amazingly, you only need four ingredients: flour, water, sourdough starter, and salt.

Sourdough Guides for Beginners:
- Easy Sourdough Starter from Scratch
- Sourdough Baking Terms for Beginners
- Essential Sourdough Bread Making Tools
I’ve maintained my sourdough starter for over a few years now. I find it so satisfying to make all kinds of baked goods from my starter including soft sourdough potato rolls, soft whole wheat sourdough rolls, and even sourdough croissants.
I’m going to show you how you step-by-step how you can make long-fermented artisan sourdough bread! I’ve also included a printable recipe card at the bottom of this post so you can save it and refer back to it again and again.
This process spans about 48 hours from start to finish, but don’t worry… for the majority of that time your dough will be in the fridge, and the hands-on portion is very manageable.
The long ferment is well worth the wait, though, as it makes for bread with incredible depth of flavor with minimal sourness, a thin, crackly crust, and a chewy and airy interior (not to mention added nutritional benefits).
You will start your dough the morning of day 1 and bake two mornings later. You won’t even touch the dough on day two. You can follow the time frame in this post exactly, or start a little earlier the morning of day 1 with the same time intervals.
I always freeze what we don’t eat the day of baking so I have bread ready for another meal later on.
This versatile bread is perfect alongside dinner with butter or olive oil, or it makes for the best toast or grilled panini sandwiches.
Some Notes About This Recipe
- All-purpose flour is used for the texture it imparts to the finished bread (and it’s widely available). However, use bread flour if that’s what you have on hand.
- This recipe utilizes an extended cold autolyse which functions to affect the texture of the finished bread. You can alternately use lukewarm water in the recipe and autolyse for 1 hour at room temperature. This might shorten the bulk fermentation time since the dough will not start out cold.
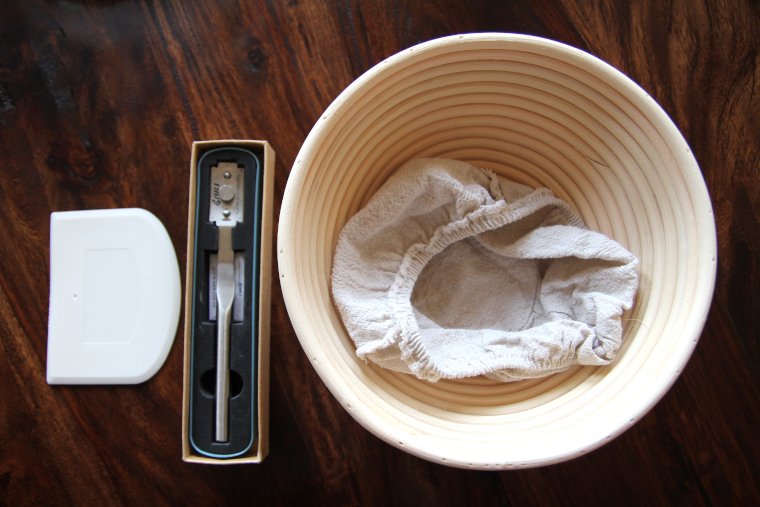
Recommended Equipment
- Kitchen scale
- Large lidded glass bowl
- Dough scraper (mine came with my banneton, linked below)
- Small fine-mesh strainer
- 9-inch banneton with muslin liner or similar size bowl lined with a flour sack towel
- Lame or razor blade for scoring dough
- 6-quart enameled cast iron Dutch oven (oven safe to 500°F)
- Parchment paper
How to Make Long-Fermented Artisan Sourdough Bread
Step 1 (11am on day 1) – Feed Starter + Autolyse Flour & Water
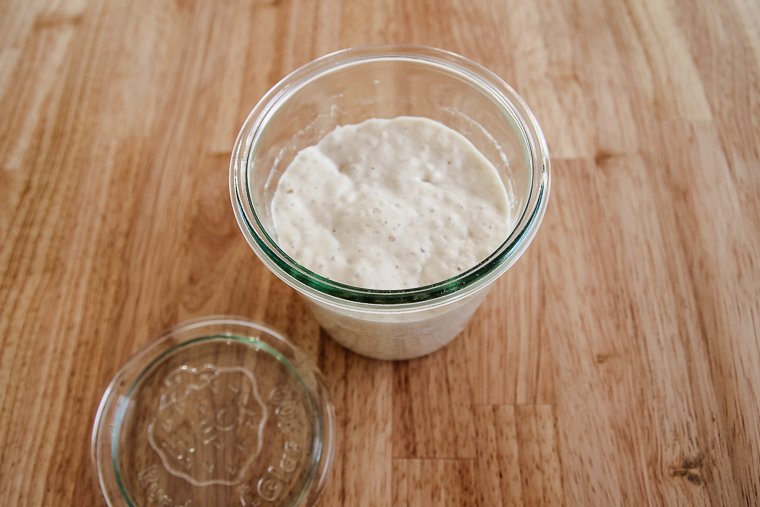
Start by feeding your sourdough starter if it hasn’t been fed, insuring you’ll have 150 grams for this recipe with some left over to save.
Let your starter sit to become active and bubbly before you add it to the dough later.
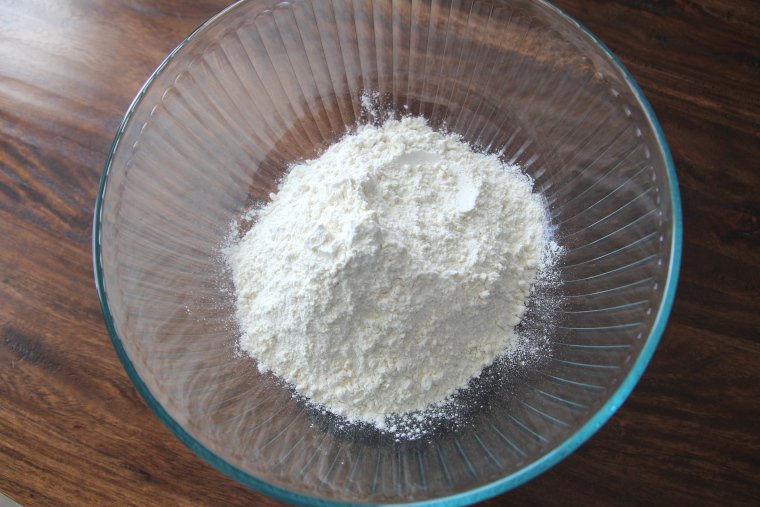
To start your dough, tare out your kitchen scale with a large bowl on top and weigh out your flour.
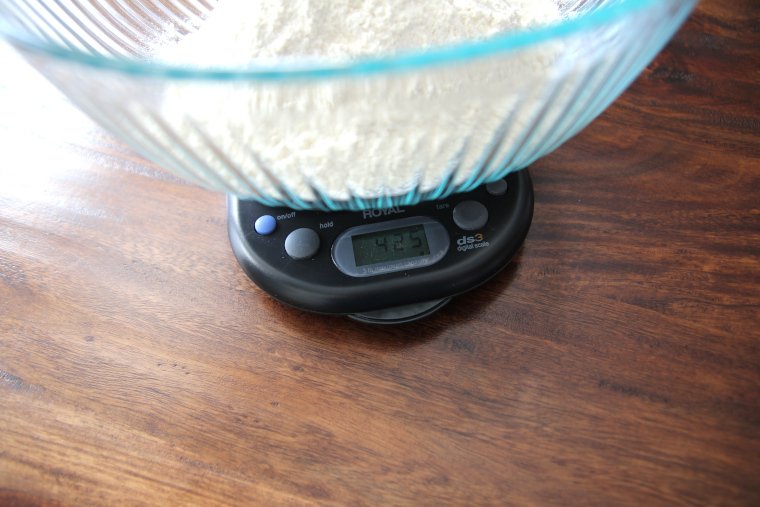
Now you might scoff at first at the thought of using a kitchen scale. When I first started baking sourdough bread, I resisted weighing my ingredients.
But I’ve since learned that it’s actually easier to dump ingredients straight into my bowl while I’m weighing them instead of messing with measuring cups and spoons.
Plus accuracy is important here.
Now tare your scale again and slowly add the ice water.
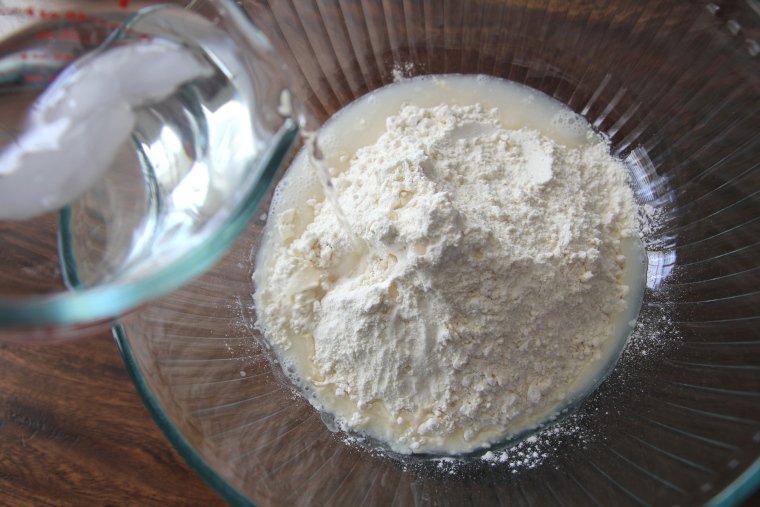
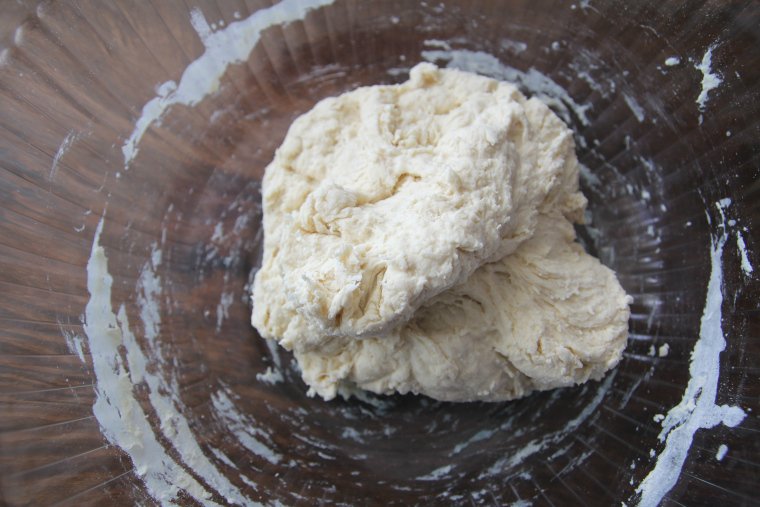
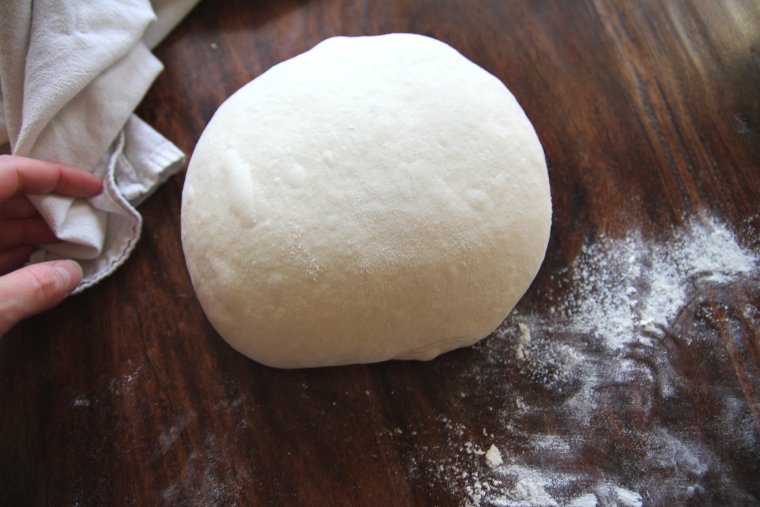
Remove your bowl from the scale, and mix the flour and water together until all the flour is absorbed.
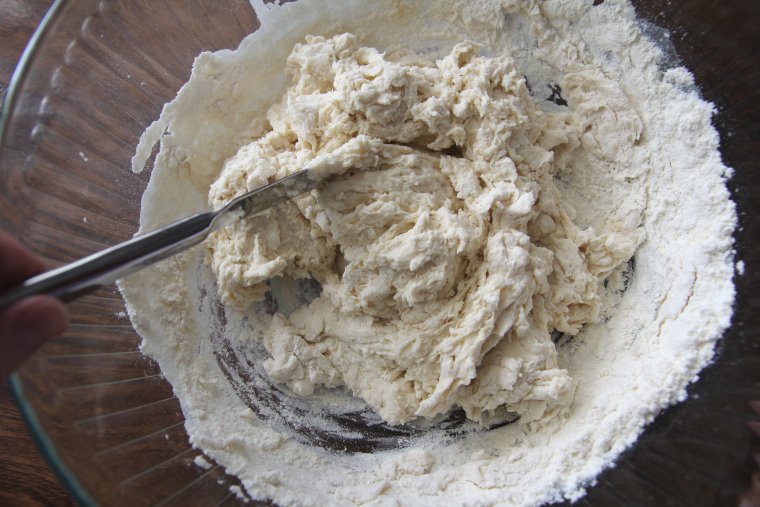
I use a table knife to mix because the dough sticks to it less than to a spoon.
If your dough looks more slack than mine in the picture below, mix in another sprinkle of flour. Every brand of flour is slightly different.
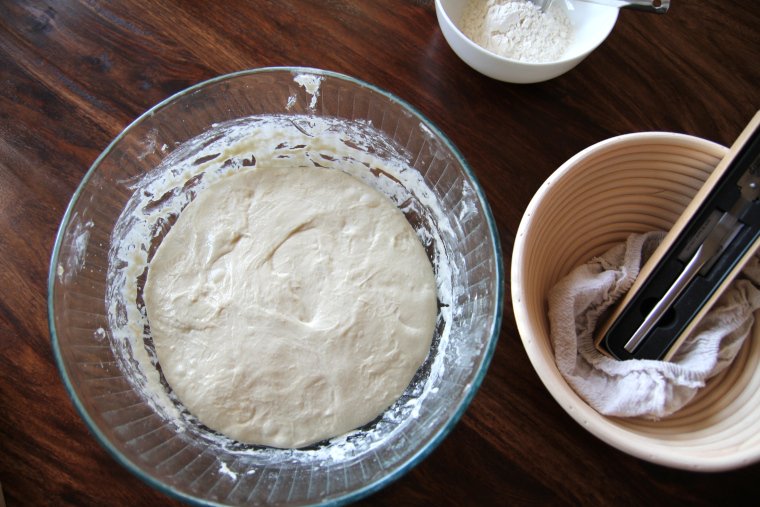
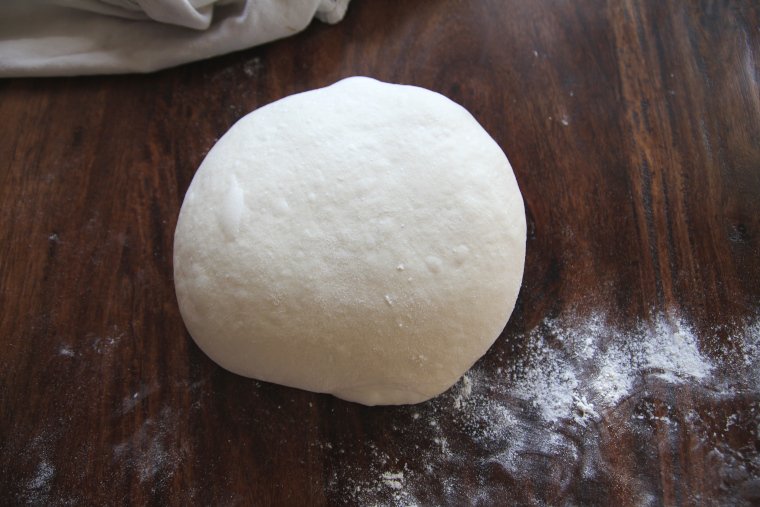
Now cover your bowl with the lid and stick it in the fridge for 6 hours.
This rest time before the starter and salt are added is called an autolyse and will help your dough develop properly.
Here is the dough after the autolyse, ready for step 2:

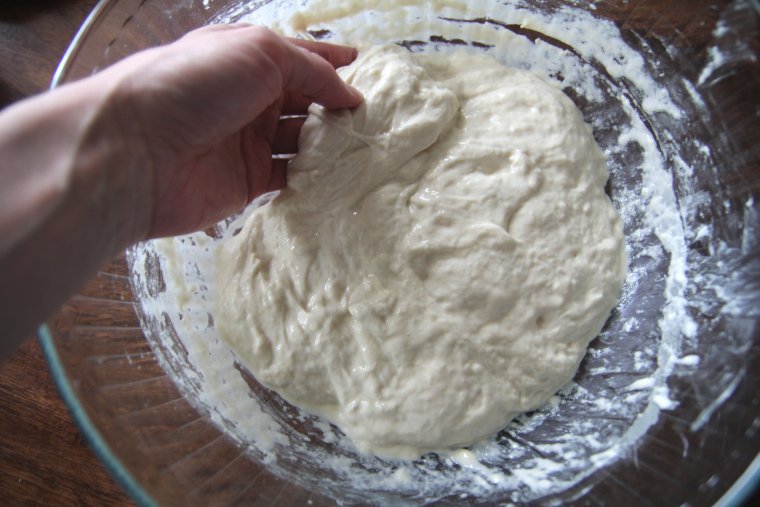
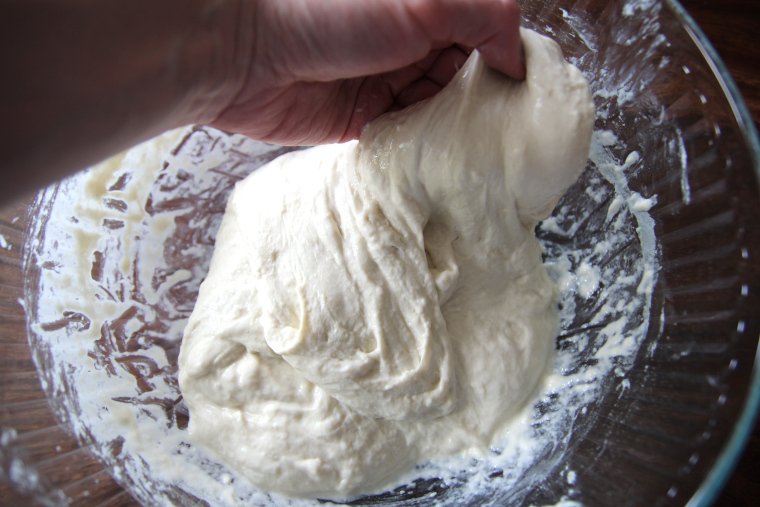
Step 2 (5pm on day 1) – Add Salt & Sourdough Starter
At this point, your starter should be active and bubbly. It should have reached it peak in the jar.
You’ll weigh out the 150 grams you need and save the rest of your starter for next time. I keep mine in the refrigerator since I don’t bake with it every day.
I like to weigh my salt in a separate little bowl and then sprinkle it over my autolysed dough, and then pour my starter over the top to help dissolve the salt.
Now use your fingers to poke the starter into the dough.
Then squeeze and work the dough with your hands to continue to incorporate everything.
Your dough will fall apart, and then come back together.
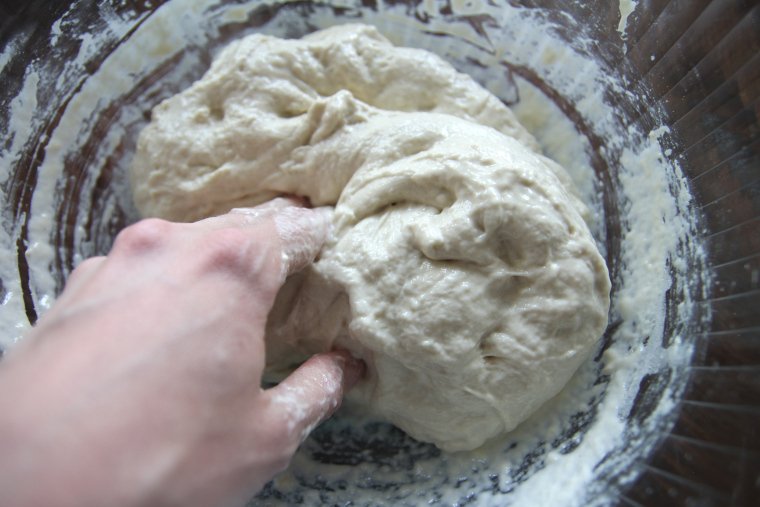
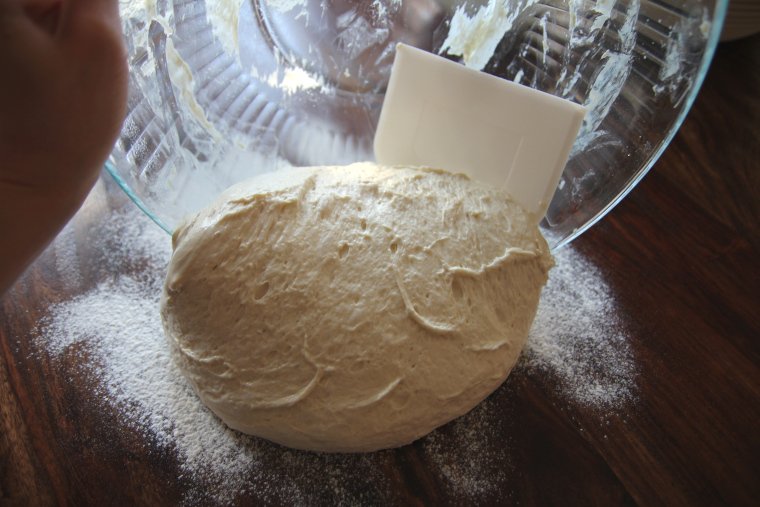
Step 3 (5:10pm-9:10pm on day 1) – Bulk Fermentation with Stretch-and-Folds
Now we are going to develop strength in the dough with three sets of stretch-and-folds. We want to treat the dough gently from here on out so we don’t deflate it as it ferments and aerates.
Wet your fingers so they don’t stick to the dough. Slide your fingers underneath the dough. Pull the dough upwards…
and then fold it over itself to the opposite side of the bowl. Don’t press the dough down.
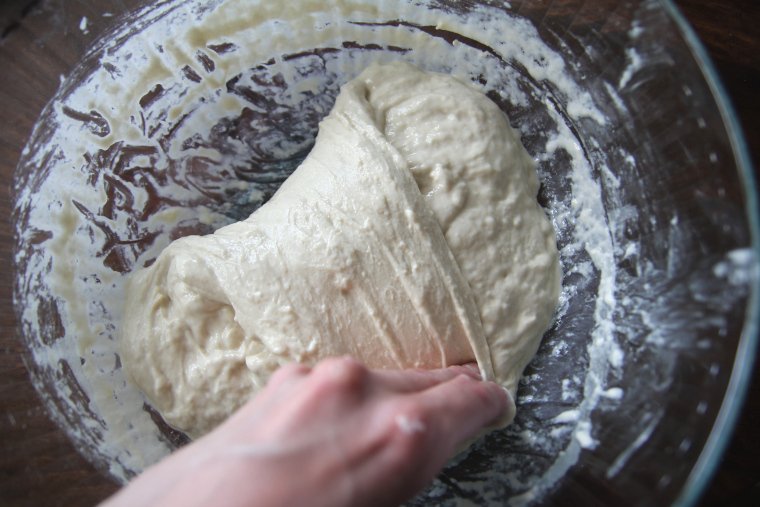
Turn your bowl slightly, grab underneath, gently stretch and fold again.
And one more time.
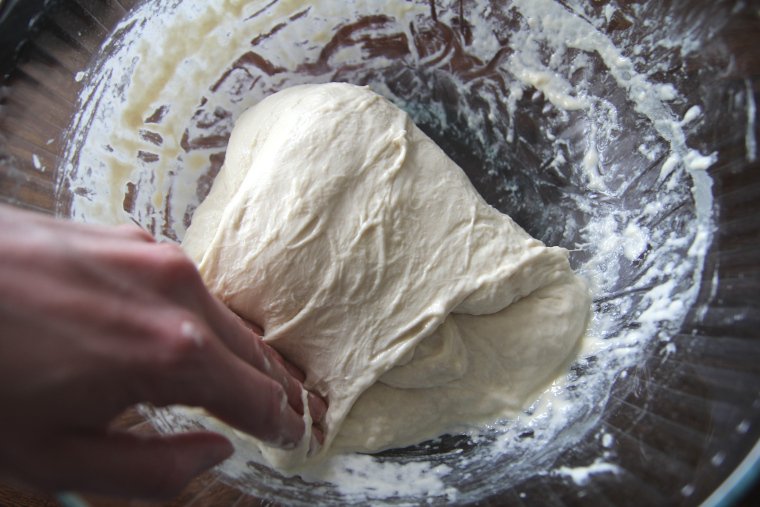
Cover your dough loosely with your lid and let it sit on the counter for 30 minutes. (If your house is colder than 72°F, put the bowl in your oven with the oven light on for a little extra warmth.)
Your first set of stretch-and-folds is done! You will repeat this process for two more sets.
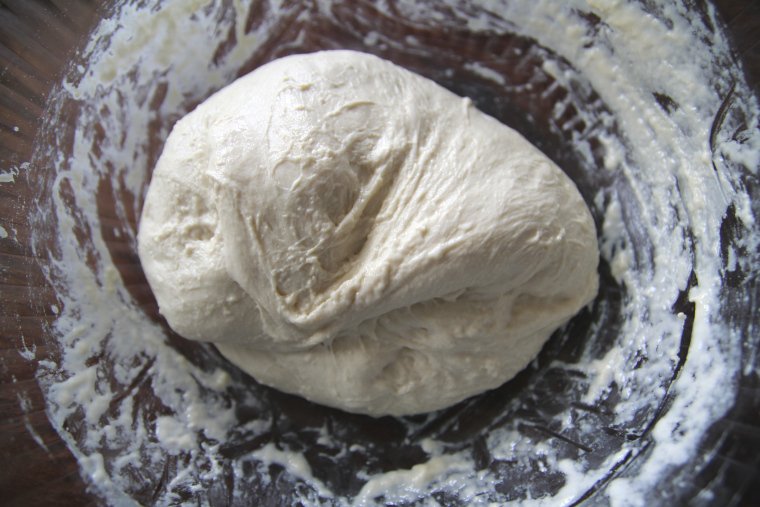
So in total, bulk fermentation will last for 4 hours. You’ll do three sets of stretch-and-folds spaced 30 minutes apart (do more if you feel like your dough hasn’t gained any more resistance), then let your dough continue to sit for the remainder of the 4 hours.
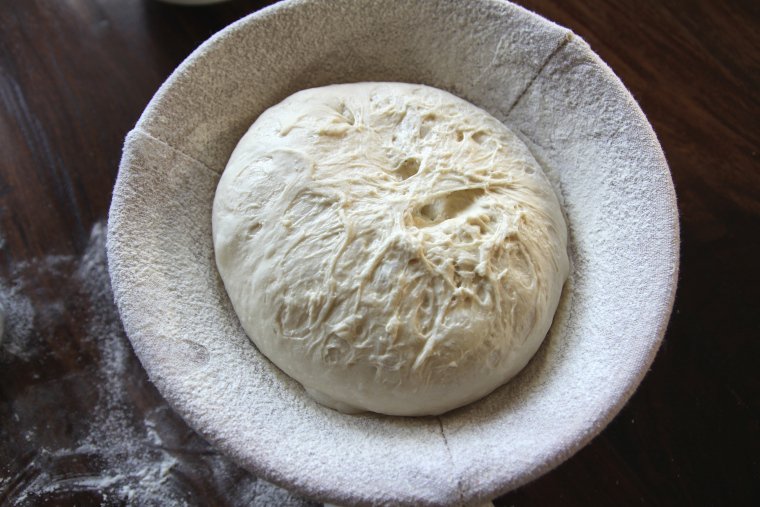
When bulk fermentation is done, your dough should have increased in volume by at least a third, formed a convex shape around the edges even after it has rested, and look smooth and strong.
Note: If you feel like your dough isn’t showing these signs, let it sit even longer before step 4!
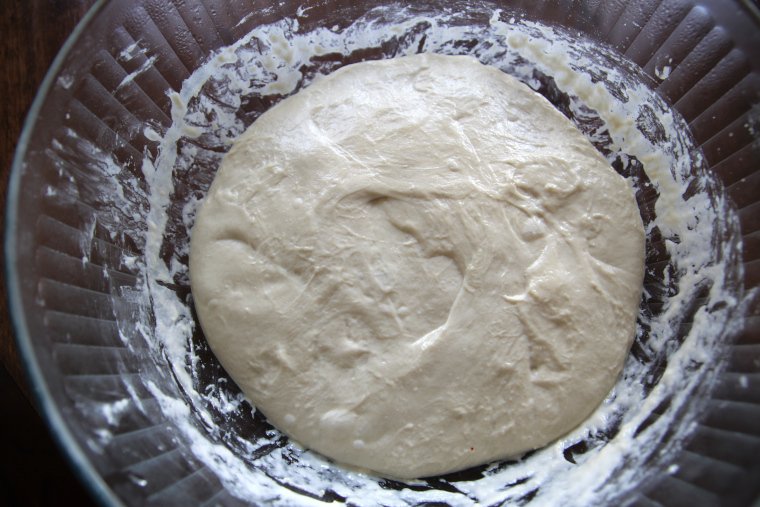
Step 4 (9:10pm on day 1 to day 3) – Retard in Refrigerator
This is the easy step: cover your dough and place in the refrigerator overnight, through day and night two, and you’ll be ready to shape your loaf in the morning on day 3.
The fridge is slowing (or retarding) the process so we can get that long ferment time as the dough continues to develop.
Step 5 (9am on day 3) – Shaping & Proofing
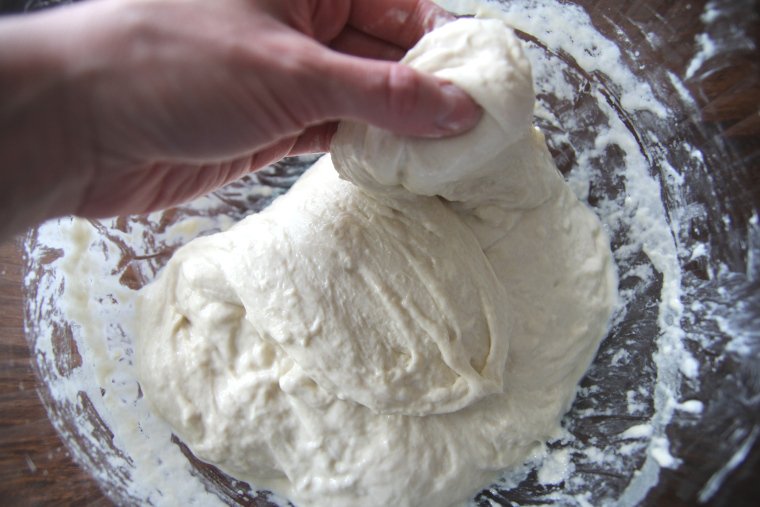
Now that you’ve reached the morning of day 3, it’s time to turn out your dough and form your loaf.
Lightly flour your counter and use your dough scraper to gently encourage the dough out of the bowl in one mass (don’t deflate it).
Now you need to preshape your loaf. A round loaf is called a boule (pronounced BOO-l).
Pull the edges of the dough onto itself to form a ball shape.
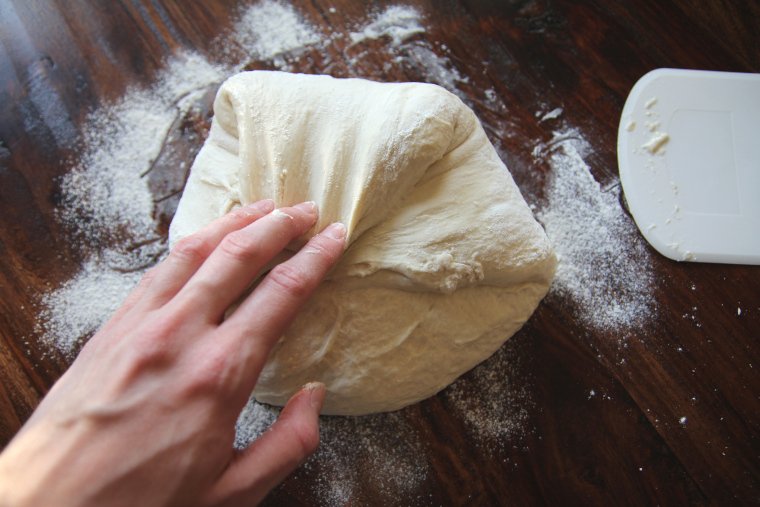
Now flip it over and move it to a part of your counter that is not floured.
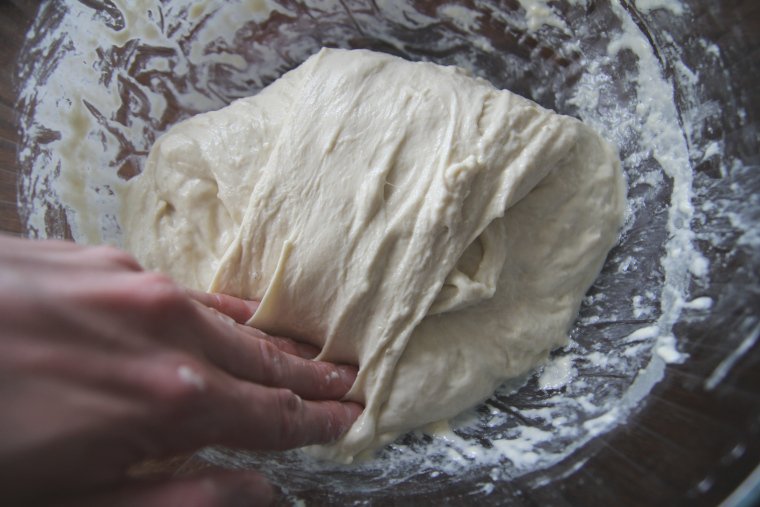
Cup your hands around the top of the ball and gently pull the dough a couple inches toward yourself against the countertop.
Here’s my one-handed attempt as I snap a photo at the same time.
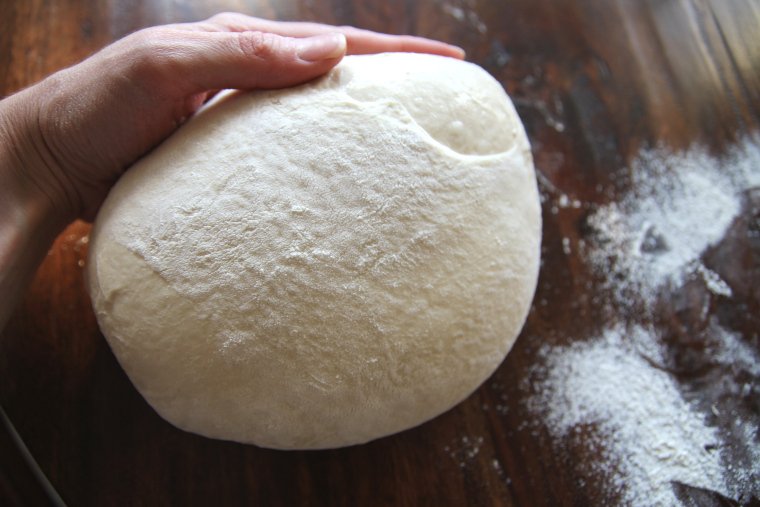
Give the ball a quarter turn and pull against the counter toward yourself again.
Gently pop any large air bubbles that appear on the surface of your loaf.
Repeat until the skin on the top of the loaf is smooth and tight. Don’t go too far, though, or your boule will begin to tear.
Cover your loaf with a flour sack towel and let it rest for 10 minutes.

Your loaf will probably relax after resting, so flip your loaf right side down and repeat the shaping process: ends in, flip over, pull against countertop to tighten skin.
Proper shaping will ensure that your loaf will hold it’s shape even after proofing.
Use a fine mesh strainer to generously flour your banneton (or a bowl lined with a flour sack towel). Rice flour works best, but you can use all-purpose flour. Use more flour than you think so your loaf doesn’t stick.

Now place your boule top side down in the banneton.
Cover again with a tea towel and let it proof (rise) for 1-2 hours or until it passes the poke test. Wet a finger and poke the dough. If the indent from your finger springs back just barely, it is ready to be baked.
Again, if your house is less than 72°F, you can set your covered banneton in the oven with the light on for more warmth.

When proofing is almost done, preheat your oven to 475°F (make sure your dough isn’t in there while you preheat!).
Once the oven is comes to temperature, place your Dutch oven inside so it can preheat for 10 minutes.
Step 6 (after about 2 hours proof time on day 3) – Score & Bake
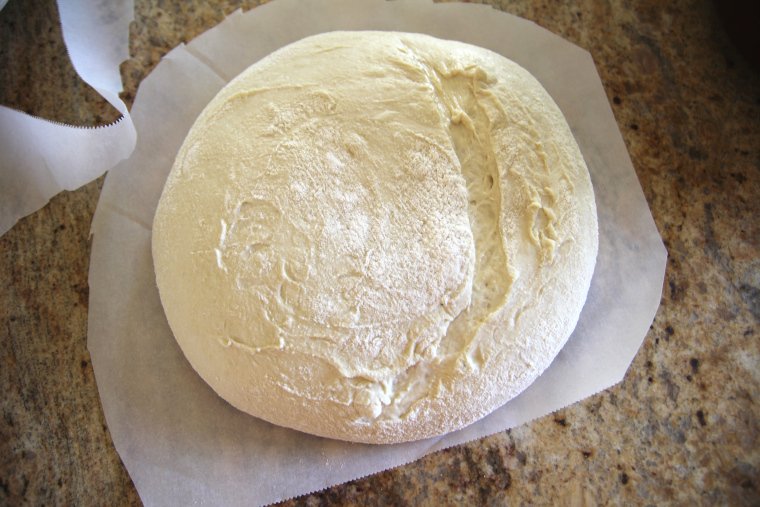
Once proofing is done and your Dutch oven is almost done preheating, place a large square of parchment paper on your counter top.
Dust your boule with flour (I like coarse semolina for a crunchier bottom crust), and then gently invert your loaf onto your parchment paper. (Sorry, no pictures for this part.) You can hold the parchment over the banneton while you flip it.
If the top of your loaf has too much flour, use your hands to gently rub it around/off.
Trim some of the excess parchment from around the loaf so it doesn’t burn, but leave enough to grab onto.
Remove your preheated Dutch oven from your oven, and working swiftly, use a lame or a razor blade to slash your loaf.
Confidence is key when scoring, and the score line will enable your bread to expand in the oven. I found this video extremely helpful: How to Score a Loaf of Bread
Carefully transfer your boule into your Dutch oven, cover with the lid and bake for 20 minutes. (Your Dutch oven will trap the steam and help your bread to rise to it’s full potential.)
After 20 minutes, lower the heat to 450°F, remove the lid, and continue to bake until your loaf is a deep golden color. This could take more than 15 minutes. Just watch it.
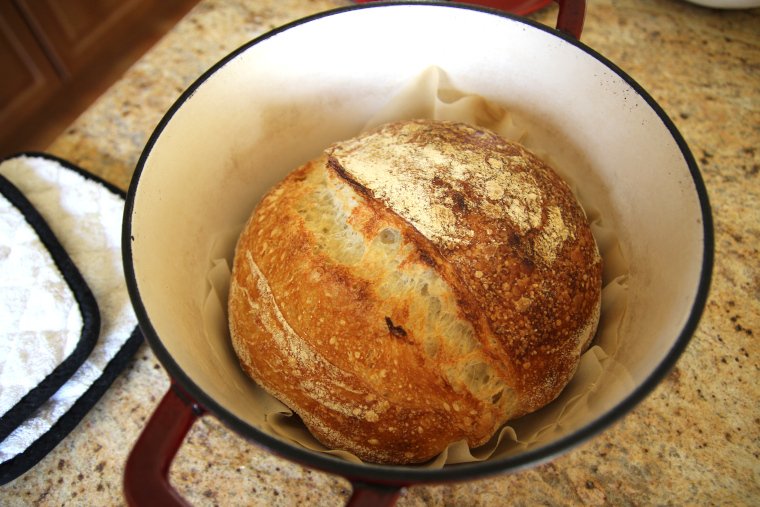
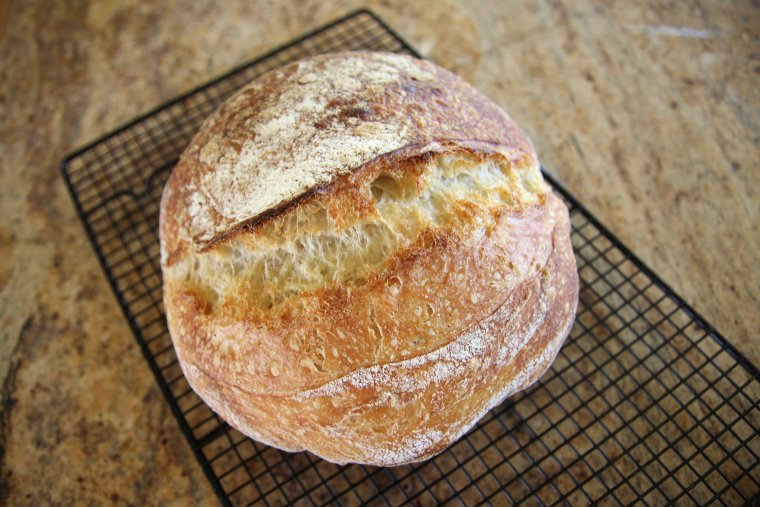
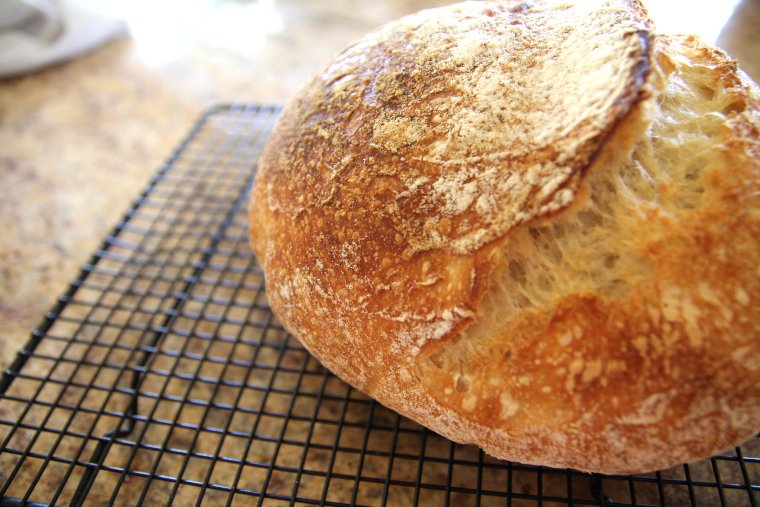
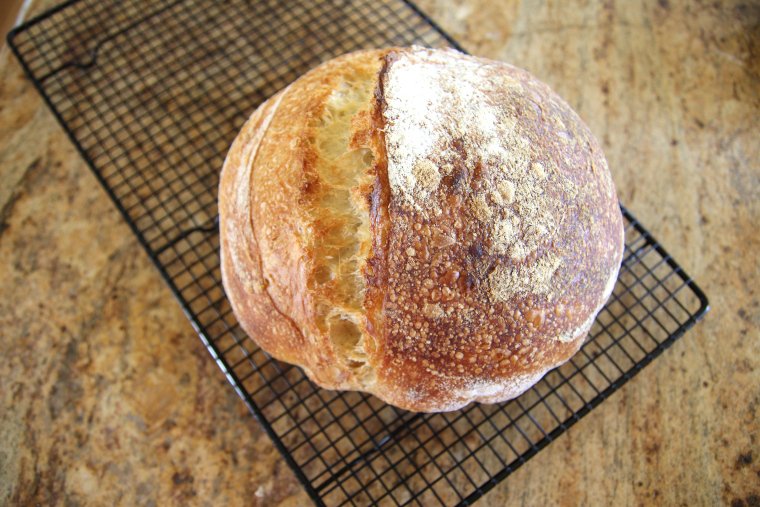
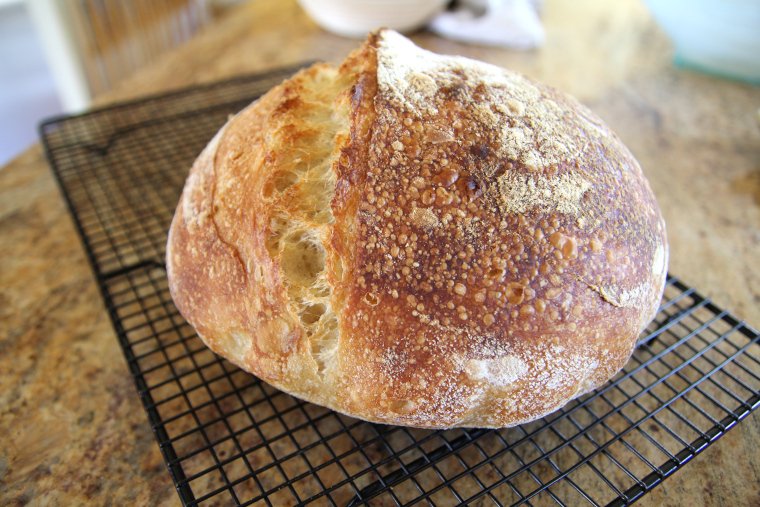
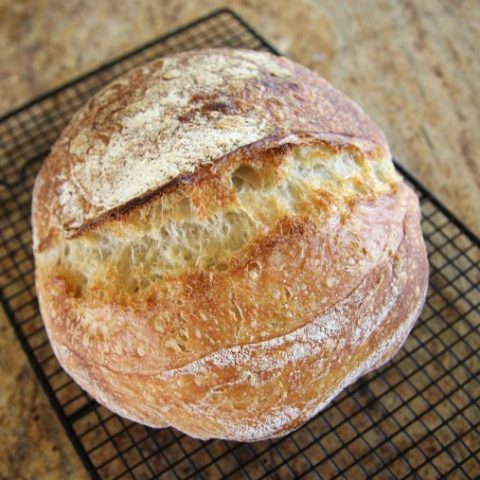
Remove to a cooling rack right away, and let it cool completely before slicing. The interior will continue to bake through as it sits.
Just look at that crackly, blistered crust.
How to Store Long-Fermented Artisan Sourdough Bread
This bread has a decent shelf-life when stored at room temperature. My favorite way to store the leftover bread, though, is in the freezer. It tastes freshly baked (minus the crackly crust) this way.
I will slice the bread and place it in a zipper freezer bag. Then we can pull out slices to microwave or toast whenever we want.
Now excuse me while I eat half the loaf of this long-fermented artisan sourdough bread in the form of buttered toast. There’s nothing quite like fresh sourdough bread from scratch. Delicious!

I’m so grateful for your comments, reviews, and questions! Your star ratings help others discover my recipes, and your feedback helps me make improvements. Thank you for your support!
Long-Fermented Artisan Sourdough Bread
You'll love this from-scratch sourdough artisan loaf with a chewy interior, incredible depth of flavor with minimal sourness, a thin, crackly crust, and a chewy, airy interior!
Ingredients
- 425 grams unbleached all-purpose flour
- 300 grams ice water
- 11-12 grams kosher salt or fine sea salt
- 150 grams active sourdough starter, 100% hydration
- Additional flour for dusting (rice flour works best)
- Semolina flour for bottom of loaf (optional)
Instructions
Start the dough two mornings before the day you intend to bake the loaf.
- (11am on day 1) Feed sourdough starter and set aside. Tare out your kitchen scale with a large bowl on top and weigh out your flour. Tare out your scale and slowly add the correct amount of ice water. Mix flour and water together until all the dry flour is absorbed. (Refer to photo in blog post. If your dough is more slack than mine, mix in a sprinkle more flour. Every brand of flour is different.) Cover bowl with a lid and refrigerate for 6 hours.
- (5pm on day 1) Weigh out salt and sprinkle over dough. At this point your starter should be active and bubbly (almost foamy). Weigh out 150 grams of starter. Add starter to your dough over your salt. Use your fingers to poke the starter into the dough. Squeeze and work the dough until it comes back together.
- (5:10pm-9:10pm on day 1) Wet your fingers so they don't stick to the dough. Slide your fingers underneath the dough, pull the dough gently upwards, and then fold it over itself to the opposite side of the bowl. This is called a "stretch-and-fold." Turn your bowl slightly, and do another stretch-and-fold. Turn the bowl again and do one more. Cover your dough loosely with your lid and let it rest on the counter for 30 minutes (or in your oven with the light on if your house is less than 72°F). Repeat this process for two more sets of stretch-and-folds spaced 30 minutes apart. Then let your dough rest for the remainder of the 4 hours (or longer) until dough has risen by 1/3 its volume. Place the lid on your dough and refrigerate until the morning of day 3.
- (9am on day 3) Dust your counter with flour and use a dough scraper to gently encourage the dough out of the bowl in one mass. Don't deflate the dough. Pull the edges of the dough onto itself to form a ball shape. Flip it over gently and place on your counter in an area with no flour. Cup your hands around the top of the ball and gently pull the dough a couple inches toward yourself against the countertop. Give the ball a quarter turn and pull against the counter toward yourself again. Gently pop any large air bubbles that appear on the surface of your loaf. Repeat until the skin on the top of the loaf is smooth and tight. Don't go too far, though, or the surface will begin to tear. Cover your loaf with a flour sack towel and let it rest for 10 minutes. Flip your dough top side down, and repeat the shaping process one more time: ends in, flip over, pull against the counter to tighten the skin.
- Use a fine mesh strainer to generously flour your banneton or a bowl lined with a flour sack towel (rice flour works best). Place your boule top side down in the banneton. Cover again with a flour sack towel and let it proof (rise) for 1-2 hours or until it passes the poke test (in the oven with the light on, if needed).
- When proofing is almost done, preheat your oven to 475°F (make sure dough isn't in there) and then place your Dutch oven in the oven to preheat for 10 minutes.
- Place a large square of parchment paper on your countertop. Dust your loaf with flour or semolina flour and gently invert your loaf onto your parchment paper. Rub any excess flour on the top of your loaf around to evenly distribute it. Trim the excess parchment paper from around your loaf leaving only enough to grab onto. Remove your Dutch oven from the oven and open the lid. Use a lame or razor blade to slash your loaf. Transfer the loaf into the Dutch oven, cover with the lid, and bake for 20 minutes. After 20 minutes, lower the temperature to 450° and remove the lid. Continue to bake until your loaf is a deep golden color. Remove to a cooling rack and allow it to cool completely before slicing.
Notes
- All-purpose flour is used for the texture it imparts to the finished bread (and it's widely available). However, use bread flour if that's what you have on hand.
- This recipe utilizes an extended cold autolyse which functions to affect the texture of the finished bread. You can alternately use lukewarm water in the recipe and autolyse for 1 hour at room temperature. This might shorten the bulk fermentation time since the dough will not start out cold.
Recommended Products
As an Amazon Associate and member of other affiliate programs, I earn from qualifying purchases.
-
 9 Inch Banneton Proofing Basket
 -
If You Care Parchment Paper
-
Baker of Seville Bread Lame – Change from Straight or Curved Blade Lame in seconds with the Patented Design. Built for professional and serious bakers.
-
Lodge Enameled Cast Iron Dutch Oven, 6 Quart, Red
-
Pyrex 8-piece Glass Mixing Bowl Set
-
Bakers Math Kitchen Scale - KD8000


Hi, I’m in the process of making this recipe and have made it about 20 times in the past. About 1/2 of the time the dough fails, pretty epically and I think it just did again. I’m at the stage where it just went into the fridge for the 2nd rise/ferment and it looks completely collapsed and floppy. When it started the first rest, it looked perfect. Please don’t post this but if you could send me an email w/advice on what I”m doing wrong, I’m getting despondent and ready to give up sourdough! I’m in Texas, it was 100 today outside and 74-75 inside. I did put the dough in the fridge but I think its already ruined. If it’s collapsed on Friday (Day 3), I’m throwing it away; I’ve had it it with dense crappy bread and will just make a brioche or something light. Thanks. SC
I will send you an email as soon as I can, Sue!
This is a detailed delicious recipe that I have used over the past few years. When I open my SD binder, it’s always niceable as it’s got notes, flour, and smugges allover the printed pages. Thank you for guiding me though my SD journey.
I’m so happy to hear! Thanks, Maryanne!
Is there a way to use some fresh wheat flour in this recipe? I like to grind my own flour from wheat berries.
Hi Stacy! Yes you can try that, but it will likely need some extra stretch-and-folds! Let me know if you try it!
I will let you know what it is like with partial wheat flour.
I just finished my first loaf with the white flour. Excited to taste it. 😀
I tried your recipe and I admit, it was different than what I had seen on other recipes, especially doing the 6 hours cold rest in the fridge before I added the starter/salt. But I followed your directions and the loaf turned out so much better than other loaves I’ve made. First, I noticed that it was easier to cut, especially the crust bottom. No more sawing through hard crusts! Second, the crumb was much more evenly distributed throughout the loaf. Third, the loaf was slightly larger. Fourth, no gummy under-proofed layer! So, all in all, this was a winner and I’m now making my second loaf. I think I can do better at shaping the loaf so I’m going to work on really following the directions on that. I think last time, I used the floured surface the whole time because it was too sticky the other way but I’m down for re-trying it again. LMK if you have any suggestions for how to keep it from sticking to my hands when I’m shaping it!
Hi, started bread today now I will not be back home in time for 6 hr fridge window
Will it be ruined if it stay in fridge 8 hrs before the next step😳
Hi Lela, it should be just fine!
Super excited to try this! Ive been baking with sourdough for a little while but never long fermented because I worry about it being too sour for my kids. Does this recipe make it super sour? Or does the cold water that helps with that?
Whew! Thanks
Good morning! My cast iron pot is 8”circumference and 4 1/2 high. Will your recipe fit
Otherwise I have a stainless steel Dutch oven, will that work?
Hi Lela, the cast iron pan sounds small. I think the stainless Dutch oven could work as long as it’s oven safe to the temp in this recipe. I hope it goes well!
Thanks for this super helpful recipe! I made my very first sourdough loaf using this recipe and it turned out delicious! I do have a question about the fridge long fermentation I was hoping you could help me understand. I noticed many other recipes that long ferment in the fridge seem to do a bulk fermentation until doubled in size and then have you shape the dough and put into your banneton before putting it in the fridge for the cold proof/long fermentation. Then they say after the cold proof to bake right after removing from the fridge. Is there a reason or advantage to the way this recipe does a bulk ferment and then the cold proof, followed by doing the shaping and another room temp proof after the cold proof? Does it change the loaf somehow to do it that way? Thank you!
Nope I bought a Dutch oven to have here as well as home. It was perfect! I then made your long fermented cinnamon rolls😍
Hello, I am still on ‘day 1’ of making your ‘long fermented’ bread. I’ve just finished the 3rd stretch&fold. The dough is REALLY gummy – I followed your recipe to the T; my starter is 5 yrs old, and and makes excellent overnight sourdough. Is it usually gummy at this stage? I am using Canadian flour, which I believe has a higher protein content than American. I seem to have developed a nasty gluten intolerance so am the long fermentation allows me to enjoy at least one type of bread.
Hi Meryl! I’m not sure what you mean by gummy. Was dough was too stiff or too sticky? You can email me if you want to troubleshoot. It might have just been due to differences in the flour.
HI Leanne. Thank you for your guidance in learning the sourdough craft! I am using Artisan bread flour. Following your recipe, I got a very flat, dense loaf that was a chore to enjoy and was underbaked in the center at the bottom. I’m now trying it again and let it bulk ferment for 5.5 hrs. It rose a bit but I would hard-pressed to say it was a third larger. Ithen put it in the fridge overnight. This morning I looked at it and it doesn’t have the concave shape and strength like in your photo at the end of bulk fermentation. So, I have taken it out of the fridge and am bulk fermenting for another 3 hours at room temperature to see what happens with the hope that it will produce a stronger dough that I can then put back in the fridge overnight before baking tomorrow. What do you think?
Hi Rich, oftentimes a loaf will turn out dense and underbaked when the dough didn’t ferment long enough or the starter wasn’t working well. Is your starter new? That could be the issue, if so. I think it’s a good idea to ferment longer this time and see if that fixes the issue. Let me know how your bread turns out!
Leanne, thank you for your advice! I have since tried variations with my starter, flour, and fermentation time. It seems that using the starter within a few days of feeding and storing in the fridge made a difference. Even in the fridge, the starter starts to rise a bit after 4 days or so and I try to use it by when it does. Also, I have been trying to catch the starter just as it peaks at room temperature before I add it to my sourdough. Both of these have produced a dough that had more volume and was soft and pliable during folding. My loaves consequently rise better and have more of the appearance in your photos. I also have been using an artisan bread flour but tried using all-purpose flour for my last loaf and it was delicious! I am wondering if I could get even more volume and air in the loaves if I alter my folds technique or add more time to my proofing?
Hello! On the third day, I took out the loaf as instructed and shaped it into a ball and tightened it (which turned out perfect). I waited for 10 minutes and did it a second time and it was then that the dough started to come apart and tear and get all mushy. Do you know what might’ve gone wrong? I have been making sourdough for a while and all my loaves come out beautiful….. This is the first time I do along ferment. And I did use all purpose flour. Thanks!
Hi Jennifer, I’m not sure what went wrong! The gluten structure can degrade with over-fermentation, but I haven’t had that problem after cold-retarding my dough. I’m sorry it didn’t turn out well for you!
Thank you for the clear and extensive details. I am a baking “clutz”, making odd and interesting mistakes (like setting fire to my dish towel) until I got it right around loaf #7. Now on loaf #15 I am super proud that I can consistently provide healthy bread for my family!
Hi. This is my second time using your recipe. I cannot seem to get a good shape to my noule after proofing. It just does not retain the tightness of the ball. Also, its quite hot here, so I wonder if that might be the reason?
Hi Alida! You can try doing about 5 minutes of stretch and folds on the the dough right after you first mix in the starter (before bulk fermentation). You can also try to shape it tighter. Over-proofing when it’s hot can also cause dough to deflate. If you would like to email me a photo of the inside of the bread at leanna (at) aberlehome.com, I can take a look and see.
I’m going to briefly machine-mix my flour for both the autolyse and the subsequent bulk fermentation stages. I will stretch-and-fold and otherwise follow directions. Will the folding be excessive?
Hi David, it will likely still need some folds. If the dough resists being stretched, though (like it’s tight and going to tear), then you can stop stretch-and-folding.
I accidentally started forming bread on day 2. Hope it will be ok.
It should be just fine, Rick!
Hello there. Thank you so much for the awesome directions. I do have one question.
I’m not able to bake on day three and wondering if my loaf will be ok still in the fridge?
Hi Jodi! Yes, it should be, or you could even bake on day 2.
Great recipe. First time I made it, it came out gummy, but the next try I let it proof for two and half hours and baked it about 15 minutes longer and then removed it from the Dutch oven and left it on the oven rake with the door open to cool. Came out fantastic! Thank you
I’m so glad to hear your bread came out well the second time, Dan! Thanks for coming back to leave a comment. 🙂
I am so happy with how this bread turned out that I now consider myself an official sourdough bread baker! I am very new to bread baking and this is only my fourth loaf (three others were different recipes). No need to look any further. And, don’t let the three days scare you. You just have to plan ahead. Thank you @aberlehome.com for sharing this with clear, easy directions!
I’m so glad to hear your bread turned out well, Caryl! Thanks for your kind comment.
Hello again, Leanna! I was wondering, if I wanted to make my boule black for Halloween, how much activated charcoal do you think I would need to add to the recipe to make it a nice dark black? Like 3-5 grams? 20? I have no idea! 🙂
Also, every time I go to make a couple cuts in the boule with my bread lame before baking, all it does is tear and tug at it and it’s very messy, vs. a nice clean quick cut. I have a decent lame, but do you have any suggestions for what I might be doing wrong? Thank you so much for you help and again for this excellent recipe!
Hi Bonnie, I have never used activated charcoal… sorry I can’t be of help there! As far as the tearing when scoring, it’s tricky because the dough isn’t cold at that point. (That’s the reason I typically do a very simple slash for this loaf and nothing fancy.) You can wet your lame to help it slide through better, or maybe stick the loaf in the freezer for a stint a little before proofing is done.
Hi Leanna, no worries about the charcoal, and yes, slashing it when chilled seems to be the general consensus of the bread community! Thank you for your help!
Hi!
I just made my first sourdough loaf with this recipe and it turned out great. Not perfect, but that’s due to my beginner’s technique. I wanted to keep playing around with this recipe, and I’m wondering if it would be okay to play around with the flour. Same weight, but switching it with 70% bread flour and 30% whole wheat. What do you think? Thanks!
Also, I accidentally autolysed for 6 hours at room temp instead of the fridge. How do you think that would’ve affected my loaf? It has a slightly chewy texture but I thought it might have been underproofed. Thanks again.
Hi Ella! If the autolyse goes too long, the dough will start to break down (lose structure and become extra sticky). It would be hard to diagnose your loaf without seeing it.
The recipe should work with bread flour and whole wheat. Those flours are thirstier, so you would likely need extra water. It might take less time for the dough to rise after the stretch-and-folds because of the whole wheat, but if you watch the dough instead of the clock, you should be fine. 🙂 -Leanna
Day 3 out of fridge and ready to pull and flip dough
Dough is sticky still, difficult to flip
I continued with process and now in oven with light on
Not sure how it will be as finished product🙁
I will try this again. Any advice is much appreciated
Hi Lela! How did the dough look compared to my pictures during the stretch-and-folds? The dough should be pretty sticky, but not too slack. It could be too much water in the formula for the flour that you’re using… I’d be curious to know how it bakes up for you.
It was pretty close to picture, I was able to pull and stretch
Dough was pretty sticky at that stage
I will absolutely let you know.
My husband is pretty excited for it to be done
Oh my goodness! It turned out beautiful. Thank you for your easy instructions
I can’t wait to use my reserved starter to make another one.
I’m so glad to hear that! Thanks for letting me know. 🙂
What an incredibly clear, efficient and delicious recipe. Thank you! My first loaf came out wonderfully. I mistakenly didn’t press the right button when I turned down the stove to 450 so the bread cooked all the way through at 475 and seems terrific. Can you tell me what would be different with the lower temp—i’m assuming just less chance of char and more time to cook internally? Thanks for your help!!
Hi June! Yes, the lower temp is to make sure the loaf bakes through, but if 475°F works for you, stick with that. Since I’m at high altitude, I usually leave my oven at the higher temp the whole time too.
Love this receipt!! Have been trying out for a few times and all went well. While today i have forgotten to put the dough in fridge and left the dough at room temperature for almost 5 hours after stretch and fold (its summer and the dough has raised more than double), wondering if this would still work? If there would be anything I can do to fix this?
Hi Zoe, thanks for making my recipe! I would just pre-shape/shape, proof, and bake today since it has fermented longer. Even if it bakes up a little flat, it should still be tasty!
Thanks Leanna! As it was late at night, I could only put the dough in the fridge and bake in early morning the next day. Not having the best oven spring but like you said, it tastes good as usual, thank you so much for sharing the great receipt!
Hi Leanna! Thank you for putting together this great website & all the info:)) today is my day 7 of making the starter & I’m pleased it has been a successful process:))
I read in the book nourishing traditions that spelt is a great grain to use for sourdough bread. So my question is can i use my fresh milled spelt flour to make the sourdough bread?
Thank you!
I’m so glad the starter was successful, Artamis! Spelt is wonderful. I don’t have a spelt loaf on my site yet, but I’ve made The Perfect Loaf whole grain spelt pan loaf a number of times, and it’s delicious! I do have recipes here for spelt waffles and a spelt banana bundt cake that uses sourdough discard.
This is my favorite recipe! I use it at least once a week, and pretty much have it memorized. I’m going out of town for five days, and I’m wondering if I stuck the dough in the fridge before I left, would it be okay to bake after getting back? Or is that too long in the fridge? Thanks!
I’m so happy to hear that! It would be okay to bake after five days. It might take on a more sour flavor or spring up less in the oven, but it should still work. 🙂
Hi,
First time making sour dough bread and I love your recipe, it is so clear and easy to follow with your pictures.
I am ready to put dough in the fridge for 72 hrs but now have a conflict on day 3. Would it ruin all my hard work if it had to spend another 6 additional hrs in the fridge
I am going to try this bread. I am wondering is the final Shaping of the bread, right out of the refrigerator? Or do you let it sit out and come to room temperature before you shape it before baking.?
Hi Judy! You will shape the dough straight from the refrigerator.
Amazing! Wonderful! So very excellent instructions…many, many thanks for sharing your wisdom with us!!!
I’ve been wrestling with sourdough for a number of years, never attaining any form of consistent results. After following your clear and illustrated instructions. BAM!
EVERY. SINGLE. TIME.
A gorgeous and tasty loaf of perfection! Thanks again, from the bottom of my heart❣️
Dawne – a devoted lover of all things sourdough ☺️
Wow, thank you for your kind comment, Dawne! I’m so happy to hear that this recipe has worked well for you! 🙂
Hi–Im eager to try this recipe but I do like to use a portion of whole wheat flour in my bakes. Usually white wheat flour. Have you tried substituting a portion of the flour with whole wheat flour? If you have, how would you tweak the other elements. Maybe I should just experiment, but am wondering if you have any thoughts. Thank you so much
Hi there! I think if you replace up to half of the flour for whole wheat, you won’t have to change much. If the dough feels too dry, just add a sprinkle more water during mixing until it looks like the photos. It might proof a little quicker as well. Let me know how it turns out if you try it. 🙂
Hi Leanna, I’m curious if you do your stretch and folds while the dough is cold right out of the fridge after autolyse ? My dough remained cold for the entire room temp bulk ferment is this okay? Also on the third day do you shape your dough while it’s cold right out of the fridge ?
Hi there! Yes, I do the stretch and folds while the dough is cold. The dough warms up quite a bit as it is handled, but you can set it in a warm place during bulk (and make sure it increases in volume by about 1/3 before going back into the fridge). You will also shape the dough while it’s cold from the fridge.
Have you ever tried this recipe in a loaf pan like for sandwiches? I have researched all kinds of recipes and really love the look of this recipe as it has long fermentation and want that for the health benefits. Most sandwich loafs have a zillion ingredients and hardly no fermentation. I am just really wanting to make sandwich loafs to start. Any idea if I tried that with this if it would work? Any recommendation on oven temp and time baking if I wanted to try. Thanks
Hi Felicia! The bread should work well baked in a loaf pan. The texture would still be like an artisan loaf with a fairly open crumb. I would grease the pan and experiment with 425°F for the baking temp. The internal temp should read between 200-210°F on an instant-read thermometer when it’s done. I’m sure others would be interested to hear how it turns out if you try it! 🙂
Hello! I’ve used your recipe twice now (my first two times ever making sourdough!) and both boules came out absolutely perfect! My question now is, if I want to bake two boules, do I just double the recipe into one boule, then separate in half before the banneton step? Also, I can only bake one at a time, what would I do with the other boule while the other bakes? Leave it in the fridge? Would I bring it back to room temp before baking? I appreciate any advice you can give! Thank you 🙂
Hi Bonnie! Yes, simply double the recipe and divide the dough when it’s time to preshape. And yes, I would hold the second loaf in the fridge after proofing until you can bake it. You don’t need to bring it back to room temperature. 🙂
Great to know, thank you so much!
Leanna – what a wealth of information!! As others, I’m on my way to making my first loaf of sourdough bread. Can you tell me what size is the large glass bowl you mentioned ? I have many nice ceramic bowls so hoping not to purchase another one. Thank you. Kathy
Hi Kathy! Yes, any large bowl will work. The bowl I used is 4.5 quarts and the top measures about 11 inches in diameter. I hope your first loaf turns out well! -Leanna
Thank you very much !
Leanna – I’ve been using a 9” round banneton and 10” oval banneton with another recipe that called for 500g. flour. Dough seems to be too much for that size basket, with rising quite a bit above during bulk fermentation. I’m guessing your recipe with 425g. should be more suited?
Hi Kathy, yes, I’m using a 9″ round here, so you might like the scale of this recipe better. 🙂
Hi Leanna, just found your blog and I LOVE it! This is such a great tutorial on making sourdough bread. I love the look of a great loaf of sourdough and yours turned out beautifully!!! Thank you for the tip about using a fine mesh strainer to flour the banneton. What an awesome way to spread the flour evenly. And yes, I sometimes eat half the loaf too. 😉 So yummy!! Thanks again for this great post!
Thank you so much for your sweet comment, Laura! 🙂
Amazing…truly truly amazing. The most delicious bread ever. I baked my first loaf today and just cut into it. I followed the recipe exactly. I purchased the same bowls and the lodge Dutch oven. I waited the length of time necessary, baking it on day 3. It has such a delicious sour taste. My husband and I never thought the sourness would be so prominent, but we are so thrilled that it is. When our 19 year old son gets home from work we are guessing the loaf will be gone before the day is over. . I have already started a double batch so I can bake them on Wednesday. Yippee. Thank you so much for such a perfectly detailed recipe. It was my very first loaf of sourdough ever with the starter I started over two weeks ago. It was slow to get going, but now it’s finally super active.
I’m so glad to hear this, Rebecca! Enjoy your sourdough bread! 🙂
This has been my go to sourdough recipe. Easy to follow, and everyone loves the results. Bread smells heavenly and looks beautiful. Still haven’t perfected my use of the lame- but always hopeful for the next loaf.
I’m so glad to hear that, Debbie! One trick I’ve learned is wetting the lame with water before slashing. That helps it to glide through the dough easier. It is hard to do any detailed scoring with this particular recipe since the dough is not cold when it’s time to score.
So glad to have found instructions and recipes from someone who lives at high altitude like me. I’m new at sourdough bread making and was worried that directions for hi-alt bread would need a different recipe than what I’ve seen.
I made my first sourdough loaf yesterday and it turned out surprising well for a beginner. Thank you!
I’m so glad your loaf turned out well, Bonnie! Thank you for taking the time to leave a comment. 🙂
Hi, I mixed my autolyse this morning, but my starter needs more time. Is it okay to leave the autolyse in the refrigerator overnight??
Hi Erika! That might be too long to autolyse. The risk is that the gluten structure could start to break down if the dough ferments too long (resulting in a deflated loaf). If you tried it with the long autolyse, let me know how your loaf turned out! 🙂
Just wanted to share my experience with the few who asked about a longer autolyse. I had a schedule conflict and left my dough to autolyse for 9 almost 10 hours and honestly when all was said and done it was the best crumb and rise I’ve ever gotten! Could be a fluke so I’m going to try again.
Thanks for sharing, Anne!
Can I use a non enameled cast iron Dutch oven with a lid?
Hi Lisa! Yes, that should work just fine!
Can i autolyse for more than 6 hours? Say 8 or 9? So that i can autolyse while i sleep. Also have you heard of baking with sourdough sponge?
Hi Doreen, I haven’t tried to autolyse for more than 6 hours in the fridge, but it does work to autolyse for 1 hour at room temperature if that would help you. 🙂 Yes, some recipes call for a preferment or sponge to be made first. This one you can just activate your starter and go from there.
Lovely loaf, this is my second round with this recipe. Hoping to get a great result once again. Curious can autolyse be shorter? I’ve seen recipes on King Arthur site showing 1 hour time period, rather than six hours. I don’t usually stay up that late, and need to bake at 4 am when the heat of the day isn’t upon me yet.
Hi Michelle! Yes, I’ve had success with a room-temp autolyse for 1 hour. 🙂 I hope that helps!
Thank you for your response. I stayed up to 9 to follow the recipe instructions. Then I was up early this morning shaping boules and baking. Delectable bread! Funny thing I realized I’d loaned my enamel ware pots to my daughter. So I put a pan of boiling water in the bottom shelf and used a cast iron skillet to heat and bake my bread in. I suspect my bread would have risen more in the closed enamel pot but all the same I’m happy with a lovely loaf. Next time I’ll have a pot with a lid.
Awesome bread recipe. Tried this with brown and Rye flour combo and Brown flour. Add some olives in the dough to make it even better
Sounds delicious, Erik!
Hi there! It looks like this method is about 30 hours in the fridge for the retarding proof. I’m curious how big a difference you think it would make to leave it closer to only 20 hours in the fridge? I have a weekend I’m hoping to bake this in but have a shorter timeline to do it in just because of logistics and I’m curious what effect you think this might have?
Hi Kirsten! I don’t think it would make a huge difference if you bake it after 20 hours in the fridge.
I made this bread on 3/2/22 and though I think I should/could have got more rise, it came out perfectly. It made me realize the importance or proper tools (improvised lame) and matching sizes (I had a 9″ basket for the rise and 8″ Le Creuset for the cook), but it still was good. I have pics it you like
Sounds like you made things work out, Sue! I would love to see pictures. You can email me at [email protected] or if you have Instagram, you can find me @aberlehome and message me.
Every time I make this recipe, it tastes sensational but it doesn’t have the beautiful air bubbles that an artisan sourdough tends to have. Mine always turns out really dense. I’ve baked this four times now and always the same result. What am I doing wrong???
Hi Nina! My first thoughts would be that your dough may need more time to bulk ferment or to proof (maybe both). You can put your dough in a warm place to help it along (and make sure your starter is nice and active before adding it in). Try leaving it on the counter after the stretch-and-folds until it looks bubbly in the bowl and jiggles when you bump it. I think this may help. Also make sure to handle your dough very gently during shaping to prevent it from deflating. If you have any other questions, let me know!
Hi Leanna,
I’m loving this recipe. Could you give some suggestions on adding some different flours? I’d love to try a wheat or rye variation. Thanks!
Hi Suzie, I’m actually planning to test and post some more artisan bread recipes with different flours in the near future! If you try with this recipe, I would start by replacing less than half of the all-purpose flour. You will probably need to decrease the amount of flour in the formula overall (or add a touch more water) because wheat and rye flours are more thirsty than all-purpose.
Hi Leanna – Now that the temperatures are cooling off, I’m getting ready to pull mu starter from the freezer and start feeding it. I’m curious why you use ice water and autolyse in the fridge?
I’ve always used room temp water and autolyse on the countertop.
Thanks!
Hi Sheri! I do a long cold autolyse here for a more open crumb, though I’m tempted to test this recipe again with a shorter autolyse at room temp to compare the results.
would there be a downside to shaping after the bulk and then letting proof in the basket in the fridge? experienced sourdough baker but looking to double up on my fermentation time so interested to try your method with the shorter bulk and longer retarded proof !
Hi Chris! I’ve tried a retarded proof with this method, but I didn’t get good oven spring. I don’t think I’ve ever had success retarding a proof in general, actually, although I know others do it successfully. It works better for me to stretch the bulk and then proof at room temperature. If you try it, let me know how it turns out!
Hi, I love your recipe. I just did a 72 hour ferment and you can tell it is sourdough. The bread turns out wonderfully. I have made this three times. My loaf comes out less round and flatter than yours. I struggle with the stickiness, esp. when getting it out of the fridge and shaping it into a ball. I have not gotten the hang of pulling it against the countertop. Even if I did, the stickiness would cause it to spread. I weigh my o gradients and follow your instructions to the letter best I can. Any help for me?
Hi Kris, I’m glad you’re enjoying the recipe! Different flours absorb water differently, so if you feel like your dough looks wetter than mine after you mix the ingredients, you could try adding a little more flour at the beginning. It may just be your shaping issue that is causing your loaves to collapse, though. The preshaping and shaping are meant to give the loaf tension on the outside to help it hold its shape, but high hydration dough can be difficult to handle.
When you’re ready to turn out your dough after refrigeration, dust your counter with flour first. Your dough will land on the flour, coating the bottom of the dough so it doesn’t stick to your counter. Use a dough scraper to help you lift the floured edges of the dough up over itself, encasing the sticky side of the dough. Give the ball a flip with your scraper, and if it still sticks to your hands as you pull the dough against the counter to tighten the skin, wet your hands slightly to prevent sticking, or use your bench scraper to pull the dough towards yourself.
I found a Youtube video that might help you. She shapes her boule similarly to mine.
I hope this helps!
I’m starting this now (I hope!) but could you clarify in Step 1 how much starter to add 1 C flour and 1 C flour to? I usually do 50 grams of each 3 so I did 100 grams of each just now.
Hi Karen, I usually save about 1-2 cups of starter in my fridge that I take out and feed with the flour and water. I updated the post for clarity.
Have you ever tried leaving this to ferment for an additional day? I had read from @just.ingredients that if you ferment sourdough for 72 hours it reduced the gluten by over 90%! I will try when I use this recipe, but was curious if you had any experience with that.
Thanks!
Wow! I haven’t fermented it that long, but I’d love to know how it turns out for you!
How did leaving it an additional day turn out?
Despite the steps, this seems so straightforward! One question: I have organic bread flour or regular bleached ap flour (not organic). Can I do this with bread flour, or would it be too heavy?
Hi Lauren! I think you could substitute with either of those flours and still end up with a nice loaf. Bread flour has a higher protein content than all-purpose, so you may want to add an extra sprinkle of water to your dough initially to make up for that.
By far the best sourdough recipe I’ve made. After many attempts with other recipes, this is the easiest, tastiest and just delicious. I’d love to make a fruit loaf version. Has anyone tried???? When to add fruit…less liquid????
I’m so glad you liked the recipe! I haven’t tried adding fruit, but I think if you soaked dried fruit from when you are first starting your dough, you could add it after bulk fermentation before you refrigerate the dough. I would poke it in gently first with wet hands, then fold the dough in half over itself a few times to incorporate the fruit without damaging the structure of the dough. If you try it, I’d love to hear how it turns out!