This post may contain affiliate links. See my full disclosure. As an Amazon Associate, I earn from qualifying purchases.
Making homemade yogurt in jars has never been easier thanks to the Instant Pot and the cold start method! I’ll show you exactly how to do it.

Homemade yogurt is a staple for our family served on baked oatmeal or with fruit and granola, and it’s easy to make!
We love being able to choose the milk and method of preparation, we save a little money, and we love that the yogurt isn’t cultured in plastic containers.
Why Make Instant Pot Yogurt in Jars Using the Cold Start Method
I used to make homemade yogurt, but then stopped for quite some time because the process of heating, cooling, and keeping the milk warm enough to culture just seemed so laborious.
But this method using the Instant Pot® (pressure cooker) erases every extraneous step! It’s perfect for busy people who want to make homemade yogurt weekly.

The secret is partially in the type of yogurt starter you have, which we’ll discuss in this post.
Yes you can make yogurt directly in the inner pot of the Instant Pot, but if you’re not planning to strain, it’s ideal to make yogurt directly in jars!

If you want to see which other whole foods I prep for our family in the Instant Pot, visit this post.
You’ll also love learning how to make milk kefir and cultured buttermilk. You’ll be amazed how easy these two cultures are to make at home!
What is the Cold Start Method?
Usually, milk for yogurt is heated to about 185°F and then cooled back down to 112°F before the yogurt culture can be added. This step breaks down the proteins in the milk for the thickest yogurt.
With the cold start method, however, you will add the starter culture directly into cold milk and culture from there.
The cold start method saves time, but also preserves more of the desirable health benefits of raw milk or low-temp pasteurized milk. The milk doesn’t exceed 113°F in the Instant Pot.
Yogurt Thickness Notes (Cold Start vs. Heating)
Now let’s talk about how this method affects the thickness of the yogurt.
I’ve tested with both Maple Hill Grass Fed Organic Whole Milk (an ultra-pasteurized, homogenized milk) and Kalona Supernatural Whole Milk (a low-temp pasteurized, non-homogenized milk) to compare.
- Yogurt made with pasteurized milk will only have a slight difference in thickness when made with the cold-start method as opposed to being heated and cooled first. A pasteurized whole milk seems to yield the creamiest, thickest yogurt.
- Low-temp pasteurized or raw milk will likely yield yogurt with a looser texture with the cold start method. There will be a cream layer on the top of yogurt made with non-homogenized milk.
It’s ultimately up to your own preference, and you can experiment from batch to batch! You also have the option to strain your yogurt (after chilling) for Greek-style yogurt if made directly in the inner pot instead of jars.

Let’s go over the types of yogurt starter cultures and then I’ll explain my easy method for preparation.
Understanding Types of Yogurt Cultures
Direct Set vs. Heirloom Starters for Instant Pot Yogurt in Jars
You may know that store-bought plain yogurt with live and active cultures can be used as a starter culture.
And while this is true, yogurt started this way will only perpetuate about one more batch before the bacteria loose strength.
A weak yogurt starter will produce yogurt that is too thin, with a stringy, gelatinous texture.
Yogurts from the store and other single use yogurt starters are called direct-set starters.
If you want to use store-bought yogurt or a direct-set starter culture, you’ll have to continue to purchase yogurt/starter to use for subsequent batches. This option is fine if you make homemade yogurt only once in a while.
Your other option is to purchase an heirloom starter. These starters produce yogurt that can perpetuate batch after batch (some say indefinitely, if cared for properly) if you save some yogurt aside each time for starter.
An heirloom starter is a game changer if you want to make yogurt weekly at home!
Temperature Required for Culturing
Along with heirloom and direct-set starters, there are actually different types of yogurts that culture at different temperatures:
- Thermophilic yogurt (cultures at a warm temperature 108-112°F in 5-8 hours)
- Mesophilic yogurt (cultures at room temperature 70-77°F in about 12-24 hours)
Thermophilic Yogurts – Ideal for the Instant Pot
Thermophilic yogurts are what we are used to buying in stores in the US. These yogurts are thick and tart and usually made up of 3-5 lab-selected probiotic strains.

Thermophilic yogurts must be kept at the proper warm temperature to culture, which is where the Instant Pot comes in handy! Choose a thermophilic starter for this recipe.
Mesophilic Yogurts
Mesophilic yogurts are not as well known. They are generally thinner in consistency than thermophilic yogurts (almost drinkable) with a mild (and sometimes unique) flavor profile.
They contain a greater diversity of naturally-selected probiotic strains than thermophilic yogurts.
Some examples of mesophilic yogurts are matsoni, viili (this one is thicker), piima, and filmjolk. Since these yogurts culture right at room temperature, you wouldn’t need the Instant Pot to make these!
Choose a starter based on your own preferences.
Where to Purchase a Yogurt Starter
Starters usually come in freeze-dried form and are activated when the first batch of yogurt is made.
Cultures for Health is a great online store that has a variety of both mesophilic and thermophilic cultures to choose from. They offer both direct-set and heirloom cultures.
I’m currently using an heirloom Bulgarian starter (Yogo Therm brand).
Tips for Making Instant Pot Yogurt in Jars Using the Cold Start Method
- This recipe uses the yogurt function on the Instant Pot. This function may have two settings: low and high. Insure you set the pot to low for culturing the yogurt.
- Do not use the sealing ring when using the yogurt function. The pot does not come up to pressure when using this function.
- It’s not necessary to sanitize your jars and utensils, but make sure you’ve washed them with soapy water and rinsed them thoroughly.
- Try to make yogurt weekly to keep your starter strong (you can make as little as you like, or fill the Instant Pot with 3 quart jars).
- You can store heirloom yogurt starter in the freezer in an airtight container for up to 2 months if you need a break from yogurt-making.
How to Make Instant Pot Yogurt in Jars (Cold Start Method)
Step 1 – Fill Jars with Milk & Whisk in Yogurt Starter Culture
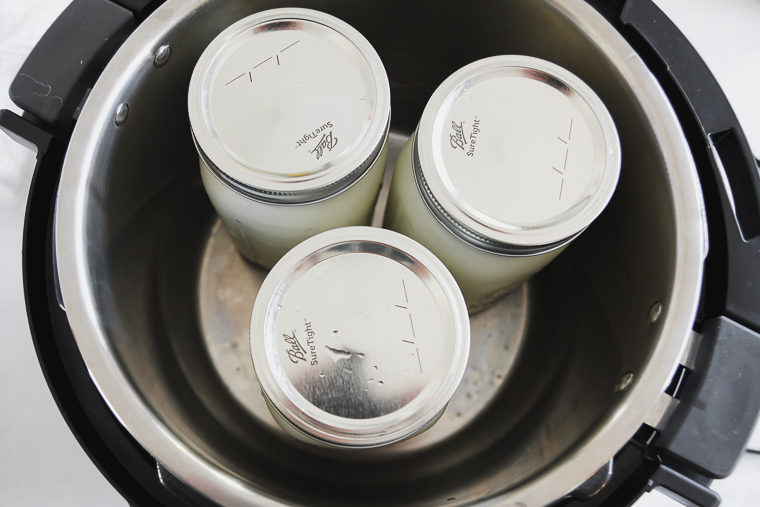
I typically use two or three Ball Wide Mouth 32oz Mason Jars, but you can use smaller jars, if you want single servings. Fill your jars with your cold milk of choice, leaving a bit of headspace.
Thoroughly whisk the correct amount of yogurt starter into each jar of milk, then place a fairly loose lid on each jar. (If it’s your first time using a freeze-dried starter, follow the directions on the packet. Feel free to adjust re-culturing ratios and times if your starter has specific instructions.)
(If you do decide to heat your milk to 185°F first, allow it to cool to 112°F before adding the starter.)
Step 2 – Culture Yogurt in Jars in the Instant Pot
Place the jars in the inner pot of the Instant Pot.
Put on the lid (with no sealing ring) and set the pot to the yogurt function (low temperature) for 9 hours or until the yogurt is set when you tip a jar sideways (culturing will likely take less time if you use smaller jars than me or you warmed your milk first).
If you like a tart yogurt, you can try extending the culturing time. Don’t stir the yogurt.
Step 3 – Chill & Store Yogurt
Chill the finished jars of yogurt overnight to thicken. Store the yogurt in the refrigerator and consume within 2 weeks, saving some to re-culture the next batch within a week.
I’m so grateful for your comments, reviews, and questions! Your star ratings help others discover my recipes, and your feedback helps me make improvements. Thank you for your support!

Easy Instant Pot Yogurt in Jars (Cold Start Method)
Making homemade yogurt in jars has never been easier thanks to the Instant Pot and the cold start method! You'll be making fresh yogurt weekly.
Ingredients
- Whole milk
- Yogurt starter culture, at a ratio of 3/4 teaspoon for every 8 ounces of milk (see notes)
Instructions
- Add cold milk to clean jars (no need to sanitize first), leaving a little headspace.
- Whisk in starter culture thoroughly at the proper starter-to-milk ratio (if it's your first time activating a freeze-dried starter that you've purchased, follow the directions on the package to make your first batch). Place loose-fitting lids on the jars.
- Set jars in the inner pot of the Instant Pot and close the lid (with no sealing ring). Set the pot to the Yogurt Function on low temperature for 9 hours, or until yogurt is visibly set when a jar is tipped sideways (you can culture longer if you like your yogurt very tart).
- Remove jars from Instant Pot and place in the refrigerator to chill overnight. Store yogurt in the refrigerator and consume within 2 weeks, but save a little yogurt aside for the next batch (re-culture within a week).
Notes
Choosing milk to culture: Pasteurized whole milk will yield the thickest, creamiest yogurt when using the cold-start method, but this method is also helpful to preserve more of the health benefits of raw or low-temp pasteurized milk if you choose to consume these milks and don't mind yogurt with a looser texture.
Choosing a yogurt starter: This Instant Pot recipe is specifically for a thermophilic yogurt (a yogurt that needs a warm temperature to culture). Mesophilic yogurts, in contrast, culture at room temperature. Store-bought plain yogurt with live and active cultures or a direct-set yogurt culture can be used as a starter if you don't need the yogurt to perpetuate batch after batch. An heirloom starter can be purchased to be used over and over to make yogurt weekly. You can also adjusting the ratio for re-culturing if your type of yogurt has specific instructions.
How to take a break from making yogurt: Freeze heirloom yogurt starter in an airtight container for up to 2 months. Allow to thaw in the refrigerator overnight before resuming culturing as normal.
Recommended Products
As an Amazon Associate and member of other affiliate programs, I earn from qualifying purchases.


2 Questions:
1. Do you need to put the jars on the instant pit rack/ trivet?
2. Do you need to add water to the instant pot (nit in the jars)?
Thank you for your help.
Hi Michelle, you do not need the trivet or water in the pot for this. The temperature stays low and the pot won’t be building pressure.