
This post may contain affiliate links. See my full disclosure. As an Amazon Associate, I earn from qualifying purchases.
A flavorful, chewy whole wheat sourdough pizza crust–perfect for fresh milled flour! You’ll love my fool-proof method for nutritious pizza!

Whole wheat flour adds so much flavor, nutrition, and fiber to naturally leavened pizza dough!
No mixer is required here, and the recipe is great for beginners thanks to my method for shaping and proofing on parchment paper. You won’t have any sticking while transferring the pizza into the oven!
I use my whole wheat sourdough starter, but you can also use a white flour starter with success.
We eat sourdough pizza almost weekly at our house, and so we vacillate between a mostly white-flour pizza dough (using my white flour sourdough pizza crust recipe with 10-20% whole grain) and this 100% whole wheat version with our fresh milled flour.

I’m in the habit of making a quadruple batch of pizza dough at once. This amount will make 6 larger pizzas for our young family of 6 (2 will cover one meal). I freeze the extra dough balls for a quick meal the following week (more on that at the end of the post).
Pizza topping ideas are endless! Don’t forget that freshly shredded, sliced or torn cheese will melt better than pre-shredded cheese from the store.
Baking Whole Wheat Sourdough Pizza Crust With Fresh Milled Flour
I have an extensive post on my blog if you want to learn how to mill flour at home. Eating fresh milled flour (with the bran and germ) has really benefited our health.
Fresh milled pizza can be a fun opportunity to enjoy heirloom wheat berries. I once made this recipe with Stardust wheat berries from Barton Springs Mill, and what a treat! I achieved an even more soft, bubbly crust with that particular variety.
The wheat berries you choose should be a hard white or hard red wheat for proper gluten development. This will insure you get a crust that is capable of rising for enough airiness and chewiness.
Do not use a soft wheat, pastry wheat, or ancient grain (like einkorn) for this recipe.

Sample Baking Schedule
*The strength of your starter, the temperature in your home, and other factors will affect how long each step in the recipe will take.
Feed your sourdough starter prior to making this recipe, so it’s ripe and ready to go!
Approximate timing:
- Mix, rest & knead: 1 hour, 10 minutes
- Bulk fermentation: 2.5-4 hours
- Divide and shape into balls: 10 minutes
- Proof: 1 hour (or in the refrigerator for up to two days)
- Shape, top, and bake: 25 minutes

Tips for Making Whole Wheat Sourdough Pizza Crust
- The crust’s texture relies on gluten development and proper fermentation and proofing. Over-proofing your dough will prevent your crust from rising well in the oven. Under-proofing will also result in a denser, crunchier crust.
- If you don’t own a pizza peel (I don’t), a large wooden cutting board or an inverted half sheet pan will work to transfer your pizza to the oven.
- Make sure to preheat and cool your stone or steel along with your oven to prevent damage.

How to Make Whole Wheat Sourdough Pizza Crust (Step-by-Step Instructions)
Step 1 – Mix Dough and Bulk Ferment
First, you’ll want to stir together your starter, water, and salt in a medium-sized bowl. This will insure the starter and salt incorporate well once the flour is added.
Stir in the whole wheat flour until the dough comes together. Then cover the dough and allow it to rest for 30 minutes so the flour can fully absorb the water for easier gluten development.
Then it’s time to knead the dough in the bowl. To do this, I fold the dough over itself and press it down with my palm. Knead for 5 minutes. The dough should look nice and smooth.
Leave the dough to rest, covered. After 30 minutes, stretch and fold the dough.
Pull the edge of the dough up as high as you can without tearing the dough, then fold it over itself. Turn the bowl to stretch every side of the dough. Cover the dough again for another 30-minute rest, and stretch it one more time.
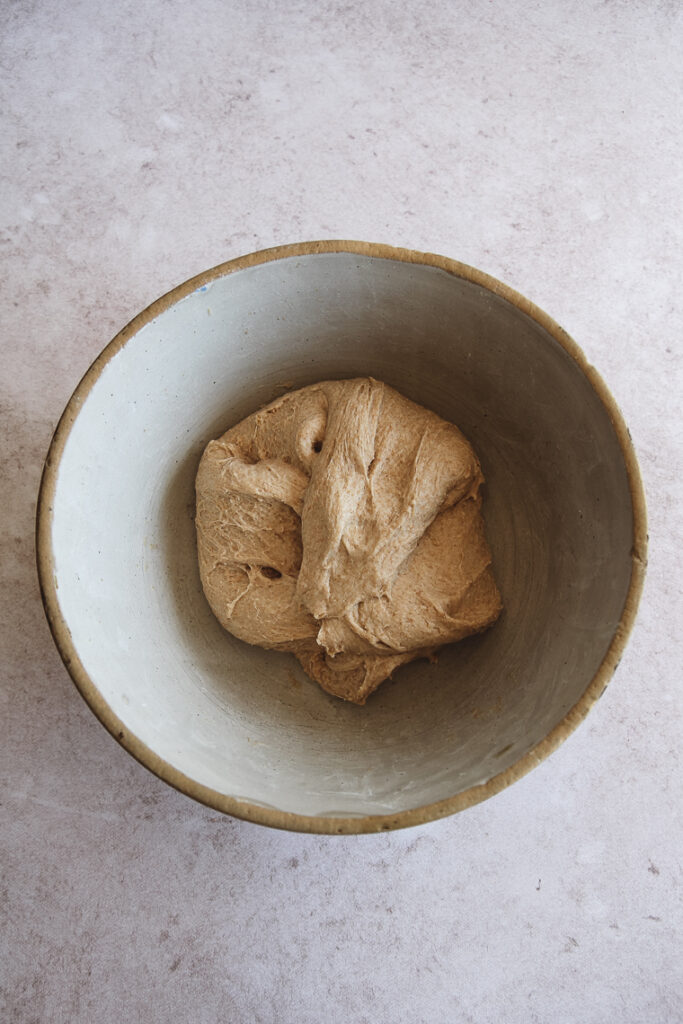
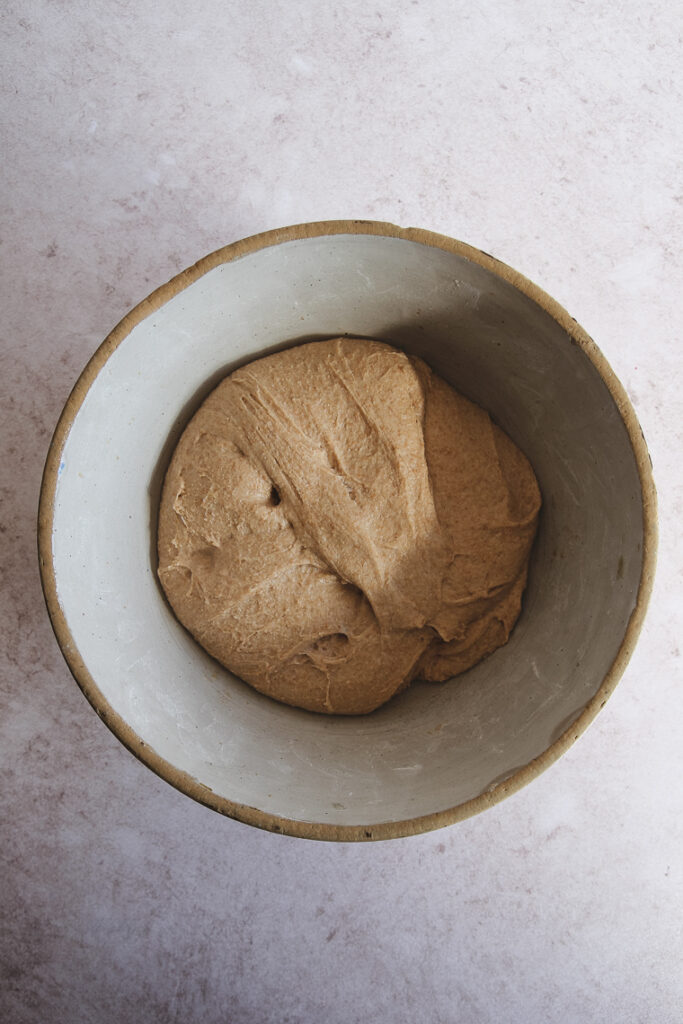
After you’ve done 2 sets like this, allow the dough to continue to rest, covered, until it looks puffy and has risen by about 30%.
Step 2 – Form Into Balls and Proof
Next, remove the dough to a clean countertop, and use a bench scraper to divide the dough in half.
Without degassing the dough, use the bench scraper to scoot each piece into a tight round ball as you create tension against the countertop. Coat each dough ball with olive oil using your hand.
At this point you can wrap and refrigerate the dough balls to use later in the day or within the next couple of days, or you can freeze them for longer storage.
If you’re wanting to bake pizza right away, place each dough ball on a sheet of parchment paper and cover with plastic wrap to proof for about 1 hour, or until the balls are puffy and have relaxed outward.


Set a pizza stone in the top third of your oven, and preheat your oven and stone together to 525°F (or up to 550°F if your oven allows).
I actually preheat a second stone staggered on a lower rack in the oven so I can bake two pizzas at one time.
Step 3 – Shape and Top Pizzas
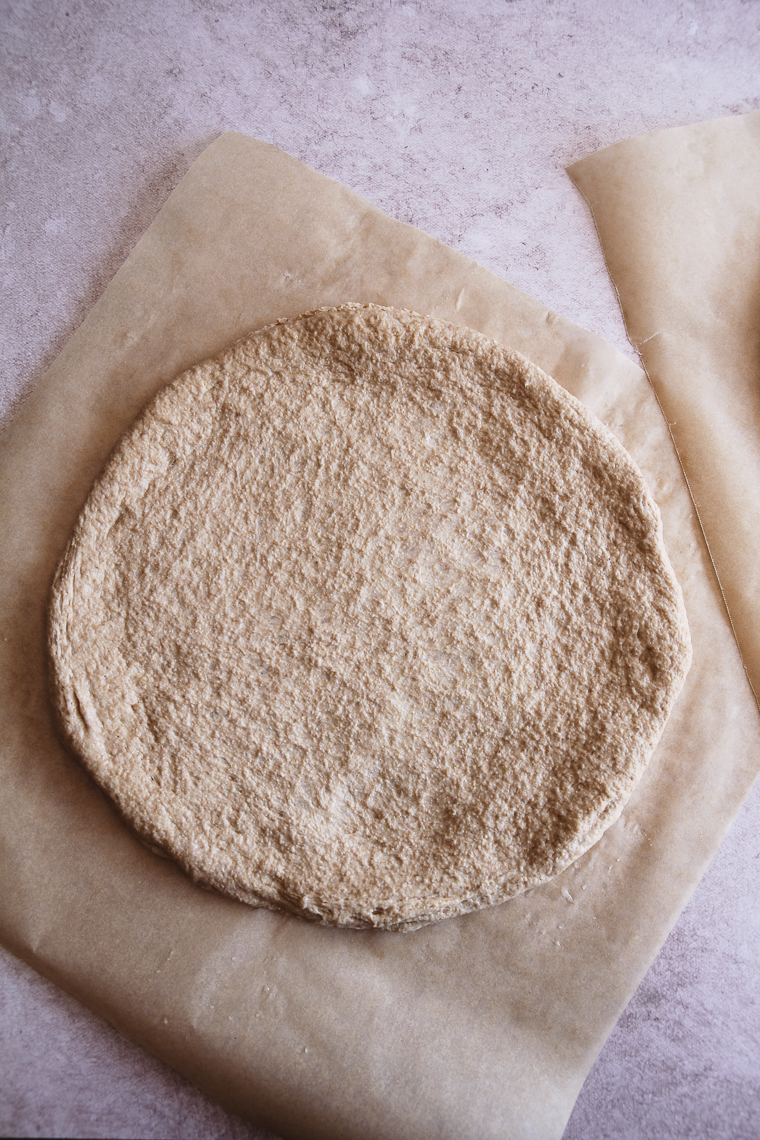
Shape your first whole wheat pizza crust once the oven is preheated.
Dampen or lightly flour your fingertips to prevent the dough from sticking to you. Then begin pressing out the dough ball with your fingers to create a circle. Continue from the center outwards until the dough is about 12 inches in diameter.
Try not to completely deflate/flatten the bottom crust, and stop before you flatten the outside edge. This way you’ll have a pronounced crust around the pizza.
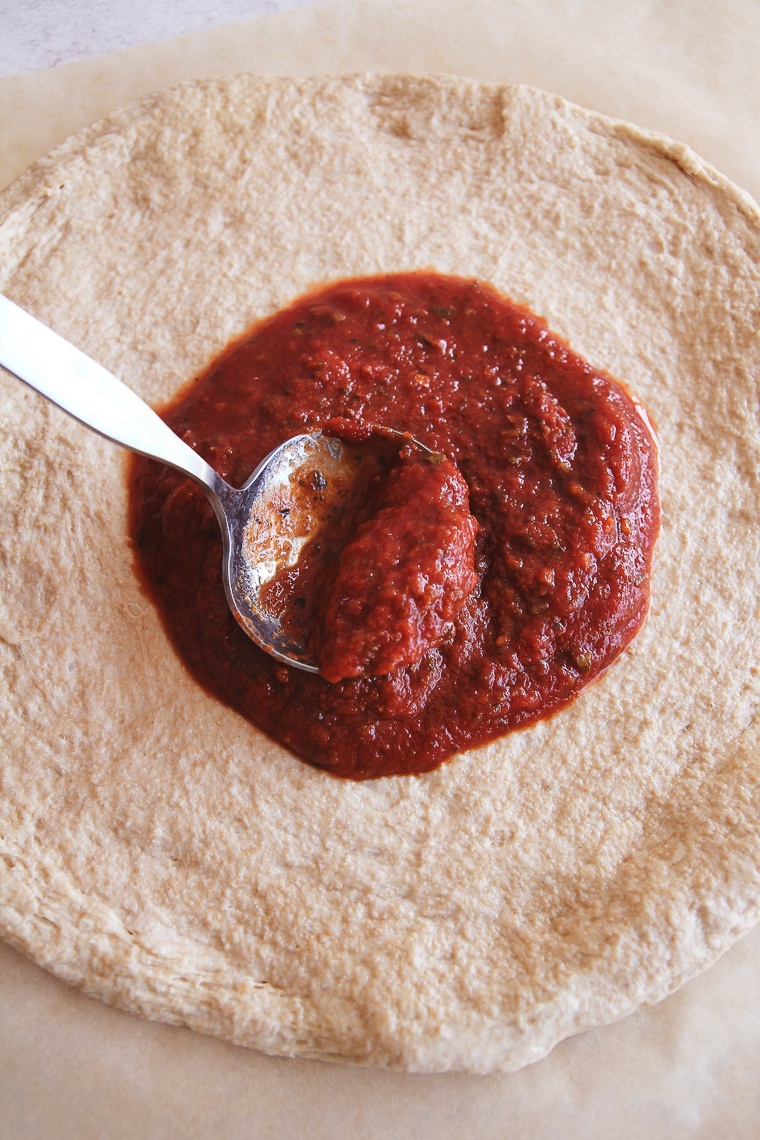
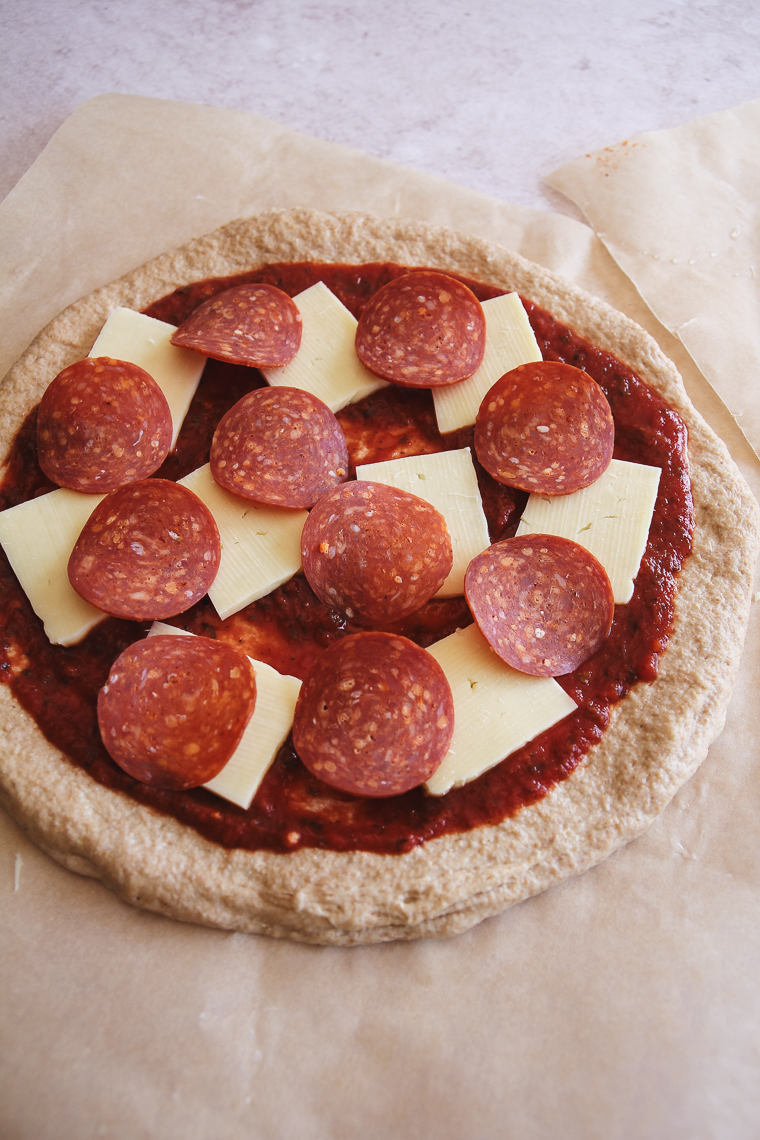
Add sauce, cheese, and pepperoni, or whatever toppings you wish.
Sometimes we do a white sauce pizza with greens or Pizza Margherita with mozzarella, fresh cut cherry tomatoes, a drizzle of olive oil, and fresh basil and oregano after baking.
Step 4 – Bake the Whole Wheat Sourdough Pizzas
To load a pizza in the oven, first slide your pizza together with its parchment paper onto a pizza peel.
If you don’t have a pizza peel, a wooden cutting board or inverted baking pan will work just fine!
Open your oven and quickly scoot your pizza right onto your hot stone or steel. Close the oven door and bake for 10-12 minutes (6 minutes at 550°F). You’ll know the pizza is done when the crust is golden brown to your liking.
Slide the pizza on a cooling rack to cool slightly before slicing. Repeat to bake the second pizza.
How to Freeze Whole Wheat Sourdough Pizza Crust Dough
The dough will be just fine in the refrigerator for a couple of days, but I’ve learned that sourdough pizza dough freezes well!
Simply wrap the pizza dough balls in plastic wrap after you shape them and freeze them in a zipper freezer bag.
To thaw later, place the dough balls in the refrigerator overnight. The next day, you’ll be ready to pull them out to make pizzas as normal!
We have always used our frozen dough within 3 weeks, so I’m not sure how much longer they can be frozen beyond that point before the starter is affected.
and sauce for quick meals later!
In addition to freezing pizza dough, we freeze homemade pizza sauce. We also shred and freeze 5lb blocks of organic mozzarella from Azure Standard to use for our pizzas. This prep work makes for some quick meals later on!
I’m so grateful for your comments, reviews, and questions! Your star ratings help others discover my recipes, and your feedback helps me make improvements. Thank you for your support!

Whole Wheat Sourdough Pizza Crust
A flavorful, chewy whole wheat sourdough pizza crust--perfect for fresh milled flour! You'll love my fool-proof method for nutritious pizza!
Ingredients
- 48g ripe sourdough starter (100% hydration)
- 260g water, room temperature
- 7g kosher salt
- 330g whole wheat flour (see notes)
- Extra Virgin olive oil for greasing dough balls
- Pizza toppings of choice
Instructions
- Mix: In a medium-size bowl, whisk together sourdough starter, water, and salt. Stir in whole wheat flour and mix until a shaggy dough forms. Cover dough and allow to rest for 30 minutes.
- Knead: Knead the dough in the bowl with your hand for 5 minutes. Cover and allow the dough to rest for another 30 minutes.
- Bulk ferment: Perform two sets of stretch-and-folds on the dough at 30-minute intervals, covering dough after folding. Allow dough to continue to rest until it looks puffy and has increased by about 1/3 its volume (about 2.5-4 hours total time for bulk fermentation depending on temperature).
- Form into balls: Remove dough from bowl and divide in half (do not degas). Gently scoot each portion into a tight ball with a bench scraper by creating tension against the countertop. Coat each ball with olive oil.
- Proof: (Option 1) Place each dough ball in an airtight food storage container and refrigerate until the evening time or to use within the next couple of days. (Option 2) Alternately, if wanting to bake the pizzas right away, place each dough ball on the center of a sheet of parchment paper and cover loosely with plastic wrap. Proof at room temperature for about 1 hour or until the balls look puffy and have relaxed outwards. (Preheat oven before proofing is finished.)
- Preheat oven: Place a baking stone or steel on a rack set in the top third of the oven. Then preheat oven to 525°F (or up to 550°F if your oven will allow). I use a second stone staggered on a lower rack to bake both pizzas at the same time. (If you've refrigerated your dough, pull the dough balls out of the refrigerator and place each one on a sheet of parchment paper. Cover with plastic wrap while the oven preheats.)
- Shape: When the oven and pizza stone are hot, remove the plastic wrap from the dough and dampen or lightly flour your fingertips. Begin to press out the first ball of dough on the parchment paper. Gently work from the center outward to extend the dough with your fingers into a circular shape without deflating the outer crust or completely degassing the bottom crust. There is no need to lift the dough from the parchment paper. Continue until pizza is about 12 inches in diameter. Repeat with the second dough ball.
- Top: Top with sauce and toppings, but avoid over-topping. Slide the first pizza (still on its parchment paper) onto a pizza peel (a large wooden cutting board or inverted half sheet pan will work). Open the oven, and use the peel to scoot the pizza onto the hot stone or steel.
- Bake: Bake for 10-12 minutes (6 minutes at 550°F), or until the crust has browned to your liking. Transfer pizza to a wire rack and allow to cool slightly before slicing and serving. Repeat to bake second pizza if not using two stones.
Notes
- Starter: I use a whole wheat starter, but you can use a white flour starter.
- Flour notes: Choose a hard red wheat or hard white wheat if you are milling your own. Do not use a soft wheat, pastry wheat, or ancient grain (like einkorn) for this pizza dough. I have a blog post about milling flour at home if you are wanting to get started.
- How to freeze pizza dough: I like to make a quadruple recipe at once and form the dough into balls for 6 larger pizzas to feed our family for three meals. To freeze the extra dough balls, I coat them in olive oil, wrap them in plastic wrap, and then place in a freezer bag. Place frozen dough balls in the refrigerator overnight to thaw and then shape, top, and bake as normal.
Recommended Products
As an Amazon Associate and member of other affiliate programs, I earn from qualifying purchases.


Nutrition Information:
Yield: 2 Serving Size: 1Amount Per Serving: Calories: 1316Total Fat: 45gSaturated Fat: 15gTrans Fat: 0gUnsaturated Fat: 26gCholesterol: 9mgSodium: 2154mgCarbohydrates: 204gFiber: 22gSugar: 3gProtein: 33g
*Nutrition information is not always accurate.
If I refrigerate the dough balls for baking later in the day, how long before I bake them do I need to take them out of the refrigerator? Do they need to be room temperature?
Hi Kathi, I have shaped and baked the dough balls straight from the fridge and it’s worked out fine. They may be easier to stretch if they sit out for a little while, though.