This post may contain affiliate links. See my full disclosure. As an Amazon Associate, I earn from qualifying purchases.
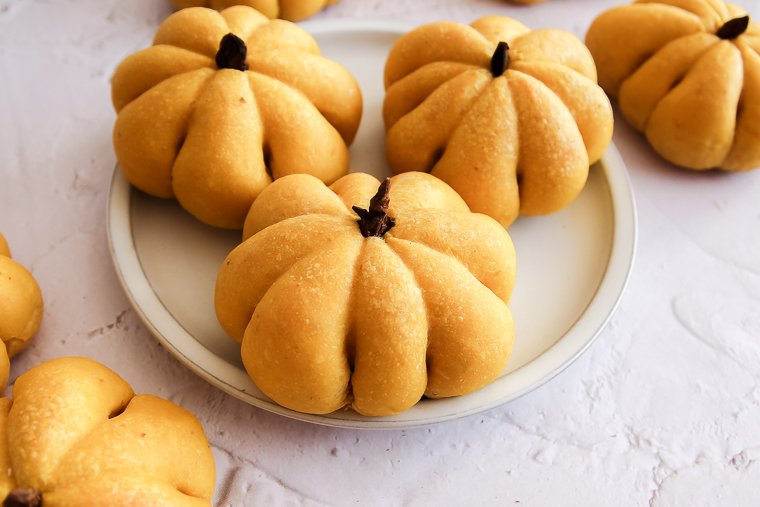
Pumpkin puree gives these pumpkin sourdough rolls their color and softness. Whether you make them pumpkin-shaped or as normal round dinner rolls, they are slightly sweet and buttery–perfect as a side for Thanksgiving or a cozy fall dinner!
*Updated 11/19/23

Pumpkin Shaped Sourdough Bread
Last year it became trendy on social media to bake pumpkin shaped sourdough bread.
The beautiful pumpkin shape is achieved by tying baker’s string a certain way around a loaf of bread before proofing and baking.
I decided to jump on this trend a year later in dinner roll fashion with these soft and tender pumpkin rolls.
These rolls are similar in texture to my soft sourdough potato rolls.
But instead of mashed potato, pumpkin puree is the star of the show, giving the dinner rolls color, flavor, and softness. Brown sugar adds sweetness and deepens the color further.
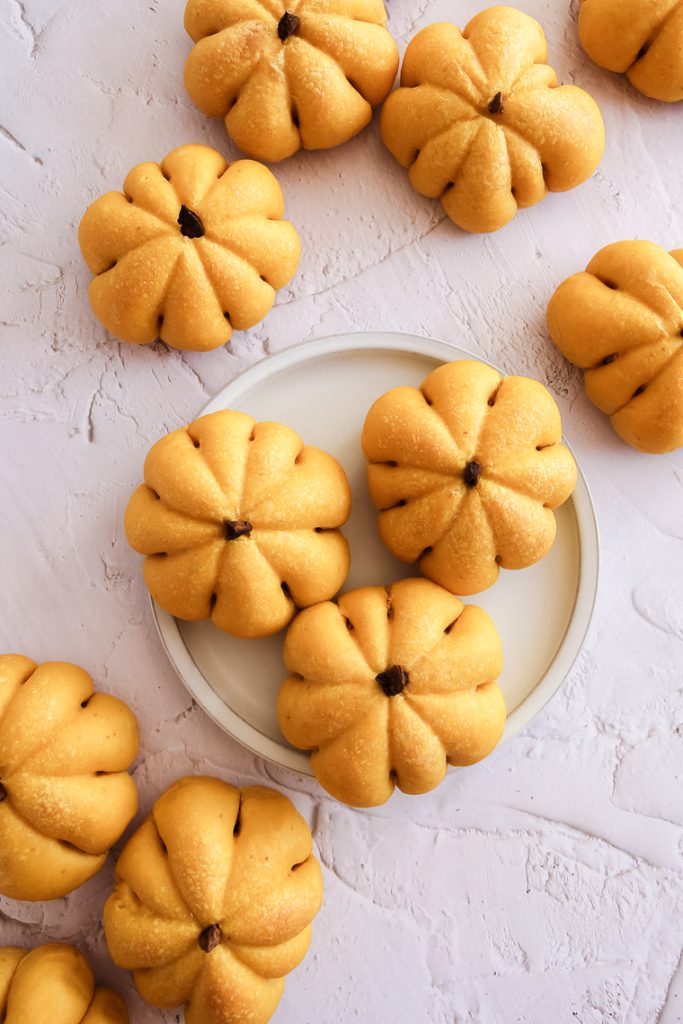
And the best part… if you don’t have the time to tie strings around each roll to make them pumpkin shaped, they bake up perfectly as round pumpkin dinner rolls too!
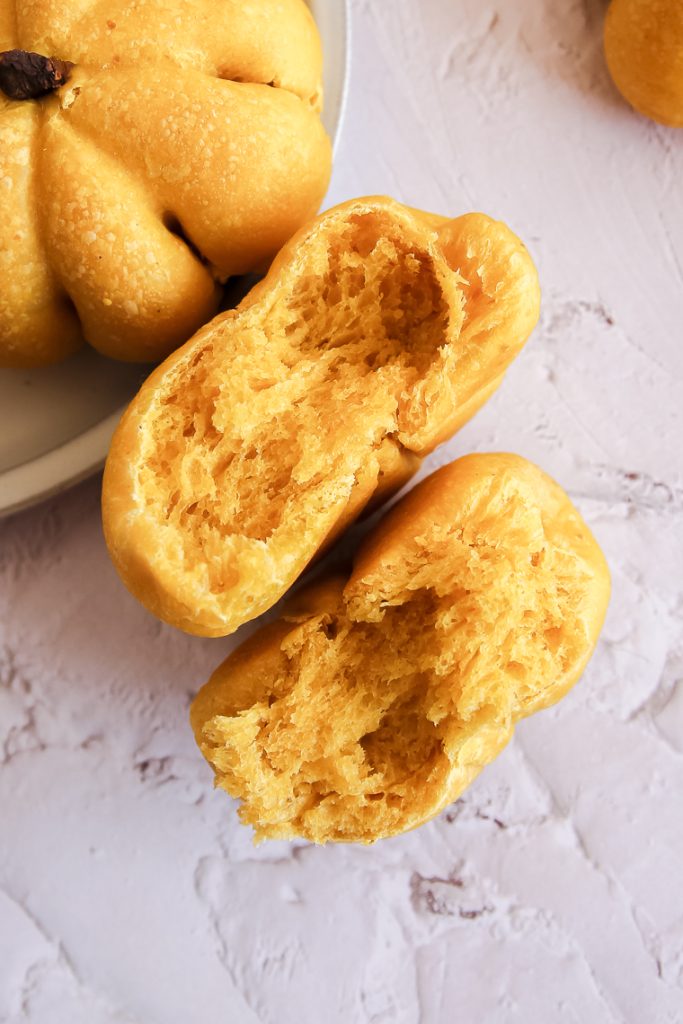
It’s difficult to tell from the photos just how soft these really are.
They are almost begging to be brushed with melted butter and dipped in cinnamon sugar (which I think could be done before stems are added, if you were so inclined!).
I played around with a sweet, stiff levain to prevent these rolls from becoming sour.
Although they turned out wonderfully that way, they also tasted wonderful when I made them with fed ripe starter.
So for you, I decided to keep the recipe on the simple side.
For soft 100% whole wheat sourdough rolls, visit this post.
Options for Pumpkin Stems
Pumpkin stem disclaimer: In my photos I poked the arms of anise stars into my little pumpkins for stems. I found that these actually flavored my rolls quickly, and I’m not sure I enjoyed the anise flavor for this application!
Here are some other ideas if you want your pumpkins to have stems:
- Pecan pieces or sliced almonds
- Thin pretzel sticks broken in half
- Pumpkin seeds
Pumpkin Sourdough Rolls Baking Schedule
Feed your starter several hours prior to baking the recipe and allow it to peak.
Approximate timing:
- Mix and autolyse (rest): 40 minutes
- Knead: 8 minutes
- Bulk ferment: 4 hours, 20 minutes
- Shape into balls: 10 minutes
- Proof (and tie strings): 1 hour, 20 minutes
- Bake: 12 minutes
- Remove strings: 7 minutes
*The strength of your starter and the temperature at which you keep the dough will affect how long each step will take. These took me about 7 hours from start to finish with an ambient temperature of 73-75°F and a dough temperature of 74°F at the start of bulk fermentation. If your kitchen is cooler, expect the process to take longer.
Tips for Making Pumpkin Sourdough Rolls
- You’ll want a healthy starter to use for this recipe. Using the starter at its peak will prevent these rolls from tasting sour. See this post for tips on feeding and maintaining a sourdough starter.
- Don’t use brown twine or the colored red or black baker’s string for your rolls. Those types of string tend to leave colored fuzzies on the bread. A natural cotton butcher’s/baker’s string works better.
- Tie the string on the rolls after they have already proofed for a little while, and tie the strings only as tight as you need to keep them in place. You don’t want the string to sink into the rolls too deeply during baking.
Recommended Equipment
- Digital kitchen scale (this one is my favorite)
- Mixer fitted with a dough hook (optional–you can make the dough by hand)
- Large bowl
- Parchment paper
- Half sheet pan
- Plastic wrap
- Natural cotton baker’s string (not a colored string or regular brown twine!)

How to Make Soft Pumpkin Sourdough Rolls – Step by Step
Step 1 – Mix the Pumpkin Sourdough Dough (with 30-Minute rest)
Hold back the salt and butter at first.
Start by weighing and mixing the starter, milk, pumpkin puree, brown sugar, egg, and flour. Mix on low speed to combine everything.
Cover the dough and allow it to autolyse (rest) for 30 minutes. This rest before the salt and butter are added helps the dough to develop gluten easily.
After the rest, add in the butter cubes and salt. Knead for 6-8 more minutes on low speed (or you can just knead the dough right in the bowl by hand if you don’t have a mixer).
Keep kneading until the dough is very smooth and elastic.
Step 2 – Bulk Ferment (First Rise)
Form the dough into a ball. Place it in a large bowl, cover it with a lid or plastic wrap, and allow it to double in size at room temperature.


You don’t need to stretch-and-fold the dough during this time, so it’s super easy.
Step 3 – Divide, Degas and Shape
After the dough has risen, turn it out onto a clean surface. Weigh the mass of dough on your kitchen scale, and divide the number by 12 so you know how many grams to make each pumpkin sourdough roll.
Divide the dough accordingly into 12 pieces.
I found each of my rolls needed to be 58g. (You could eyeball the rolls, I just like to be precise so they bake evenly.)
Degas each piece by pressing the dough flat with your palm to get rid of any large air bubbles.
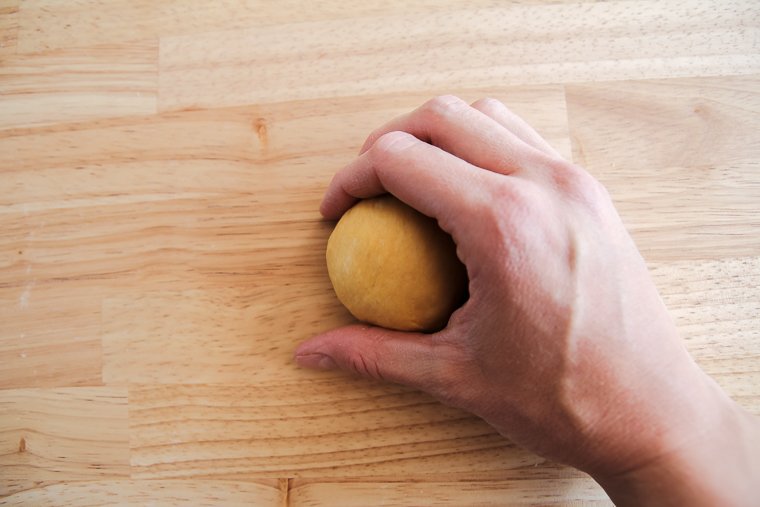
Form the pieces into tight balls. I shape quickly by cupping my hand around the dough and scooting it in a circular motion against the countertop to create tension.
Cover the dough balls with plastic wrap on the counter to let them rise slightly before tying the strings and arranging them on the pan.
Like I mentioned before, you don’t have to tie strings on your rolls to make them pumpkin-shaped:
They are beautiful round if you bake them on a half sheet pan (a double batch will fit more tightly on the sheet pan if you want them touching).
You can make pull-apart rolls: Bake them in a parchment-lined round 9-inch pan (or similar-size square pan, or make a double batch to fill a 13×9-inch pan.
I like to push the proofing a little further for round dinner rolls. Let them get nice and puffy and make sure they have relaxed enough to pass the poke test. Apply egg wash, bake, then brush with melted butter after baking for golden-brown rolls.
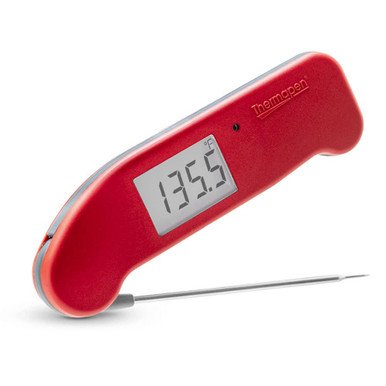
The rolls will take longer to bake if they are touching! The centers should register 190°F on an instant-read thermometer when they are done.
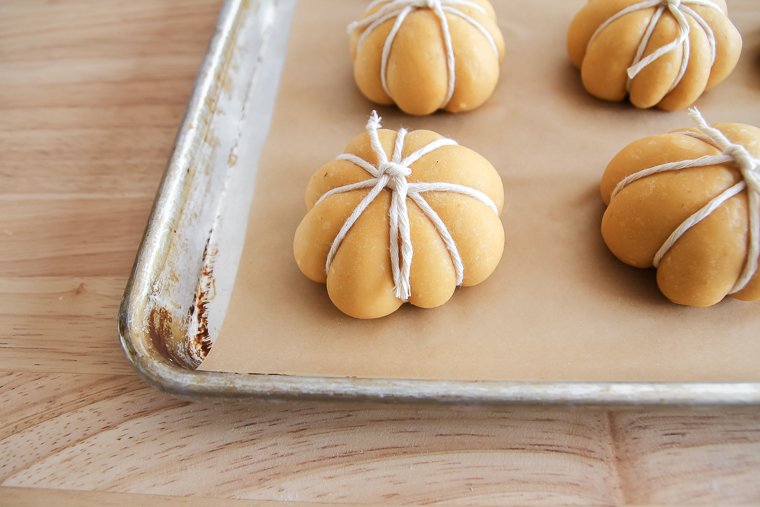
Step 4 – Proof & Tie Strings for Pumpkin Shaped Sourdough (Second Rise)
Line a half sheet pan with parchment paper.
Once the rolls are slightly more puffy (but not fully proofed), it’s time to tie on the strings. Handle the rolls gently, because they will have a little air in them at this point.
Cut a string about 30-inches long and lay it out on the counter. Place your first roll top-side-down onto the center of the string.
Now you’ll tie the string just like if you were tying a ribbon around a present, flipping the roll over after each tie. Tie only as tightly as you need to keep the string in place!


Continue tying around the pumpkin until your pumpkin has 8 segments. Cut off the excess string and repeat the process for the remaining rolls.
Arrange the pumpkin shaped rolls on a half sheet pan lined with parchment paper and cover the pan with plastic wrap (not too tightly).


Continue proofing until the pumpkin sourdough rolls look puffy and the sides of the pumpkins are protruding between the tied strings.
Meanwhile, preheat your oven to 375°F with a rack set in the center.
Step 5 – Bake & Remove Strings
If you want your rolls more golden brown on the exterior than mine, brush them with an egg wash just prior to baking. It’s all a matter of personal preference.
Bake the tray of pumpkin shaped dinner rolls until they are lightly golden on the edges. The center of the rolls should register 185°F on an instant-read thermometer when they are baked through.
Allow the pumpkin sourdough rolls to cool a little either on the baking tray or on a cooling rack. You can remove the strings as soon as the rolls are cool enough to handle.
Since some of the strings will be encased in the bread, I like to first cut the knots off the tops so they won’t tear through the dinner rolls.
You can use a toothpick to help you release any strings that are tight against the tops of the rolls. Just take your time!
Then I flip the rolls over and carefully pull the strings through the bottoms to prevent snagging/tearing the sides of the rolls.
(You could brush them with melted butter at this point, if you so desire.)
Place your stems of choice into the centers of each pumpkin sourdough roll and serve while they are still warm (with butter on the side for spreading, of course!).
How to Store Pumpkin Sourdough Rolls
Store any leftover sourdough pumpkin rolls in an airtight container after they have cooled completely.
You can freeze the rolls for longer storage if you wrap them well, and you can wait to add the stems when you’re ready to serve them.
To thaw frozen rolls, pull them out of the freezer several hours ahead of time to thaw.
Warm them briefly in the microwave, or wrap rolls in foil and warm them in a 300°F oven for about 20 minutes, or until they are warmed through.

Soft Pumpkin Sourdough Rolls (Pumpkin Shaped or Not)
Pumpkin puree gives these rolls their color and softness. Whether you make them pumpkin-shaped or as normal round dinner rolls, they are slightly sweet and buttery--perfect as a side for Thanksgiving or a cozy fall dinner!
Ingredients
- 140g ripe sourdough starter (100% hydration)
- 40g milk, lukewarm
- 100g canned pumpkin puree
- 45g light or dark brown sugar
- 1 large egg (56g), lightly beaten with a fork
- 315g unbleached all-purpose flour
- 56g (1/4 cup) salted butter, cold and cut into small cubes
- 7g kosher salt
- Something to use for stems if desired (pretzel pieces, nuts, etc.)
Instructions
Feed starter several hours prior to making the recipe and allow it to peak.
- Mix: In a stand mixer fitted with a dough hook (or a large bowl if mixing by hand) mix together ripe starter, milk, pumpkin puree, brown sugar, egg, and flour until well combined. Cover and allow to rest for 30 minutes. Mix in butter and salt until the butter is no longer visible.
- Knead: Knead on low speed (or in the bowl by hand) for an additional 6-8 minutes or until the dough becomes very smooth and elastic.
- Bulk Ferment (First Rise): Form dough into a smooth ball, place in a bowl, and cover. Allow to rise at room temperature until it has doubled in volume.
- Divide, Shape & Proof: Turn out dough onto a clean surface and divide into 12 pieces (weigh dough for uniform rolls). Press the first piece flat against the counter with your palm to degas (pop any large air bubbles), then form into a tight ball by scooting the dough against the counter in a circular motion with your hand cupped around the piece of dough. You shouldn't need to dust with flour. Repeat to shape remaining pieces of dough into balls.
To make pumpkin-shaped rolls: Cover dough balls on the countertop with plastic wrap and allow to proof for 20-30 minutes until they look slightly puffier*.
Cut twelve 30-inch pieces of cotton baker's string. Lay out the first piece of string and place the first dough ball, top-side-down, in the center of the string. Tie the string the same way you would tie a ribbon around a present, flipping after each tie, but continue tying and flipping the roll until the string makes 8 segments around the roll. Tie as loosely as you can. Tie a knot at the top and cut away excess string.
Repeat with remaining rolls. Arrange tied rolls on a parchment-lined half sheet pan and cover with plastic wrap. Continue proofing until they are puffy and the dough is protruding between the tied strings.
To make round dinner rolls:Arrange dough balls evenly on a parchment-lined half sheet pan (a double batch will fill a sheet pan if you want the rolls touching) or in a parchment-lined 9-inch round pan (or similarly-sized square pan) for pull-apart rolls. Proof until rolls are very puffy and pass the "poke test."
Preheat oven to 375°F. - Bake (and remove strings): Bake on the center rack for 12 minutes or until the rolls are lightly golden on the edges and the centers register 190°F on an instant-read thermometer. (Pull-apart rolls will take longer since they are touching.) Cool on the tray or on a cooling rack. Strings can be removed as soon as the rolls are cool enough to handle. To remove strings encased in the bread: first cut the knots completely off the tops of the rolls (use a toothpick to help you get your scissors under the strings, if necessary). Then flip the rolls over and carefully pull the strings through the bottoms to prevent tearing/snagging the sides of the rolls. Serve rolls warm after cooling for 20-30 minutes.
- Store any leftover rolls in an airtight container after they have cooled completely. Consume within 3 days, or wrap and freeze for longer storage.
Notes
- An egg wash can be applied just prior to baking for shiny, darker golden-brown pumpkins or dinner rolls. The rolls can also be brushed with melted butter after baking (just prior to adding stems) to soften the outer crust further, if you so desire.
- Do not use regular brown twine or colored baker's string.
- The strings are tied after the rolls have already proofed for a little while and only as tight as necessary to keep them in place. This prevents the string from sinking into the rolls too deeply during baking.
Recommended Products
As an Amazon Associate and member of other affiliate programs, I earn from qualifying purchases.
-
 Thermapen ONE Instant Read Thermometer
 -
Bakers Math Kitchen Scale - KD8000
-
Amazon Brand – Happy Belly Organic 100% Pumpkin, 15 Ounces
-
If You Care Parchment Paper
-
Nordic Ware Natural Aluminum Commercial Baker's Half Sheet (2 Pack), Silver
-
TJ.MOREE Butchers Twine, 3Ply 100m/328 1mmThick Feet Food Oven Safe Cotton Cooking Meat Rope String Bakers Twine Fit to Parcel Sausage and Decorate Crafts (Beige)


Nutrition Information:
Yield: 12 Serving Size: 1Amount Per Serving: Calories: 150Total Fat: 2gSaturated Fat: 1gTrans Fat: 0gUnsaturated Fat: 1gCholesterol: 18mgSodium: 244mgCarbohydrates: 29gFiber: 1gSugar: 4gProtein: 4g
*Nutrition information is not always accurate.
I’m so grateful for your comments, reviews, and questions! Your star ratings help others discover my recipes, and your feedback helps me make improvements. Thank you for your support!
These turned out great with all hard red. I did add a splash more milk as you suggested!
I love to hear that, Brittany! Thanks for sharing your results using the hard red wheat!
I’ve made these once and they came out so good! I’m planning on making them for Thanksgiving but wanted to try to make them in advance. Is there a way to do this? Maybe stick in the fridge after the bulk ferment until Thanksgiving morning & then resume from Step 4? Thank you!
Hi Gina! This past weekend I put the dough in the fridge right after bulk fermentation and then continued on with dividing and shaping the next day. They came out great, but the dough took much longer to proof since it started out cold. 🙂
Do you have any tips for converting this recipe to home milled whole wheat flour? I love the idea of pumpkin rolls (unshaped, for me!) but I really want my sourdough pumpkin rolls to be made with home milled flour. Thanks!
Pumpkin rolls with freshly milled flour are on my to-do list, Evelyn! I would try keeping the amount of flour the same, but increase the amount of milk gradually as needed. Use a hard wheat and grind finely. I’d love to know how they turn out, if you try it!