This post may contain affiliate links. See my full disclosure. As an Amazon Associate, I earn from qualifying purchases.
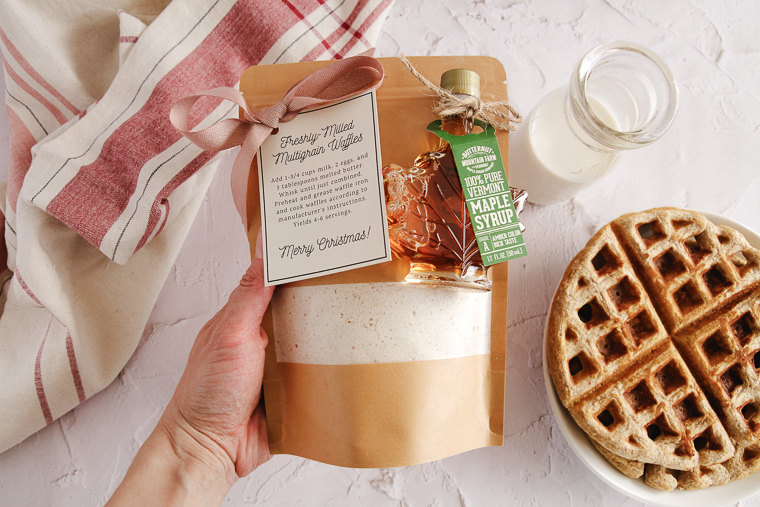
A DIY buttermilk multigrain waffle mix with a bottle of real maple syrup is a charming homemade Christmas gift. I’ve designed free printable gift tags that you can use to make your own mixes!

*Updated 12/13/23
Delicious homemade food gifts are always a part of my Christmas gift lineup! They are handy for coworkers, neighbors, teachers, and even for hostess gifts.
One of these DIY waffle mix gift pouches yields 4-6 servings of fresh buttermilk multigrain waffles.
This recipe is a version of my favorite multigrain waffles recipe.
Not only is the mix multigrain with oats, spelt, and corn, but it’s also wholegrain because it’s made with wholegrain (wholemeal) flours.

Since I mill my own wholegrain flours at home, I like to use those fresh flours in the multigrain waffle mixes.
Even so, they are all flours that can be easily purchased (I’ve linked to options from Amazon below).
The downloadable gift tags have instructions for the recipient to add milk, eggs, and melted butter to the dry mix when it comes time to prepare it for breakfast.

I’ve included two tag designs in the download for you to choose from; one reads, Freshly-Milled Multigrain Waffles, and the other reads, Rustic Multigrain Waffles.
Buttermilk powder and ground cinnamon add some additional flavor to the mix to compliment the grains.
I love how the dry mix is visible through the window on the food pouch.
Tips for Making DIY Waffle Mix Gift Pouches
- If you’re making quite a few mixes, place the separate ingredients in bowls in a line on your table or counter (multiply each ingredient by the number of mixes you need). Weigh and mix up one waffle mix bag at a time to ensure you don’t double or skip any ingredients. I’ve listed the ingredients by weight in the recipe card for consistency and easy multiplication.
- Fabric scissors work best to cut ribbon and twine cleanly.
Recommended Equipment & Supplies
- Digital kitchen scale (this is my favorite one, but any one will work)
- Blender or food processor to pulse rolled oats to a coarse texture
- Waxed stand-up food pouches – size 5.9″x8.6″
- Paper cutter
- Hole punch
- Hot glue gun
- Mini bottles or samplers of maple syrup (I found my mini maple-leaf bottles locally at World Market. You could alternately gift a standard-size bottle of syrup beside the mix instead of gluing on a mini one.)
- 5/8″-thick ribbon for tying bows on the tags (you’ll need a 17″ length of ribbon for each mix)
- Thin twine to tie around syrups (you’ll need a 13.5″ length of twine for each)
- An 8.5″x11″ sheet of card stock for every 6 gift tags you need to print (card stock pictured is off-white)
Click to Download Printable Waffle Mix Tags

Ingredients Needed for 1 Pouch of Multigrain Waffle Mix
- 60g rolled oats (quick oats will work too)
- 210g whole spelt flour
- 30g whole corn flour (note, if you are milling your own dent corn in a Mockmill, watch instructions here.)
- 30g cultured buttermilk powder (this way the recipient can simply add milk)
- 30g light or dark brown sugar
- 2 ¼ teaspoons baking powder
- ½ teaspoon baking soda
- ½ teaspoon salt
- ¼ teaspoon ground cinnamon

How to Make DIY Waffle Mix Gift Pouches – Step-by-Step
Step 1 – Mix the Dry Ingredients
First, add the rolled oats to a small blender or food processor. Pulse a couple of times to break up the oats.
The oats should still be quite coarse to add texture to the waffles, but finer than quick oats.
Next, add the oats and the remaining dry ingredients to a mixing bowl. Whisk thoroughly until everything is combined.
Now open up a waxed food pouch (I find it’s helpful to gently separate the bottom folds a little first) and use a small measuring cup to scoop the dry mix into the pouch.
Make sure to coax the mix all the way into the bottom corners of the pouch to help it open completely and stand up straight later.

Tap any dry mix away from the zipper, and close the pouch. Heat seal the top of the pouch above the notches, if you desire.
Tip: Food pouches can be quickly heat sealed with a hair straightener/flat iron set to low temperature.
If your flat iron has only one high temperature, make a barrier between the iron and both sides of the pouch with aluminum foil and seal as normal.
Repeat this process to make as many DIY waffle mix gifts as you need.
Step 2 – Prepare Your Tags and Tie Ribbon and Twine
Use a paper cutter to cut out your gift tags after printing them on card stock (print copies only of the version of the tag you would prefer).
I like to leave the black border showing on the tags, but you can cut it off.

Use a standard-size hole punch to punch out the circle in the upper left corner of each tag. This is where you will tie a bow with ribbon.
Cut a 17-inch length of ribbon, and trim the ends at an angle or as a notched V shape so they won’t unravel.
Thread the length of ribbon through the hole in the first tag, and tie the ribbon into a bow (it will not be attached to the pouch yet.)
Next, cut a 13.5-inch length of thin twine. Use the twine to tie a decorative bow around the top of the syrup bottle.
Repeat these steps for each additional DIY waffle mix gift.
Step 3 – Glue the Tags and Syrup Bottles to the DIY Waffle Mix Gift Pouches
Finally, use a hot glue gun to attach your syrup bottles and gift tags to the outsides of your pouches.
Apply glue along the entire length of the syrup bottles (even the backs of the caps) to insure they will adhere strongly to the food pouches.
Glue the syrup on the right side right above the window of the pouch. Hold it in place until the glue dries.
Then extrude a dot of glue onto the underside of the bow on the top left corner of the gift tag. Glue it in place below the zipper on the far left side of the pouch. Again, hold it in place for a moment while it dries.
Repeat for your remaining mixes, and you’re finished!

Merry Christmas, and happy gifting!
I’m so grateful for your comments, reviews, and questions! Your star ratings help others discover my recipes, and your feedback helps me make improvements. Thank you for your support!

DIY Waffle Mix Gift
A DIY buttermilk multigrain waffle mix with a bottle of real maple syrup is a charming homemade Christmas gift. I've designed free printable gift tags that you can use to make your own mixes!
Ingredients
For One Waffle Mix (Multiply as Needed)
- 60g rolled oats
- 210g whole spelt flour
- 30g whole corn flour
- 30g cultured buttermilk powder
- 30g light or dark brown sugar
- 2 ¼ teaspoons baking powder
- ½ teaspoon baking soda
- ½ teaspoon kosher salt
- ¼ teaspoon ground cinnamon
Additional Supplies
- Waxed stand-up food pouches – size 5.9"x8.6"
- Mini bottles or samplers of maple syrup (I found my mini maple-leaf bottles locally at World Market. You could alternately gift a standard-size bottle of syrup beside the mix instead of gluing on a mini one.)
- 5/8"-thick ribbon for tying bows on the tags (you'll need a 17" length of ribbon for each mix)
- Thin twine to tie around syrups (you'll need a 13.5" length of twine for each)
- An 8.5"x11" sheet of card stock for every 6 gift tags you need to print (card stock pictured is off-white)
Instructions
- Add rolled oats to a small blender or food processor and pulse a few times to a coarse texture. They should be finer than quick oats, but coarse enough to add texture to the waffles.
- Weigh oats, spelt flour, corn flour, buttermilk powder, brown sugar, baking powder, baking soda, salt, and cinnamon into a mixing bowl. Whisk dry ingredients until well combined.
- Use a small measuring cup to scoop the mix into a food pouch. Close pouch and heat seal above notches, if desired.
- Repeat steps 1-3 for as many mixes as you desire to make.
- Print gift tags. Cut tags with a paper cutter and punch out the holes in the top corners with a standard hole punch. Cut 17" lengths of ribbon (cut the ends at an angle or in a notched V shape to prevent fraying). String the ribbons through the holes in the tags and tie into decorative bows. Tie 13.5" lengths of thin twine into bows around the tops of the mini syrup bottles.
- Use a hot glue gun to glue the syrup bottles (add glue to the entire length of the back of the bottles, including the caps) to the right sides of the pouches above the windows. Hold them in place until dry. Glue the tags (with a dot of glue on the back of each bow) to the top left corners of the pouches just under the zippers.
Notes
- Use fabric scissors to cleanly cut ribbon and twine.
Recommended Products
As an Amazon Associate and member of other affiliate programs, I earn from qualifying purchases.
-
 Officemate 1- Hole Punch, 5 Sheet Capacity, Silver (90091)
 -
Fiskars SureCut Portable Paper Trimmer, 12 Inch Cut , Orange - 154450-1009
-
Moretoes 72pcs Stand Up Pouches, Kraft Paper Bags with Window, Coffee Bags, Brown Resealable Bags, Ziplock Stand Up Bags for Home or Business, 5.9×8.6 Inches Sealable Bags for Packaging
-
Bob's Red Mill Organic Spelt Flour, 20 Oz
-
Bob's Red Mill Organic Corn Flour, 22 Oz
-
Mansfield Maple Pure Vermont Maple Syrup Wedding Favors Set of 24 50ml Glass Leaf Bottles
-
KINGLAKE 328 Feet Natural Jute Twine Best Arts Crafts Gift Twine Christmas Twine Durable Packing String
-
Buttermilk Powder 2 lbs Produced in USA
-
Bakers Math Kitchen Scale - KD8000


Nutrition Information:
Yield: 4 Serving Size: 1Amount Per Serving: Calories: 410Total Fat: 4gSaturated Fat: 1gTrans Fat: 0gUnsaturated Fat: 2gCholesterol: 7mgSodium: 734mgCarbohydrates: 85gFiber: 8gSugar: 27gProtein: 14g
*Nutrition information is not always accurate.